Adding Google Indexing to Hexo-based Website and SEO Configuration
Just did some SEO for the website and took the opportunity to update an old blog post from 4 years ago. This article covers: installing plugins and generating a sitemap for the website, configuring plugins to exclude pages or files that don't need to be indexed, submitting the website sitemap to Google for index, and using robots.txt for search engine optimization (SEO).
Plugin Installation and Configuration
Installation
First, we need to install the hexo-generator-sitemap plugin to generate a sitemap for the website. Use the following command:
1 | npm install hexo-generator-sitemap --save |
Configuration
After installation, open the configuration file of the Hexo framework, ./_config.yml, and add the following settings:
1 | # Sitemap Generator |
Explanation:
pathspecifies the path for the generated sitemap. For example, if your website URL ishttps://siriusq.top/, the sitemap will be generated athttps://siriusq.top/sitemap.xml.tagsis used to determine whether to include tag-related pages. If you have a large number of tags, you might want to disable this option to prevent an overwhelming number of tag indexes.categoriesis used to decide whether to include category-related pages. Enable or disable as needed.- For more options, please refer to the plugin README page.
Excluding Specific Pages
If you wish to exclude specific pages, such as the 404 page, from appearing in the sitemap, you can add a line sitemap: false in the Front-matter section at the top of the respective Markdown file, separated by ---. Here’s an example:
1 |
|
Excluding Specific File Formats
By default, the plugin excludes js and css file formats. However, if your website contains many json format files, such as Live2D model configuration files, they will be added to the sitemap during page generation. This might result in a large number of entries. As I cannot find a configuration option in the plugin settings to exclude specific file formats, I choose to modify the plugin code directly XD.
Open the generator.js file located in your blog’s directory under ./node_modules/hexo-generator-sitemap/lib/. Find the const skipRenderList and add a line '**/*.json' as shown below. Make sure not to forget the comma at the end of the previous line:
1 | const skipRenderList = [ |
Add to Google Index
Currently, your website cannot be found through search engines. To enable search engine indexing, I’ll guide you through the process, using Google as an example.
- Go to Google Search Console, click “Start now,” and log in with your Google account.
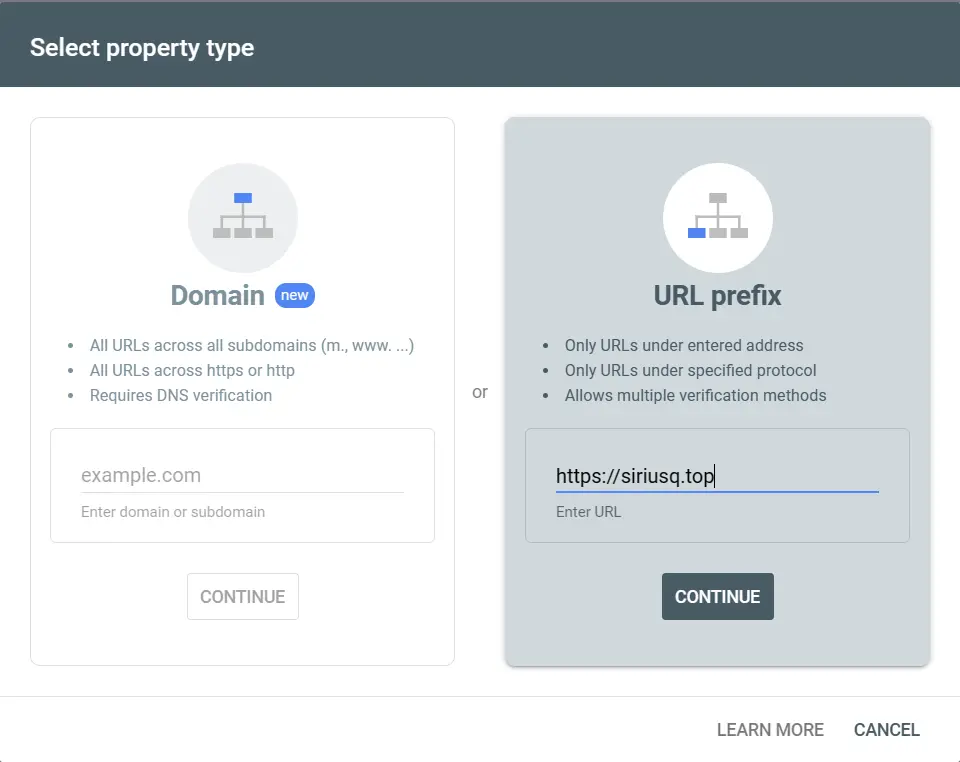
- Select your URL prefix and enter your site’s URL, such as
https://siriusq.top, then click “Continue.”![01e.webp]()
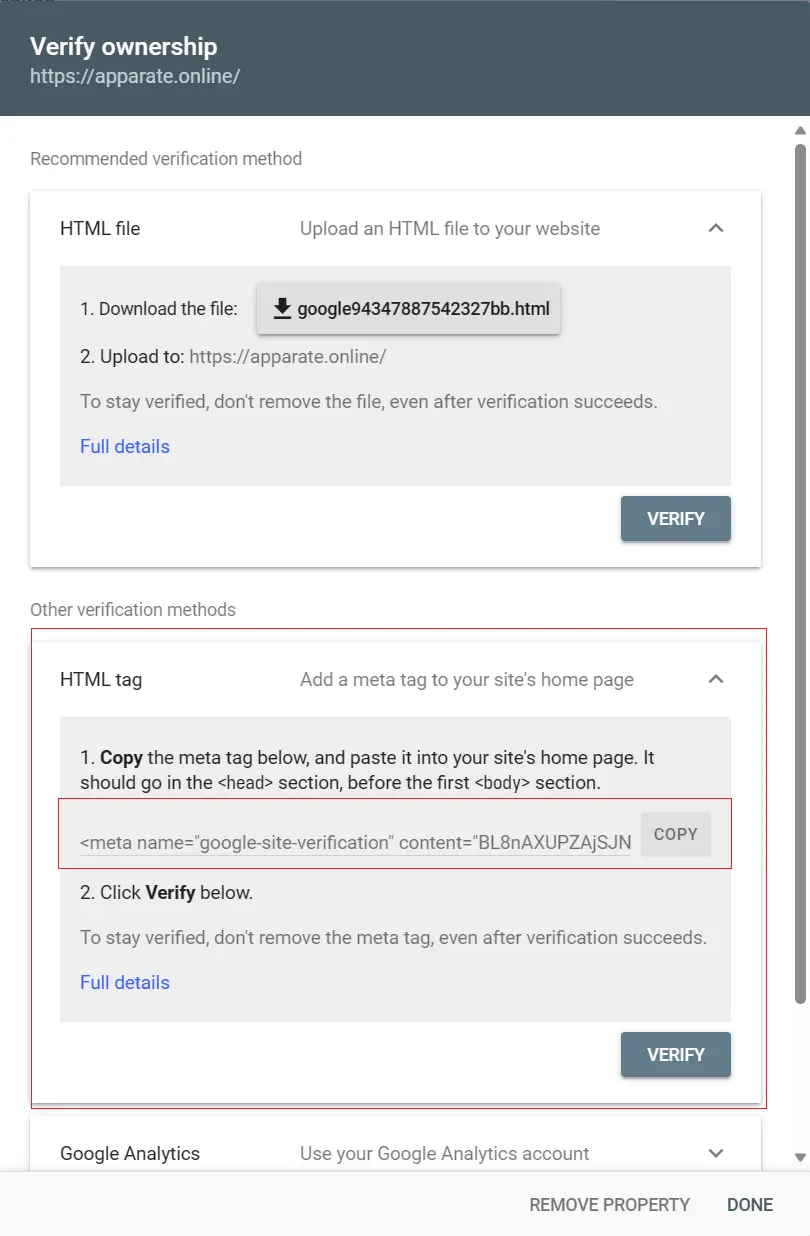
- Choose the HTML tag verification method and copy the meta tag provided by Google, which looks like this:
![02e.webp]()
1
<meta name="google-site-verification" content="tcRYfdvRwh-85F9TY63_0TZ4O56GfhgyNGZhgfzsdfgghfg" />
- Open the Next theme configuration file,
_config.next.yml. Use the search function to findgoogle_site_verification:and paste thecontentpart of the meta tag you copied in the previous step. It should look like this:1
google_site_verification: tcRYfdvRwh-85F9TY63_0TZ4O56GfhgyNGZhgfzsdfgghfg
- Run
hexo clandhexo g -dcommands to regenerate your website’s resources and push them to GitHub. Check your website’s deployment status in the Actions tab of your blog repository. - After deployment is complete, return to the page from step 3 and click “Verify.”
- Allow some time, possibly up to a month, for Google’s crawlers to index your website. Once indexing is complete, you can search your website on Google using
site:domainto see your site in the results. - I recommend manually submitting a sitemap after verification:
- Click on “Sitemaps” in the left sidebar of Google Search Console.
- The default URL for your sitemap is
https://[your blog domain]/sitemap.xml. - Paste the URL and click “Submit.”
robots.txt
robots.txt is a text file used to control the access permissions for search engine crawlers. You can place this file in the root directory of your website to specify which pages or directories can be accessed by search engine crawlers and which ones cannot.
Here are some common elements and rules for robots.txt:
User-agent: Specifies the name of the search engine crawler to which the rules apply. For example, “User-agent: Googlebot” indicates that the following rules apply to the Googlebot crawler. Common crawler names include:Googlebot- Google’s search engine crawler.Bingbot- Microsoft Bing’s search engine crawler.Slurp- Yahoo’s search engine crawler.DuckDuckBot- DuckDuckGo’s search engine crawler.Baiduspider- Baidu’s search engine crawler.YandexBot- Yandex’s search engine crawler.
Disallow: Specifies the pages or directories that the crawler is not allowed to access. For example, “Disallow: /private/“ means that the “/private/“ directory is off-limits to crawlers.Allow: Used to overrideDisallowrules. If a directory isDisallow-ed but certain files or subdirectories within it need to be crawled, you can useAllowto lift the restriction.Crawl-delay: Specifies the crawling speed of the crawler. This rule is often used to control the crawl rate to avoid overloading the server.Sitemap: Informs the search engine about the location of the sitemap, which helps search engines better understand the website’s structure.
Example of robots.txt
Here’s a simple example of a robots.txt file:
1 | User-agent: Googlebot |
In this example, the rules for Googlebot include not allowing access to the “/private/“ directory but allowing access to the “/public/“ directory while limiting its crawling speed. For Bingbot, access to the “/admin/“ directory is disallowed.
Provided by ChatGPT
Below is an example of my robots.txt file. It prohibits Baidu’s crawler from crawling the website and restricts other crawlers from accessing irrelevant directories and the 404 page.
1 | User-agent: Baiduspider |
For more information about robots.txt, please refer to the Google Search Central documentation.