Flutter 构建各平台安装包
如何在不花一分钱购买签名证书的情况下为 Flutter 项目构建各个平台的安装包,包括:Android APK,iOS IPA,macOS DMG,Linux DEB 以及 Windows MSIX
- 本文编写时使用的 Flutter 版本是3.22,请注意时效
- 如果安装后 APP 名称/包名显示不正确,需要到配置中进行调整
- 文中部分参数以我刚开发的APP
Cycle It为例,包名为top.siriusq.cycleit - 文中使用的构建环境:
- Windows、Android:Windows 11 24H2 26100
- macOS、iOS:macOS 13.7,Xcode 15.2
- Linux:Ubuntu 24.04.2 LTS
Android APK
构建
安卓的最简单,毕竟师出同门,直接运行命令:
1 | flutter build apk --release |
安装
生成的 APK 文件路径为 build/app/outputs/flutter-apk/app-release.apk,拷贝到安卓设备中可以直接安装。
配置
APP基本信息在android/app/src/main/AndroidManifest.xml的application中调整,示例:
1 | <application |
APP 包名在android/app/build.gradle.kts的android-defaultConfig-applicationId项调整,示例:
1 | android{ |
iOS IPA
iOS 的操作是最复杂的,想要上架 App Store 必须交几百元的苹果税购买开发者账号,开源软件又不赚钱,当然是选择白嫖,打包成未签名的 IPA 后,借助 AltServer 进行签名与侧载,唯一的缺点是需要7天续签一次。
构建
构建命令中添加--no-codesign参数,不进行签名:
1 | flutter build ios --release --no-codesign |
生成的app文件路径为build/ios/iphoneos/Runner.app,需要再将它转换为IPA文件。
在任意位置创建名为Payload的文件夹,将Runner.app移动到Payload文件夹中,在Payload的上级文件夹运行命令进行转换,修改appname为应用名:
1 | zip -qq -r -9 appname.ipa Payload |
安装
信任设备
- 用数据线连接 iPhone 和 Mac,等待 iPhone 弹出信任窗口并信任连接到的 Mac
- 打开 Mac 的访达,在左侧边栏找到并信任连接的 iPhone
- 可能需要安装软件更新后才能信任 iPhone,这个提醒弹窗可能不会自动获得焦点,需要拖动访达窗口看一下是不是在后面被遮住了
- 下拉找到选项中的
接入Wi-Fi时显示此iPhone并勾选启用 - 点击下面的
应用
配置 AltServer
AltServer 支持 macOS 和 Windows,这里以 macOS 为例,Windows 还需要单独安装 iTunes 和Apple Devices,稍显麻烦。
- 在 iPhone 中打开
设置-隐私与安全性,下拉找到开发者模式并启用 - 下载安装并启动 AltServer
- 点击顶栏图标,选择
Install AltStore,选择目标为自己的 iPhone - 输入 Apple ID 和密码,点击
Install,等待安装完成,在 iPhone 上可以看到安装进度 - 在 iPhone 上打开
设置-通用-VPN与设备管理 - 点击开发者 App 下与 Apple ID 邮箱同名的选项
- 点击
信任
来源:AltStore 文档
安装 IPA
- 将打包好的 IPA 文件拷贝到 iPhone 上,不能用 AirDrop,它会直接安装 IPA,但是没签名的 IPA 装完压根打不开,我用 iCloud 同步的。
- 打开 AltStore,导航到
My Apps - 点击左上角的
+ - 选择刚刚传输的 IPA
- 再次输入 Apple ID 和密码
- 等待侧载完成
配置
APP 相关信息在iOS/Runner.xcodeproj中配置,使用 Xcode 打开进行编辑
APP 名称在ios/Runner/Info.plist的CFBundleDisplayName和CFBundleName字段进行调整,示例:
1 | <key>CFBundleDisplayName</key> |
macOS DMG
构建
首先构建 app 格式,命令为:
1 | flutter build macos |
然后安装Node.js和create-dmg
生成的app文件路径为build/macos/Build/Products/Release/AppName.app,将其拷贝到任意目录,然后在目录中打开终端,运行命令将 APP 转换为 DMG:
1 | create-dmg 'AppName.app' |
DMG 的安装没啥好说的。
配置
APP 相关信息在macos/Runner/Configs/AppInfo.xcconfig中配置,使用 Xcode 打开进行编辑
Linux DEB
构建
构建命令为:
1 | flutter build linux --release |
构建得到的文件路径为build/linux/x64/release/bundle/
接下来准备创建 DEB 包:
- 在任意位置创建文件夹,如
cycle_it,然后在cycle_it/文件夹中创建以下子目录和文件:DEBIAN/:control:包含软件包的元数据(名称、版本、依赖等)。postinst(可选):安装后执行的脚本。prerm(可选):卸载前执行的脚本。
usr/bin/cycle_it/:放置构建后生成的文件。usr/share/applications/:放置桌面快捷方式 (cycle_it.desktop文件)。usr/share/icons/hicolor/256x256/apps/:放置应用程序图标。
- 编辑
./DEBIAN/control文件,示例:1
2
3
4
5
6
7Package: cycle-it
Version: 1.0.0
Section: utils
Priority: optional
Architecture: amd64
Maintainer: siriusq <eargon.skyle@gmail.com>
Description: some words - 编辑
usr/share/applications/cycle_it.desktop,示例:1
2
3
4
5
6
7
8
9[Desktop Entry]
Name=Cycle It
Comment=Track your items with Cycle It
Exec=/usr/bin/cycle_it/cycle_it
Icon=cycle_it
Terminal=false
Type=Application
Categories=Utility;
StartupWMClass=top.siriusq.cycleit - 将
build/linux/x64/release/bundle/下的文件复制到./usr/bin/cycle_it/。 - 将应用图标复制到
debian/usr/share/icons/hicolor/256x256/apps/并重命名为cycle_it.png,与.desktop文件中的Icon名称相同 - 使用
dpkg-deb工具。在文件夹的上一级目录运行命令构建.deb包:1
dpkg-deb --build cycle_it cycle_it.deb
DEB 的安装同样没啥好说的。
配置
APP 相关信息在linux/CMakeLists.txt中配置,示例:
1 | set(BINARY_NAME "Cycle It") |
Windows MSIX
因为我需要使用计划通知相关的API,所以只能选择打包为 MSIX 格式,此格式需要签名,配置相对繁琐。
签名证书
- 首先安装OpenSSL
- 将安装后的
bin路径(默认是C:\Program Files\OpenSSL-Win64\bin)添加到系统环境变量的PATH中,终端运行命令openssl version查看是否添加成功 - 使用命令
openssl genrsa -out mykeyname.key 2048生成私钥,把 mykeyname 换成想要的名字,比如 siriusq_self_signed_private_key 的命令就是1
openssl genrsa -out siriusq_self_signed_private_key.key 2048
- 使用刚刚生成的私钥,运行命令
openssl req -new -key mykeyname.key -out mycsrname.csr生成 CSR 自签名证书请求文件,替换 mykeyname 和 mycsrname 这两个字段为你想要的文件名,例如过程中会要求输入一些基本信息,不想输入的就用1
openssl req -new -key siriusq_self_signed_private_key.key -out siriusq_self_signed.csr
.代替,最后还要输入私钥保护密码 - 运行命令
openssl x509 -in mycsrname.csr -out mycrtname.crt -req -signkey mykeyname.key -days 10000,用刚生成的 CSR 文件生成 CRT 自签名证书文件,替换 mycsrname、mycrtname、mykeyname字段,注意保持前后一致,例如1
openssl x509 -in siriusq_self_signed.csr -out siriusq_self_signed.crt -req -signkey siriusq_self_signed_private_key.key -days 10000
- 使用私钥和 CSR 文件生成
.pfx文件,命令为openssl pkcs12 -export -out CERTIFICATE.pfx -inkey mykeyname.key -in mycrtname.crt,替换 CERTIFICATE、mykeyname、mycrtname 字段,例如这里会要求输入 PFX 文件导出密码,需要输入两遍,第二遍用于验证两次输入的密码是否相同,这里输入的内容不会显示,此外这个密码和之前设置的私钥保护密码没有关系1
openssl pkcs12 -export -out siriusq.pfx -inkey siriusq_self_signed_private_key.key -in siriusq_self_signed.crt
- 生成的文件默认都在
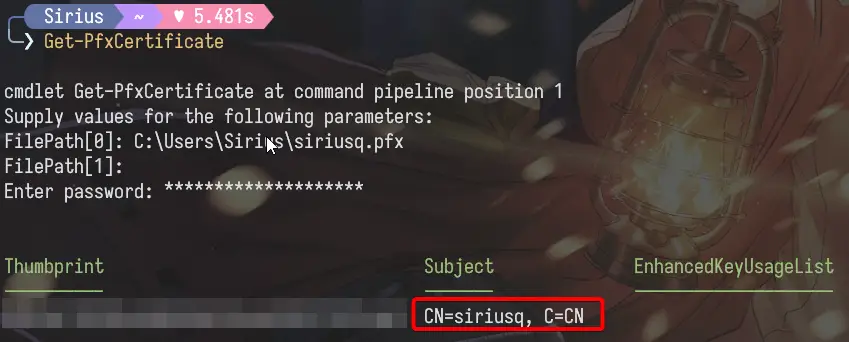
C:\Users\用户名路径下,完整的终端输出如下 - 获取 pfx 的 publisher 信息,运行命令
Get-PfxCertificate,然后:- 输入生成的 pfx 文件的路径,如
C:\Users\Sirius\siriusq.pfx FilePath[1]不需要输入- 输入文件导出密码
- 复制输出的内容,稍后需要将它们添加到 pubspec.yaml 中 msix_config 的 publisher 字段中
- 输入生成的 pfx 文件的路径,如

两种密码的区别
- 私钥保护密码(
req命令时输入的):这个密码是用来加密你的私钥文件本身(siriusq_self_signed_private_key.key)。它的作用是防止你的私钥文件在硬盘上被未授权的人直接使用。 - PFX 文件导出密码(
pkcs12命令时输入的):这个密码是用来加密你的.pfx容器文件。它的作用是保护整个.pfx文件,里面包含了私钥和证书。
安装插件
Flutter 并不支持直接构建 MSIX 格式安装包,需要先安装插件msix | Dart package,在项目根目录中运行命令;
1 | flutter pub add --dev msix |
然后对照上一步输出的内容,在pubspec.yaml中添加相关配置:
1 | msix_config: |
注意:需要在 certificate_password 中填写前面的 PFX 文件导出密码,如果要开源项目的话,记得删掉密码
构建
在项目根目录中运行命令:
1 | dart run msix:create |
生成的msix文件路径为build/windows/x64/runner/Release/output_name.msix
安装
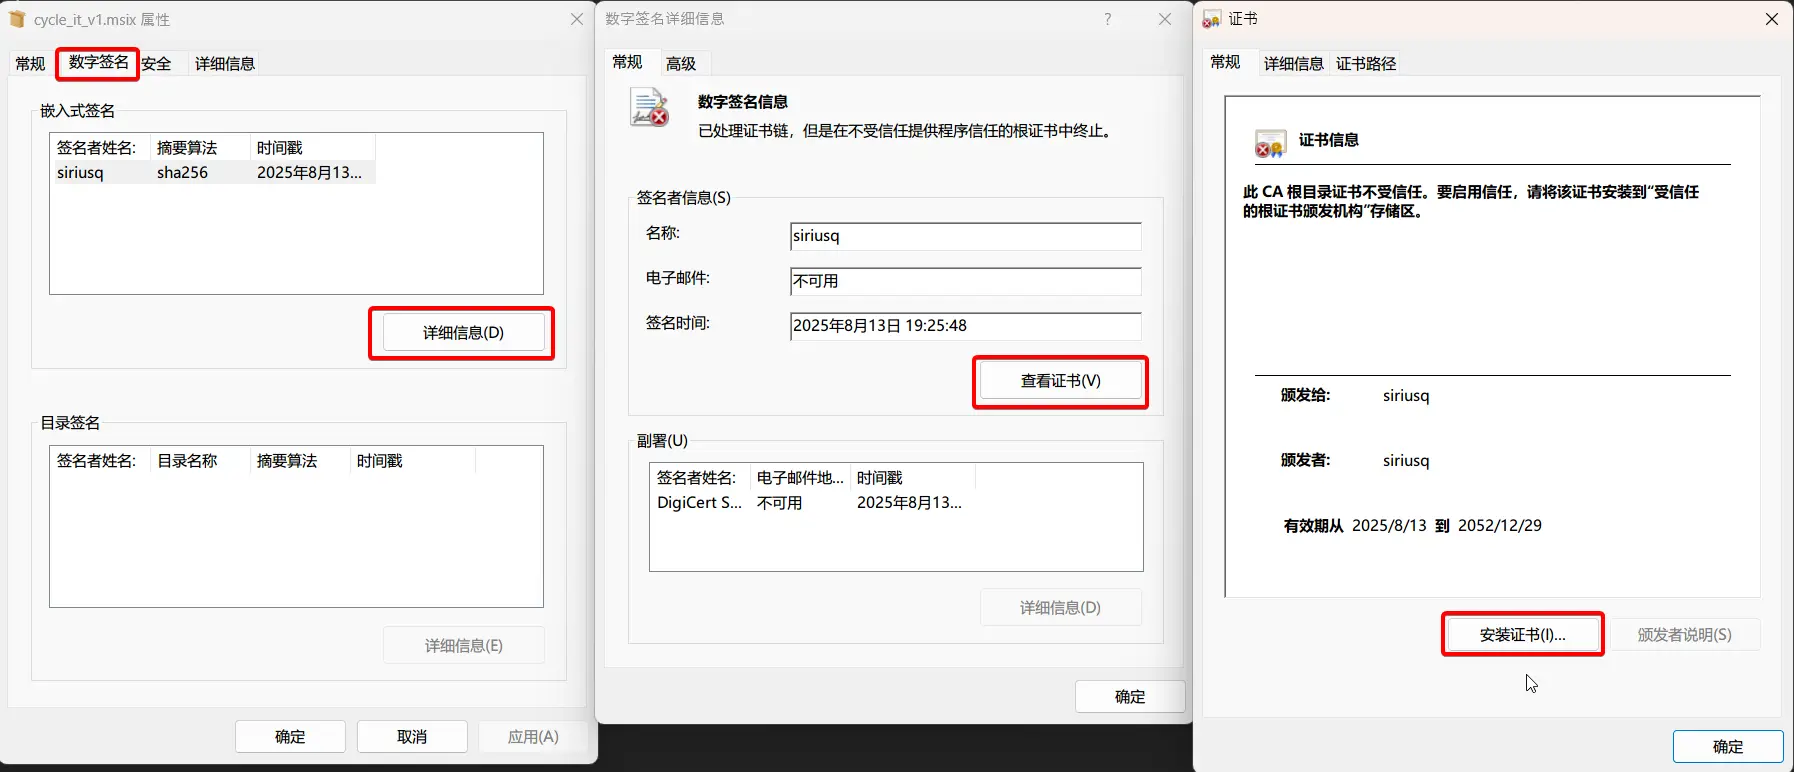
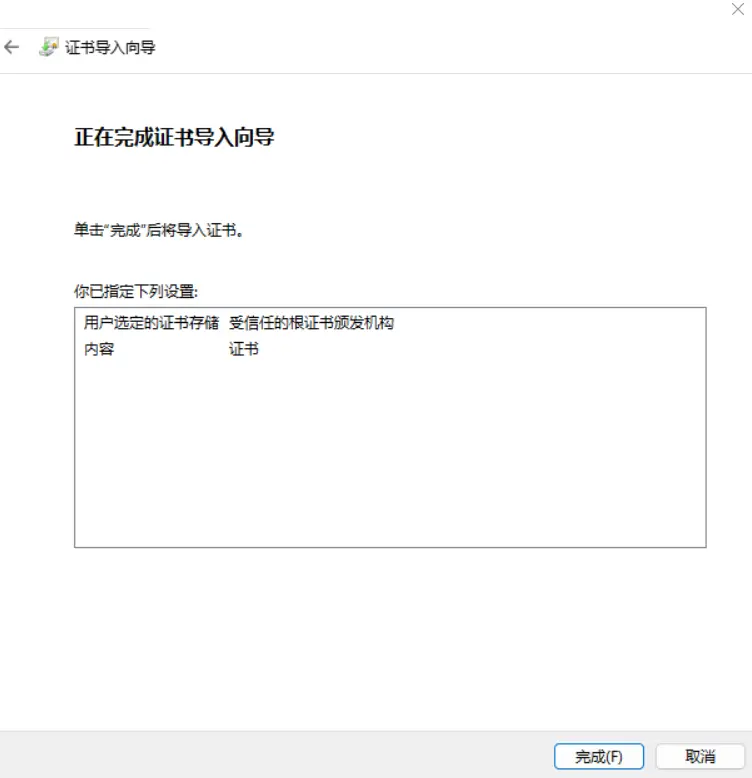
MSIX 包无法直接安装,会提示无法验证此应用包的发布者证书,需要手动安装证书,步骤为:
- 右键单击msix安装包,选择
属性 - 依次点击
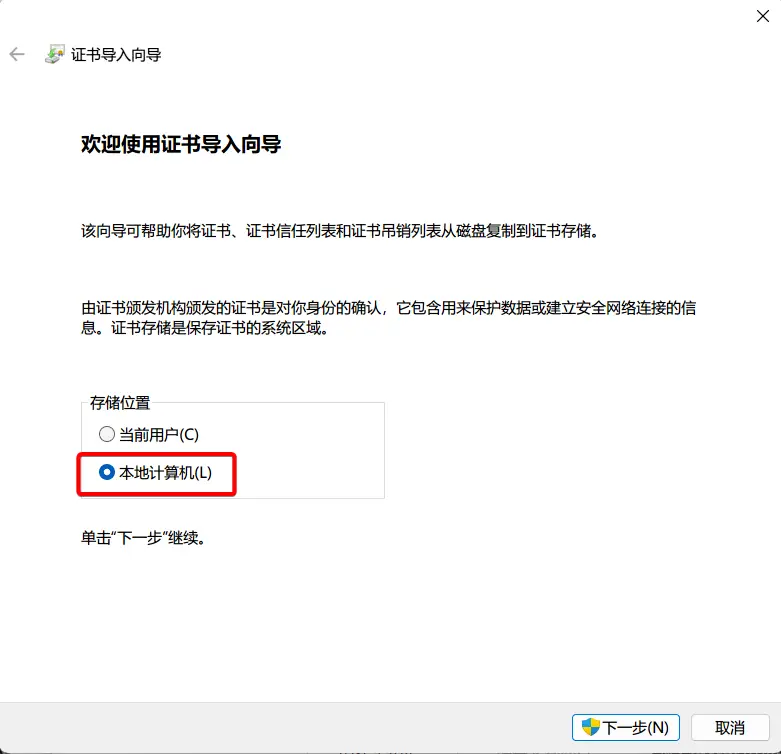
数字签名-详细信息-查看证书-安装证书 - 选择存储位置为
本地计算机,点击下一步 - 选择将
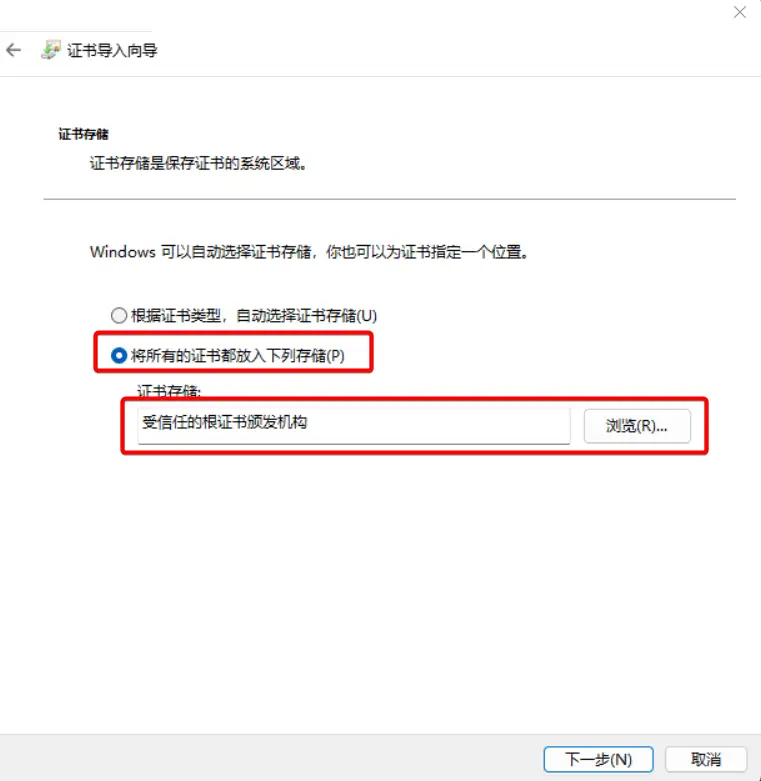
所有的证书都放入下列存储 - 点击
浏览,选择受信任的根证书颁发机构,点击下一步和完成
配置
APP 包名在windows/runner/Runner.rc中进行调整,示例:
1 | VALUE "InternalName", "top.siriusq.cycleit" "\0" |
APP 名称在windows/runner/main.cpp中进行调整,示例:
1 | if (!window.Create(L"Cycle It", origin, size)) { |
参考:Shirley的隨手筆記