Clash Verge TUN Mode Configuration Guide
In this article, I will document the configuration process for Clash Verge, including creating configuration files, switching kernels, enabling TUN mode, and preventing DNS leaks.
Background
On the afternoon of November 2, 2023, the Clash for Windows (CFW) repository was deleted. Later that evening, related topics surged to the top ten on Weibo’s trending list, attracting some malicious self-media to add fuel to the fire, and rumors were flying. The following day, most of the Clash-related repositories took measures such as deletion or archiving and switching branches to temporarily avoid the limelight. Since CFW is no longer being updated, I decided to switch from CFW to Clash Verge for security reasons.
Download and Installation
Here is Clash Verge’s GitHub Release page. Please choose the appropriate installation package according to your operating system:
- Windows users can download
Clash.Verge_1.x.x_x64_zh-CN.msi - Mac users with Intel CPUs can download
Clash.Verge_1.x.x_x64.dmg - Mac users with M-series CPUs can download
Clash.Verge_1.x.x_aarch64.dmg
The installation process is very straightforward. Simply click Next repeatedly, and no additional settings are required.
Basic Configuration
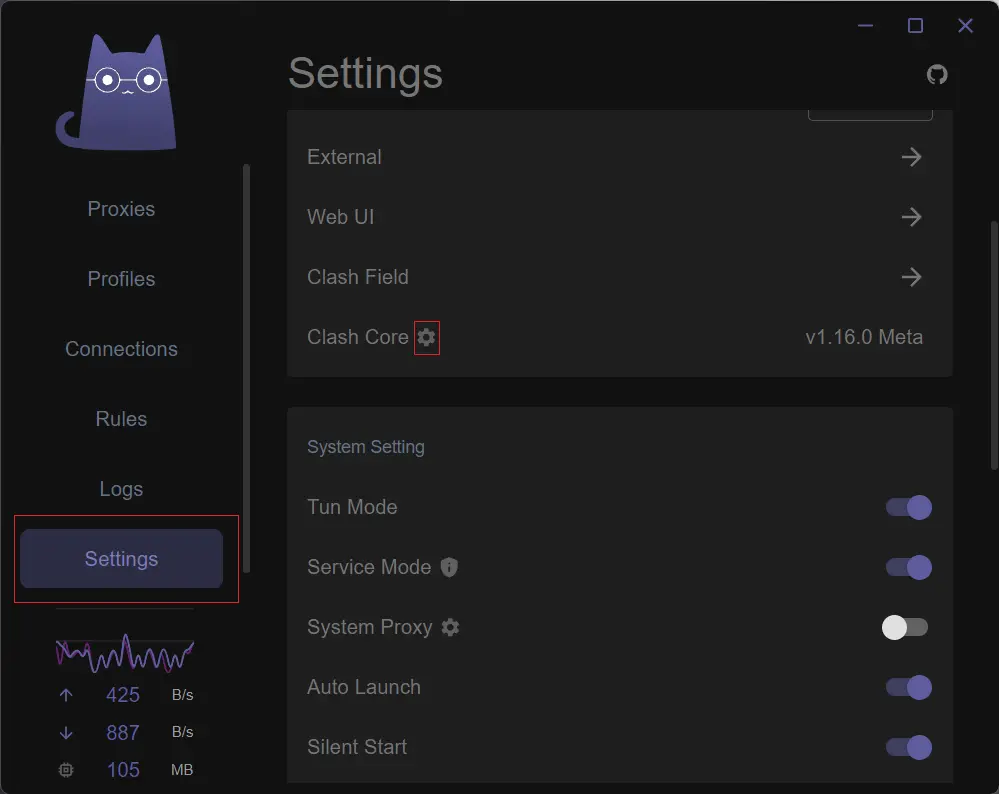
First, click on Settings in the left sidebar to open the settings page.
Outdated
Switch Clash Core
The new version of Clash Verge has removed the Clash Premium kernel, eliminating the need for additional kernel settings.
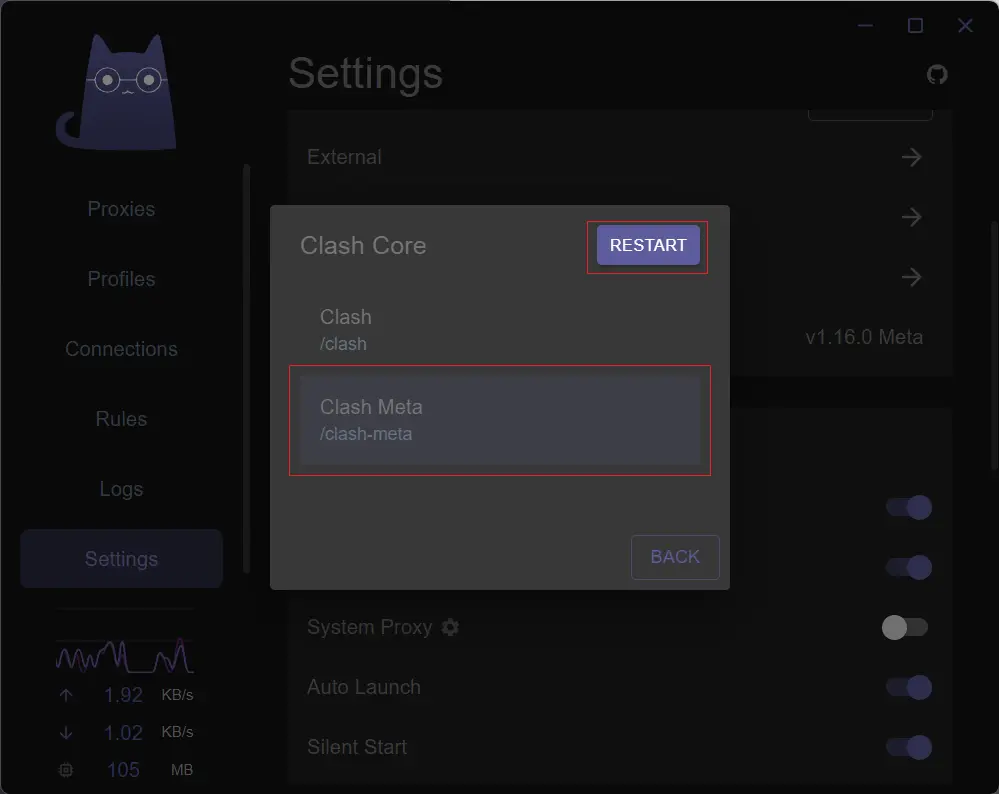
Clash Verge supports two cores: Clash Premium (closed-source and repo deleted) and Clash Meta (open-source). By default, Clash Premium is used, but it’s recommended to switch to Clash Meta.
InSettings, locate theClash Coresection and click the small gear icon next to it.SelectClash Meta.ClickRestartin the upper right corner.
Set External Controller
Previously, a vulnerability in Clash was exposed, allowing attackers to inject malware via the RESTful API interface. For security reasons, I changed the default external control port and added a password. For more details, refer to @bulianglin’s YouTube video.
- In
Settings, locate theExternalsection and click the arrow icon next to it. - Modify the port for
External Controller, the default value is9090, and you can change it to other port like11451. - Enter a password in
Core Secret. - Save the settings.
Additional Configuration
Here are some of my own configurations for reference. Adjust them based on your specific needs.
- Disable
IPv6 - Disable
Allow LAN - Enable
Auto Launch - Enable
Silent Start
Configuration File Setup
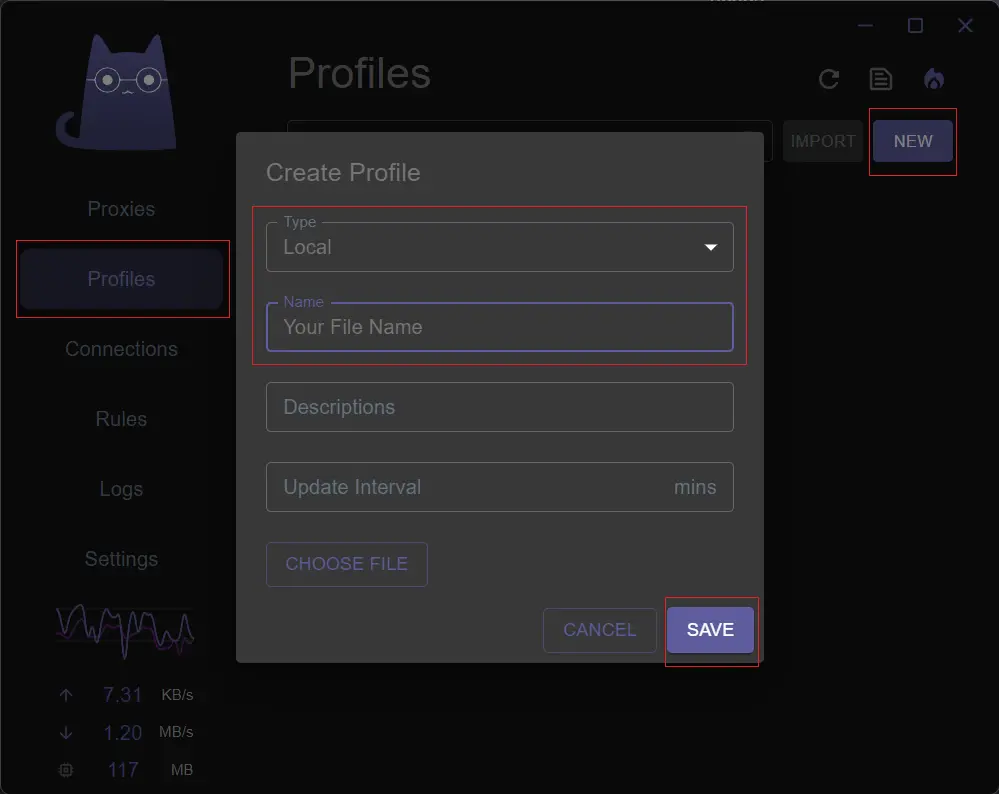
- Click on
Profilesin the left sidebar. - Click
Newin the upper right corner. - Choose
Localas the type, name it as you like, and leave the other two fields blank.- For more configuration file types, please refer to Clash Verge Wiki。
- Click
Save。 - Right-click on the newly created configuration item, you can select
Edit File, which will open the configuration file by clash verge itself, or selectOpen File, which will open the configuration file using VSCode. - Fill in your configuration and save it.
- If you are not familiar with the configuration, you can refer to the Clash Meta Documentation, which provides example configurations that you can use.
- You can also directly use most of the configuration from your CFW configuration file.

My Configuration File
1 | mixed-port: 7890 # proxy port |
For more configuration options, please refer to the Clash.Meta Official Documentation.
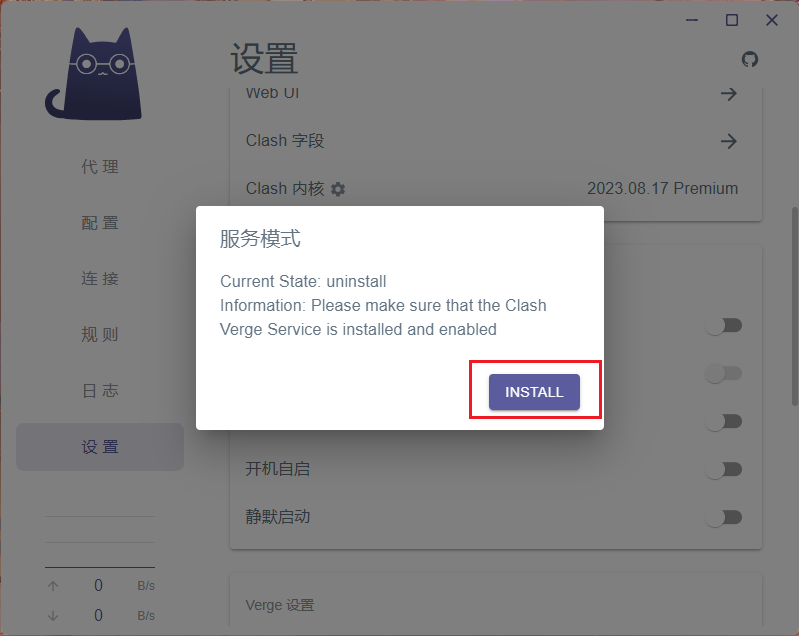
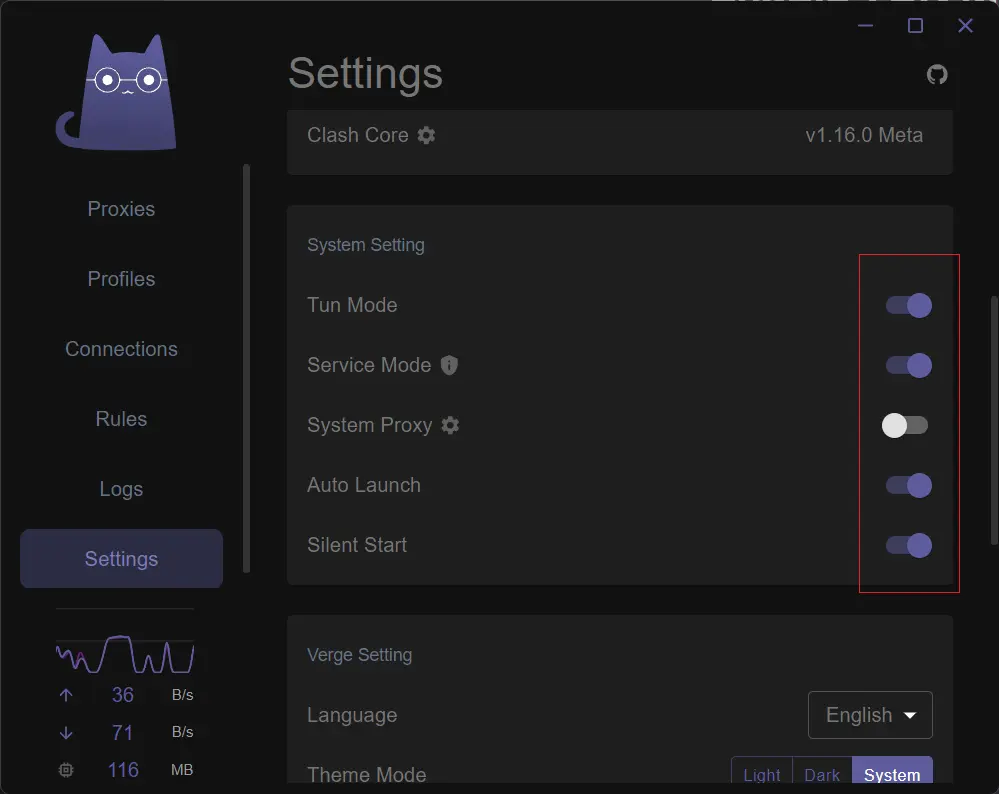
Enable TUN Mode
TUN interface is a virtual network interface that allows communication between user-space programs and the core to pass packets from one network stack to another. Clash Meta supports enabling TUN mode, which takes control of layer 3 packets in the user’s network by creating a TUN virtual NIC. In TUN mode, all applications and traffic are forced to route through the proxy server, regardless of whether the application supports proxy settings.
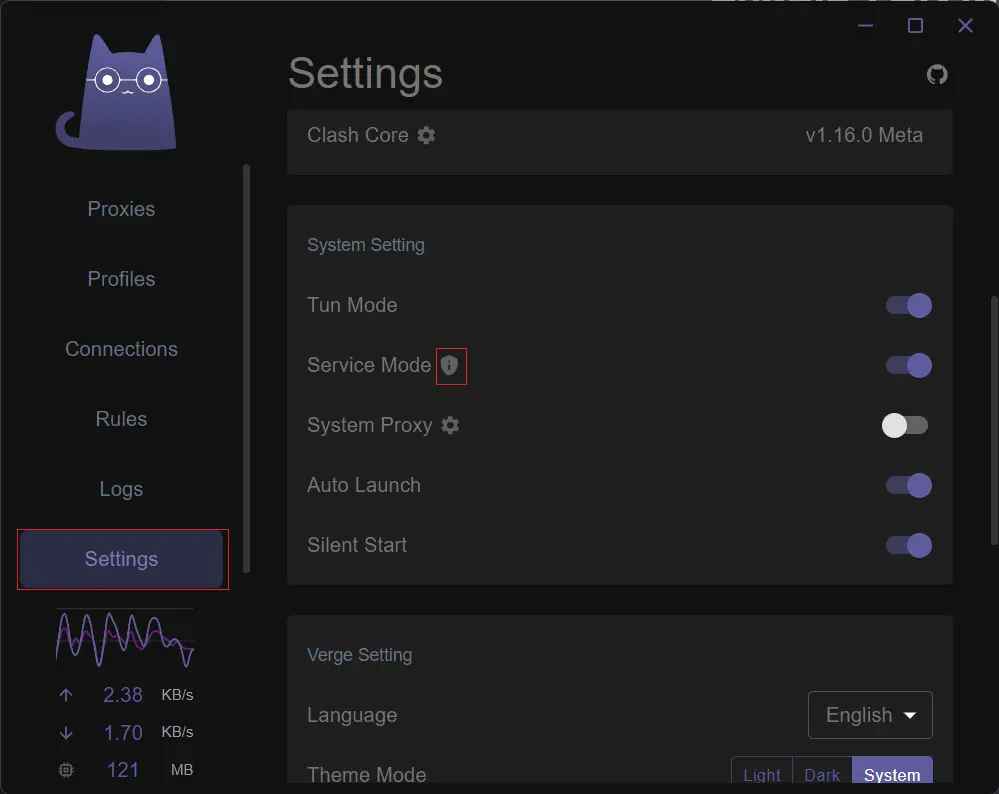
- Click
Settingsin the left sidebar and locateService Modeand click on the small shield icon next to it. - Click
INSTALL.- Installation may report a failure, but it is actually successful; this may be a bug.
- Turn on the switch for
Service ModeandTun Mode, then turn off the switch forSystem Proxy. - If the network icon in the lower left corner of the taskbar changes from Wi-Fi to the icon shown in the screenshot below, the installation was successful.
![icon screenshot.png]()
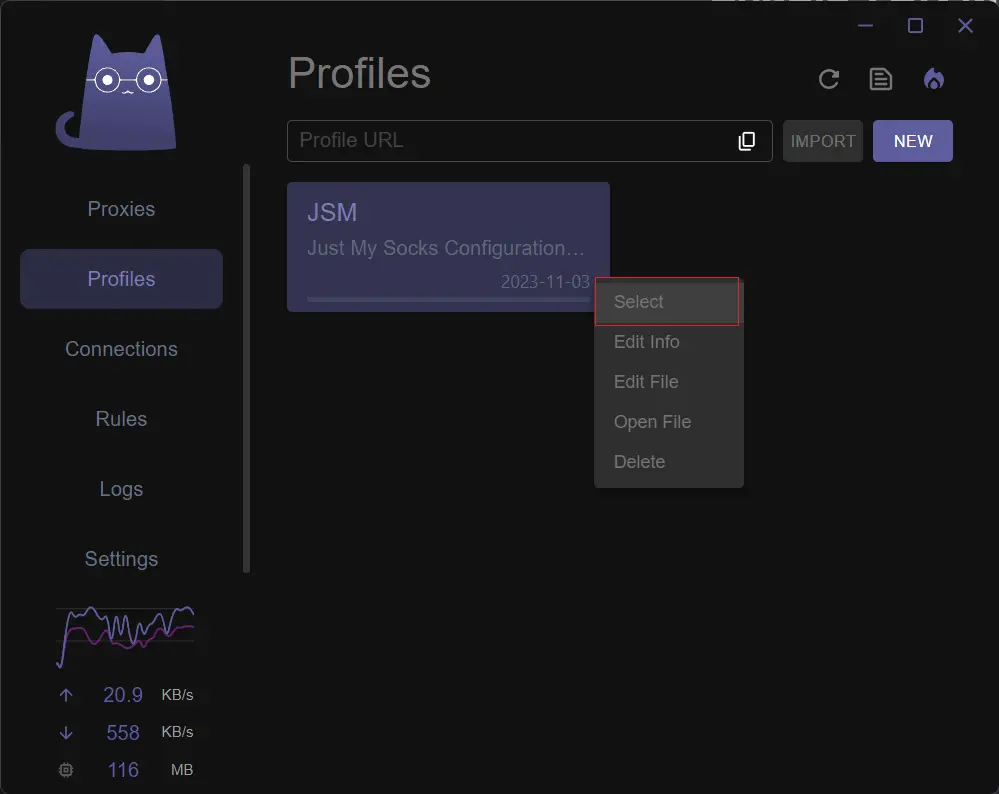
- Click on
Profilesin the left sidebar, right-click on the configuration profile you created earlier, and clickSelect。

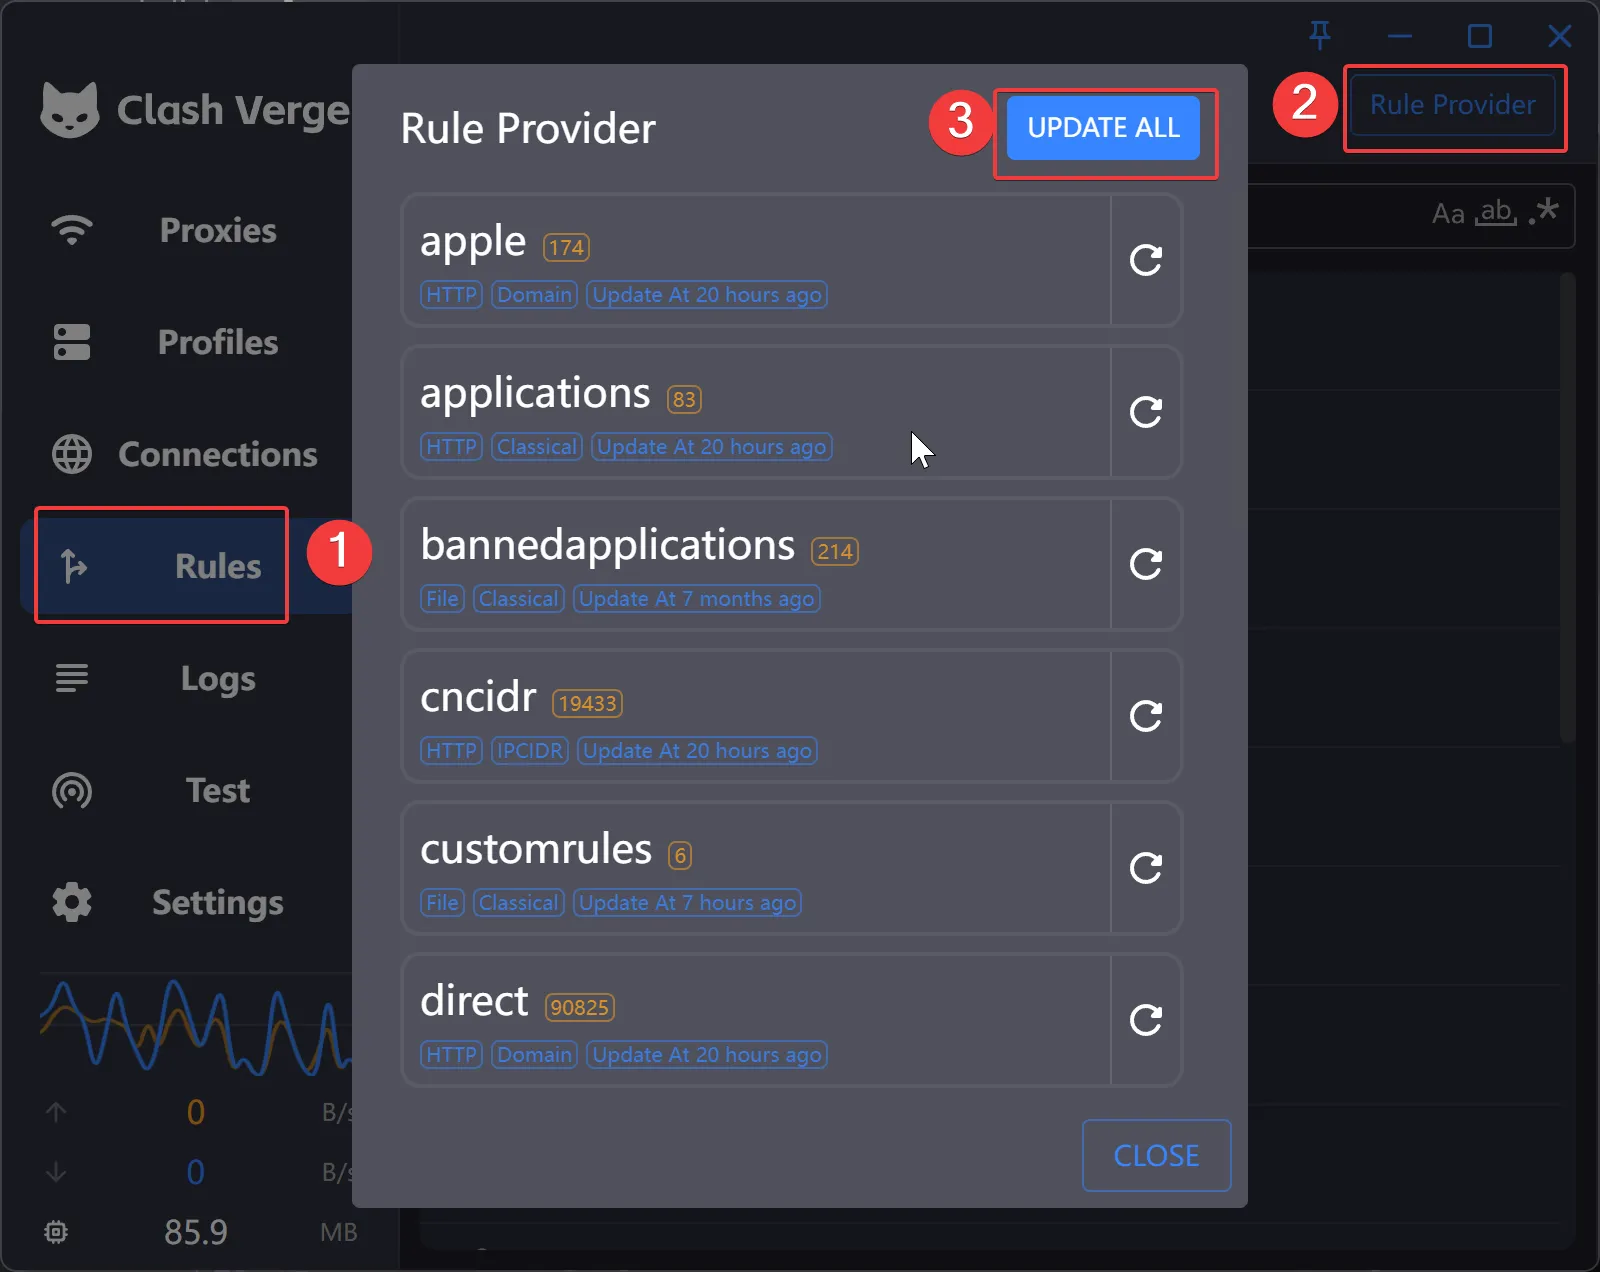
Update Rules
I’ve set up many rules in the configuration file, but to make these rules effective, I also need to manually update the rules file.
- Click on
Rulesin the left sidebar. - Click on the
Rule Providerbutton in the top right corner. - Click on
Update All.- If you have local rules files, make sure to copy them into the
rulesetfolder under the Clash App Dir before updating the rules.
- If you have local rules files, make sure to copy them into the
Prevent DNS Leaks
DNS leaks are a network privacy issue that typically occurs when using a Virtual Private Network (VPN) or proxy service. It refers to the situation where DNS queries bypass the VPN or proxy and are sent directly to a local or public DNS server. This can potentially leak information about a user’s online activities, as DNS queries often contain information about the websites being accessed, even if their network traffic is encrypted and hidden by a VPN or proxy.
For more information about DNS leaks, please refer to @bulianglin’s YouTube video:
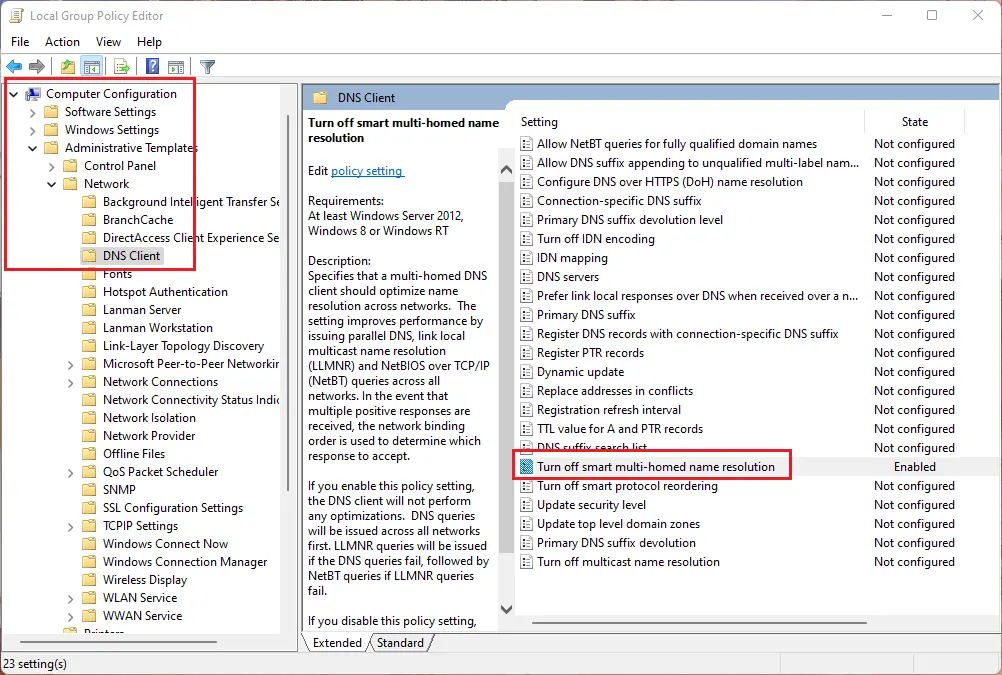
Turn Off Smart Multi-Homed Name Resolution
Windows operating systems use Smart Multi-Homed Domain Name Resolution to issue parallel DNS queries to all networks simultaneously for improved performance. Even though I have configured DNS rules in the settings, these rules only apply to the TUN virtual network card set up by Clash, and they do not control the physical network card. Therefore, without disabling Smart Multi-Homed Name Resolution, the system might initiate DNS queries through both the virtual network card and the physical network card. The physical network card typically uses local or public DNS servers, meaning that third parties like your internet service provider can see the websites you’re visiting. This is when DNS leaks occur.
You can use Wireshark to capture data from the physical network card and compare the differences before and after disabling Smart Multi-Homed Name Resolution.
To disable it, follow these steps:
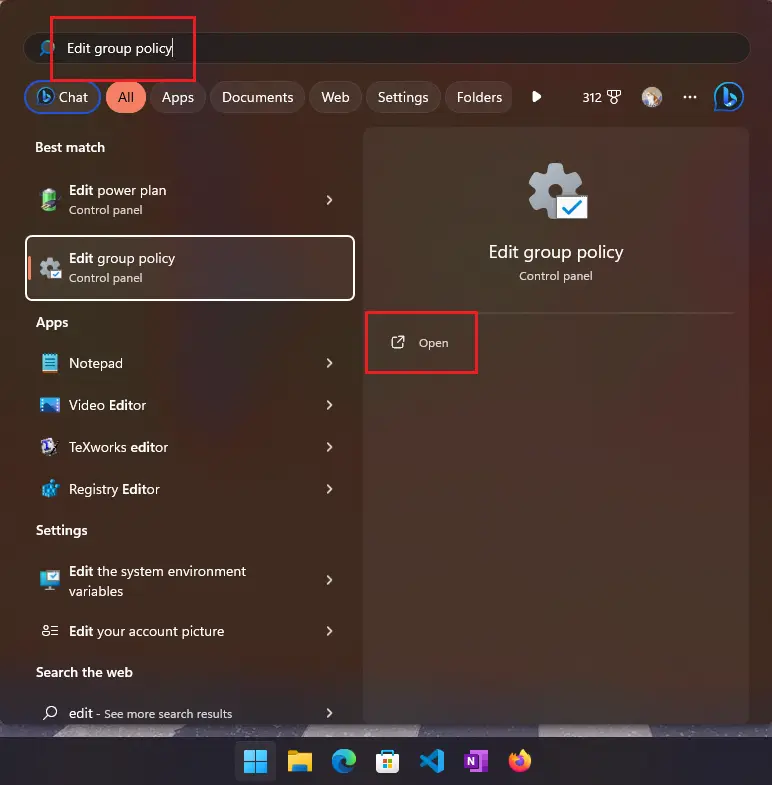
- Open the Start menu and search for
Edit Group Policyand open the corresponding Control Panel. - Navigate to
Computer Configuration>Administrative Templates>Network>DNS Client. - Find and click on
Turn off smart multi-homed name resolution. - Check the
Enabledoption in the upper left corner. - Click
OK.

Disable QUIC
QUIC (Quick UDP Internet Connections) is a network transport protocol designed to accelerate data transmission on the Internet and provide faster network connections. Developed by Google, QUIC has been standardized to improve network performance and security. An increasing number of web browsers are beginning to support QUIC to enhance users’ online experiences. However, in certain cases, QUIC can lead to DNS leaks. Therefore, it is recommended to disable QUIC in your web browser.
Since UDP must use real IP in some scenarios, Clash currently sends DNS requests for UDP traffic domains, even when using fake IP mode. For example, the UDP-based QUIC protocol used by browsers for HTTP3 will initiate DNS requests when accessing websites that support QUIC. This can result in DNS leaks. The solution is to disable the QUIC feature in your web browser.
Quoted from Advanced • DNS Shunting Section
As an example, for Microsoft Edge browser, you can enter edge://flags/#enable-quic in the address bar, which will take you to the Experimental QUIC protocol option. Set it to Disabled.

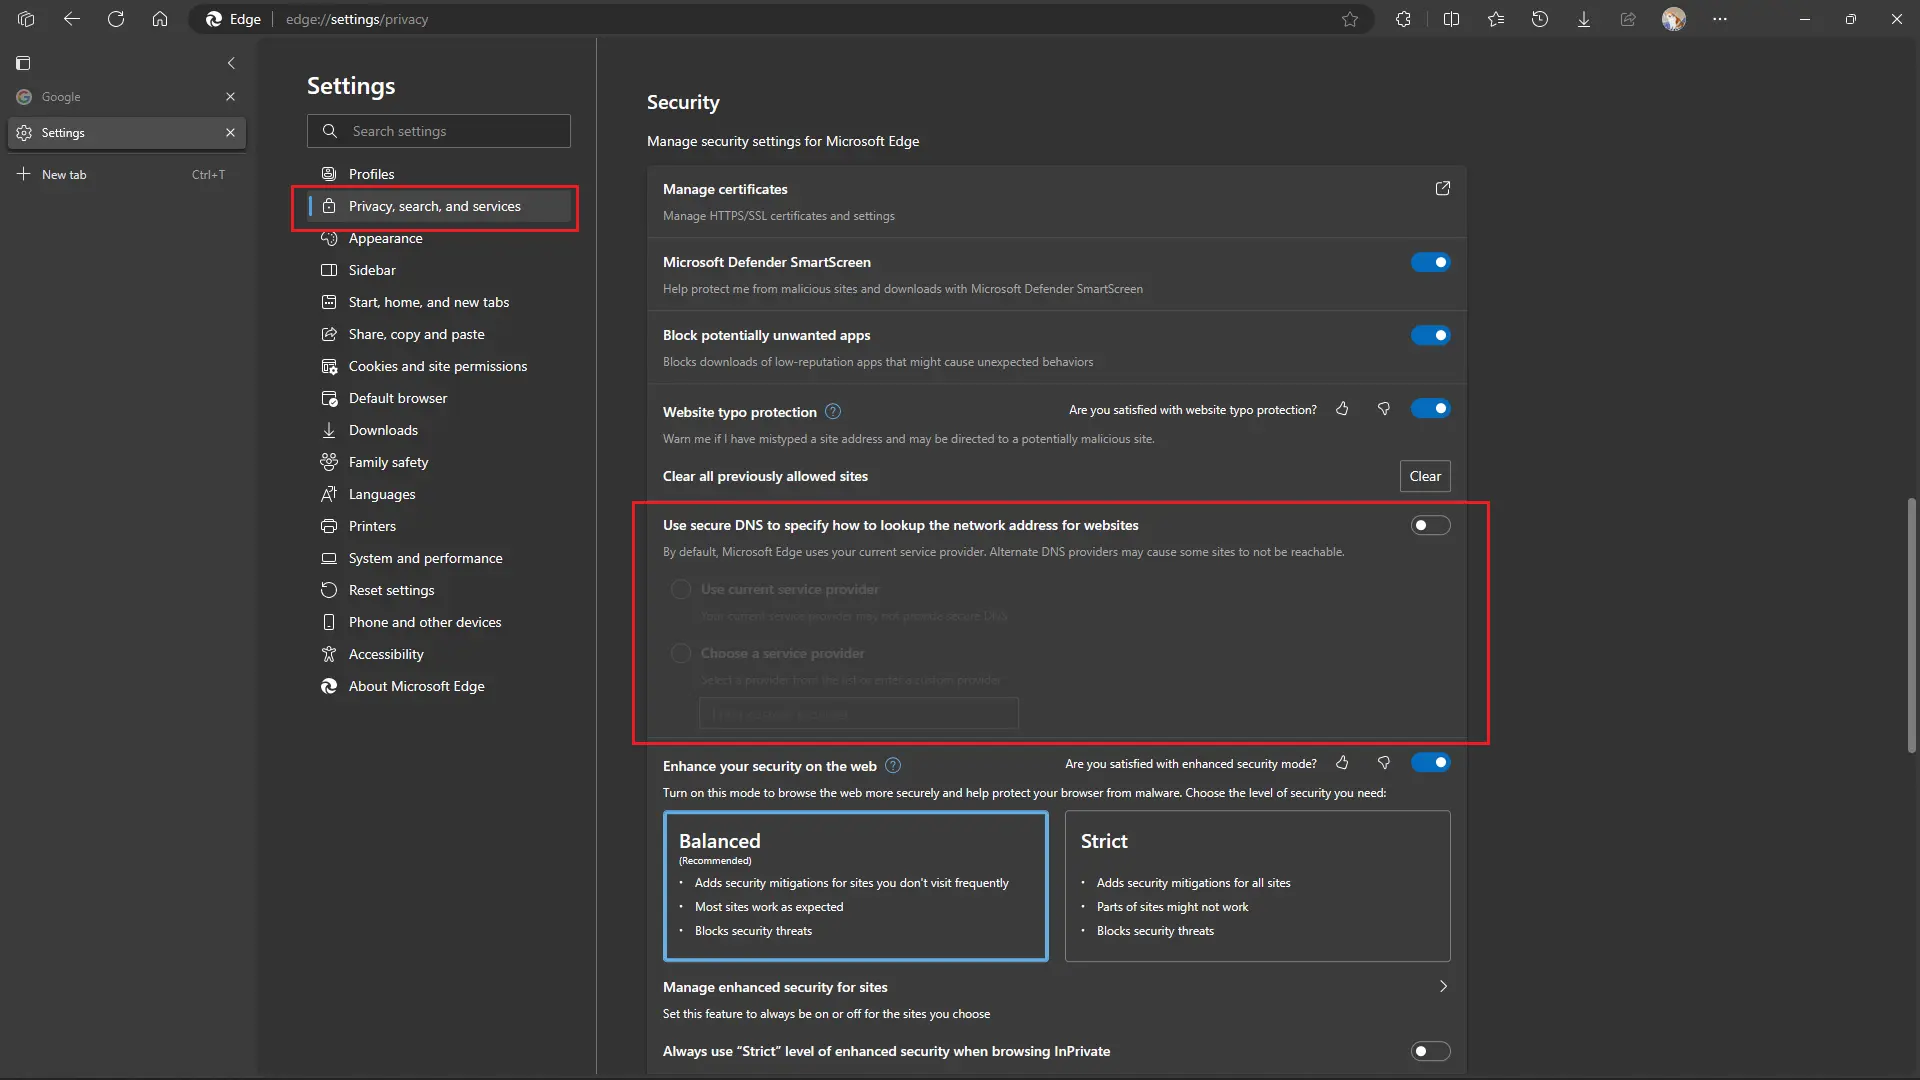
Disable Browser Secure DNS
Most modern web browsers now have Secure DNS features enabled by default, which can interfere with TUN mode by hijacking DNS requests, causing reverse domain name resolution to fail.
Taking Microsoft Edge browser as an example, go to Settings > Privacy, search, and services > Security > Use secure DNS to specify how to look up the network address of websites. Turn off the switch.
Enabling Clash DNS Server and Setting Local DNS Server
After configuring Clash DNS service in the configuration file, set the local system DNS server to 127.0.0.1. Taking WLAN as an example, follow these steps: Open System Settings > Network & Internet > Wi-Fi > Hardware Properties, set DNS Server Assignment to manual, enable IPv4, input 127.0.0.1 in Preferred DNS, and save the settings.