Grasscutter Windows Local Server Configuration Guide
Grasscutter is an experimental server written in Java, designed to simulate the server-side of a certain Anime Game. This article documents the process of configuring the server, including the installation of Grasscutter and Cultivation, the usage of relevant commands, methods for utilizing practical plugins and tools, configuration of gacha pools and shops, as well as the replacement of character models.
Note: This article is based on the Windows 11 system, where the client and server run on the same PC.
Tip: Please replace [Username] in the provided file paths with your own Windows username.
Environment Setup
Grasscutter relies on Java and MongoDB for its operation. It is recommended to install JDK17, and the latest version of MongoDB. Below are the download links:
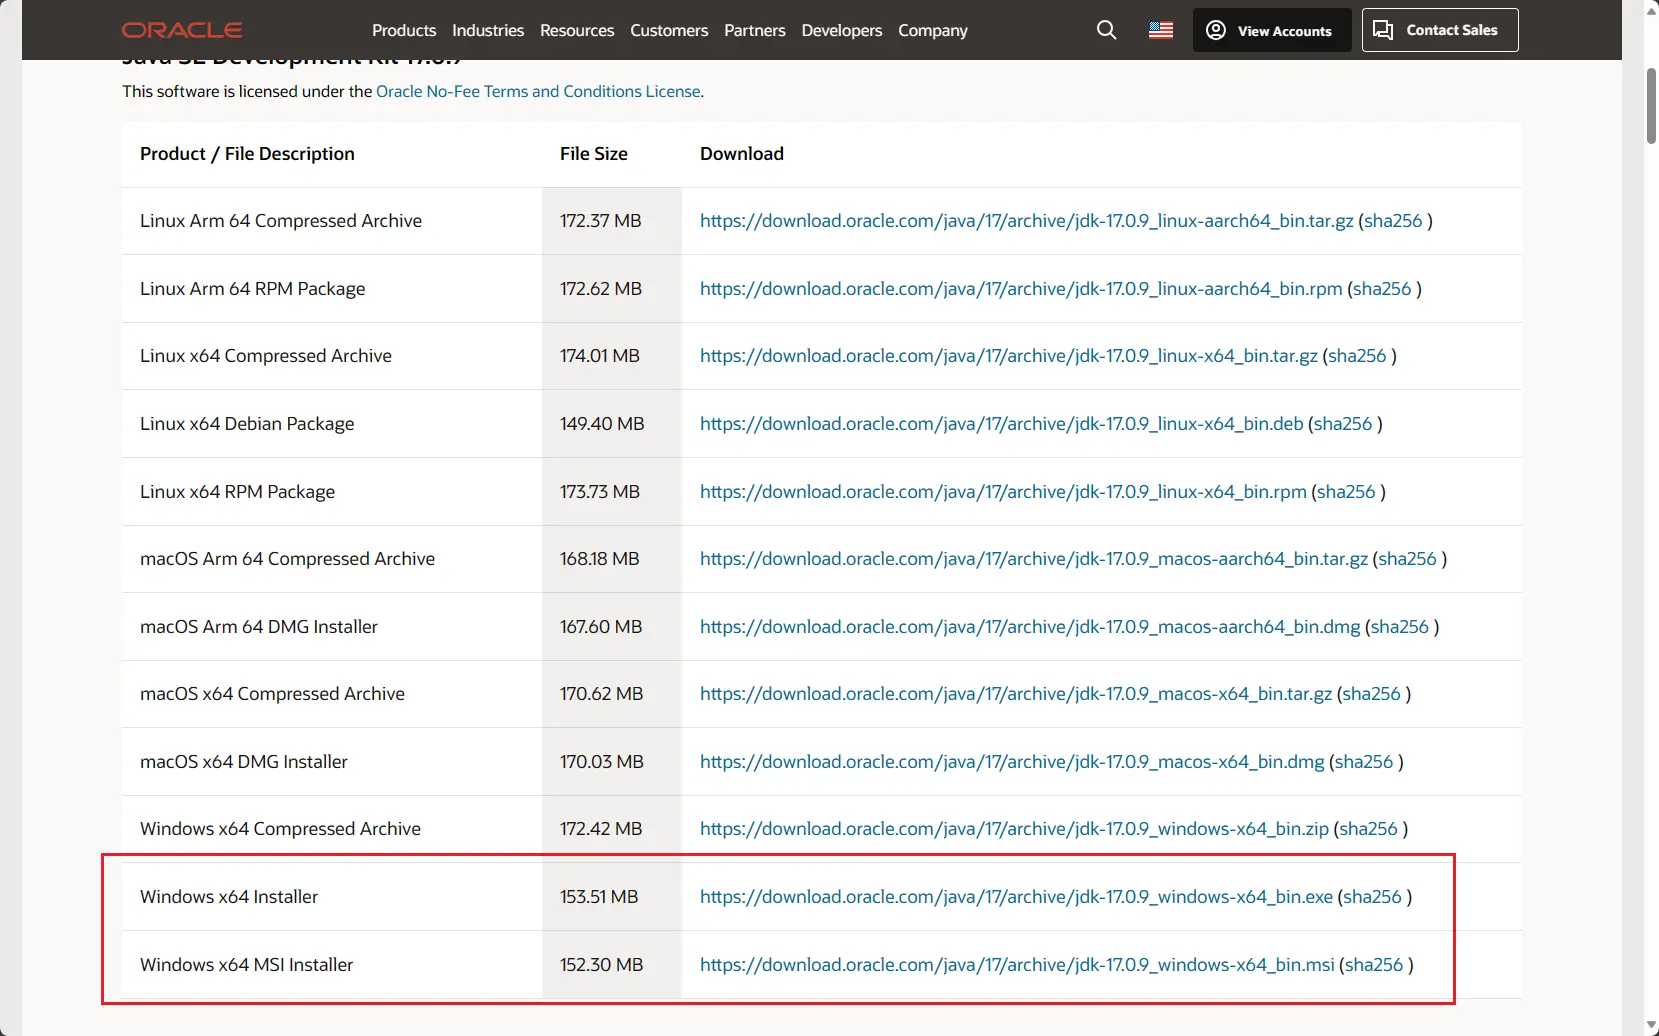

Java Installation:
- Download the Java installation package, selecting either
Windows x64 InstallerorWindows x64 MSI Installer. - During installation, proceed with the default options.
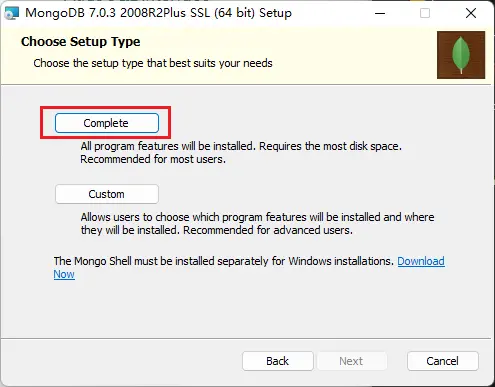
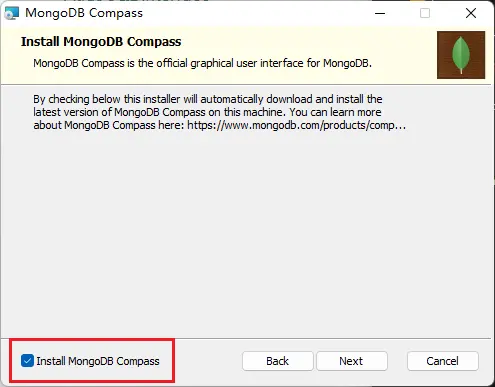
MongoDB Installation:
- Download MongoDB, opting for the community edition in
msiformat. - Choose
Completeinstallation during setup. - In
Service Configuration, you can modify file paths (the last two options), keeping the rest as default. - MongoDB Compass is the graphical user interface for MongoDB, which is optional.

Client Download
The client download links can be obtained from GI-Download-Library.
- The download link for the main files is available in
GI-Download-Library/GenshinImpact/Client/[Version].md. After downloading, unzip the files. - The download link for voice files can be found in
GI-Download-Library/GenshinImpact/Audio/[Version].md. After extracting, copy the folder to the main files’ directory.
Server Setup
Installation of Cultivation
Cultivation is a cross-platform launcher developed by the Grasscutter team, capable of running on Windows, macOS, and Linux. It comes with a built-in proxy function, greatly simplifying the Grasscutter installation process; just a few clicks are needed to run it.
Download the file with the msi extension from the link below, for example, Cultivation_1.2.0_x64_en-US.msi.
After installation, restart your computer, and then run Cultivation as an administrator.
Download Grasscutter
Click on the Download icon in the top right corner of Cultivation,
- Depending on your preferences, download either the
All-in-Onefile. Both downloaded files are pre-built, eliminating the need for manual compilation.Grasscutter All-in-Onedoesn’t include quests, but some scenes require unlocking through commands, such as the wind barrier in the Stormterror’s Lair.Questing All-in-Oneincludes quests, but be aware that there might be some bugs, occasionally requiring manual input of commands to proceed with tasks. For more details, refer to: Common Quest Bugs and Command Handling.
- Download
Grasscutter Resources.
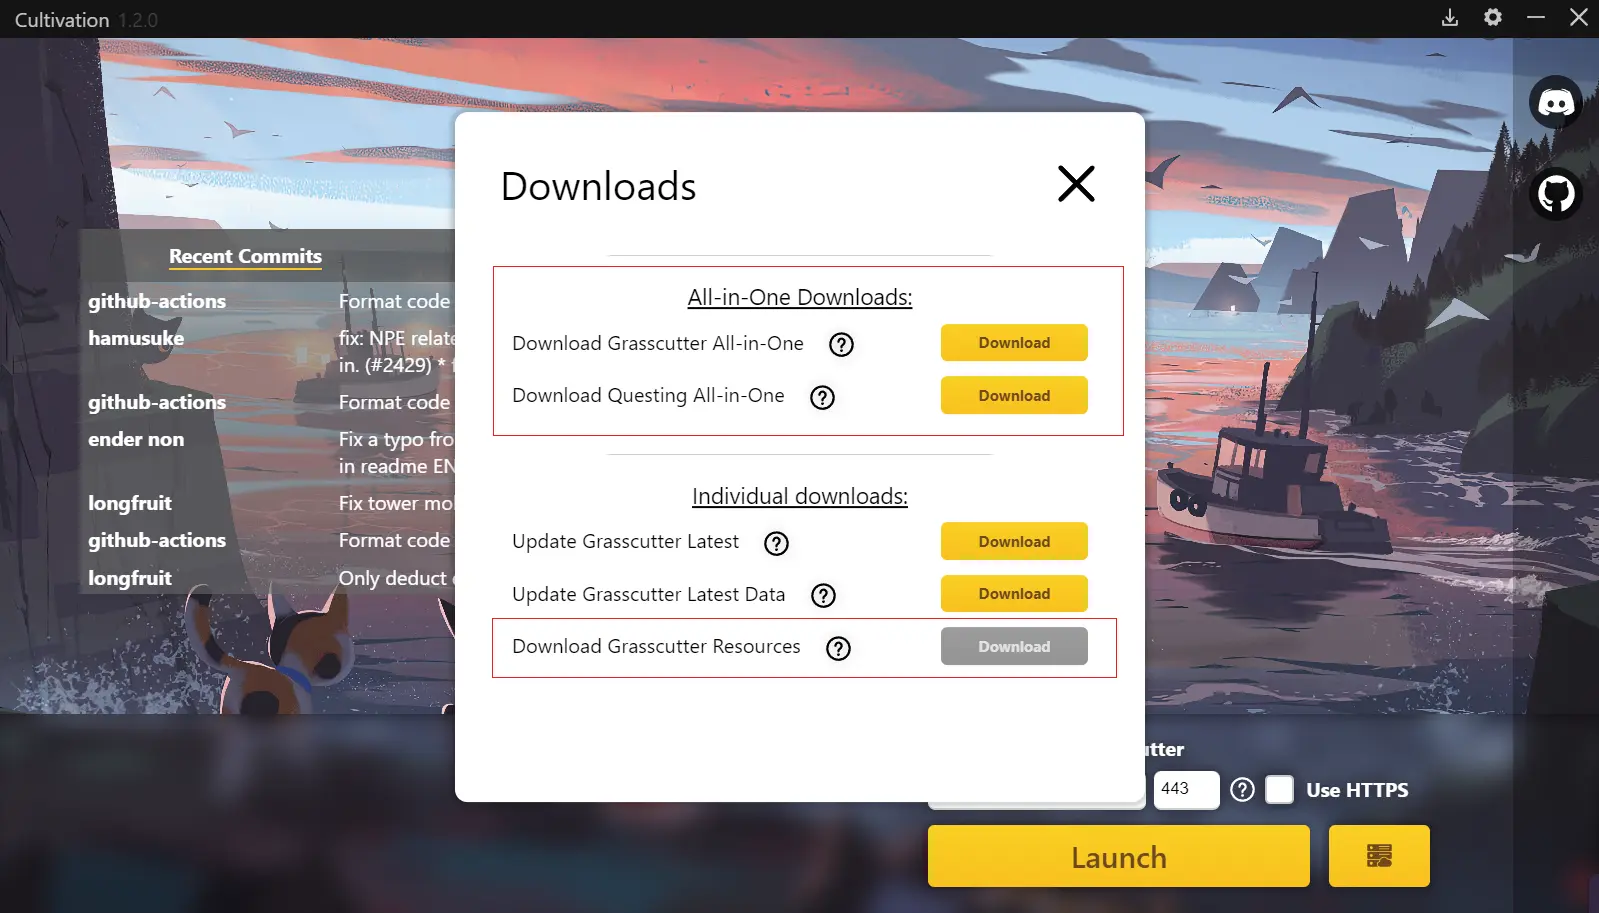
If you need resources from a specific version, you can switch to the corresponding branch in the repository below. After downloading, copy the files to the C:\Users\[Username]\AppData\Roaming\cultivation\grasscutter\resources folder.
Configure Cultivation
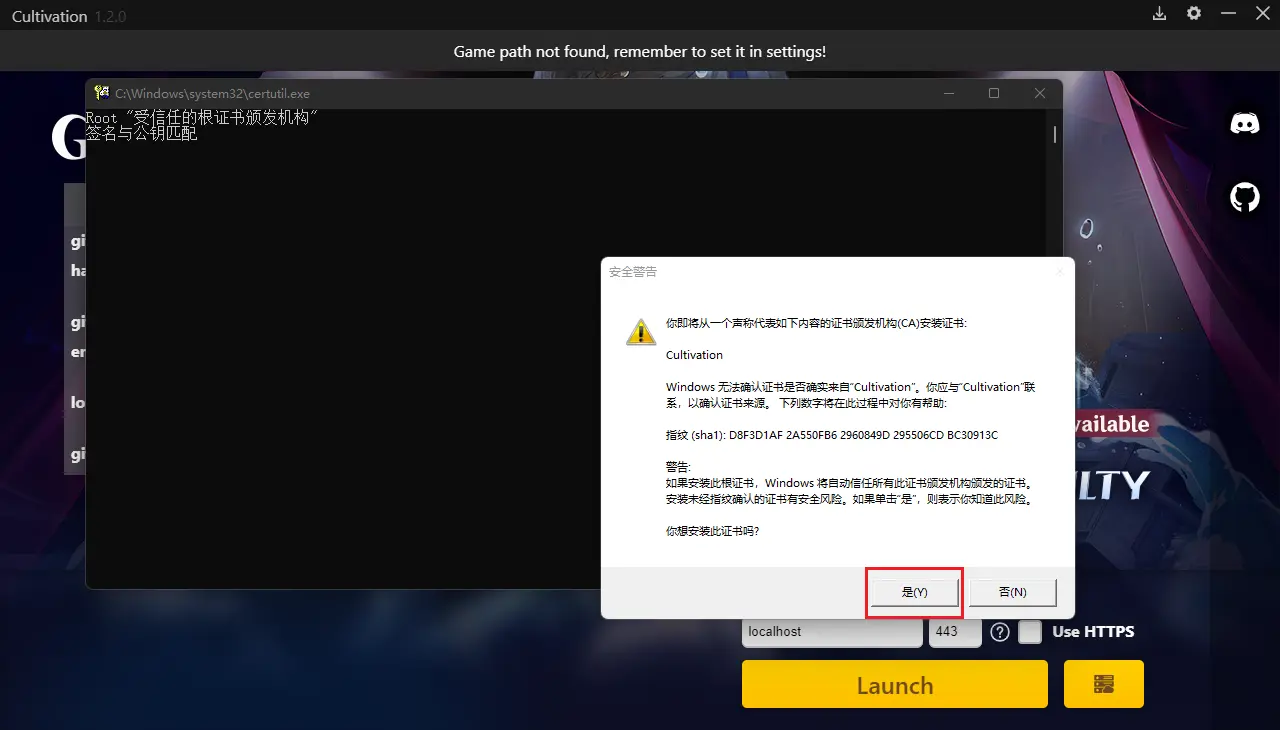
Upon the first launch, a popup window will prompt you to install the CA certificate. Click Yes to agree to the installation. After installing the certificate, Cultivation’s built-in mitmproxy will be able to proxy the communication between the client and the game server through a Man-in-the-Middle (MITM) attack to the local server.
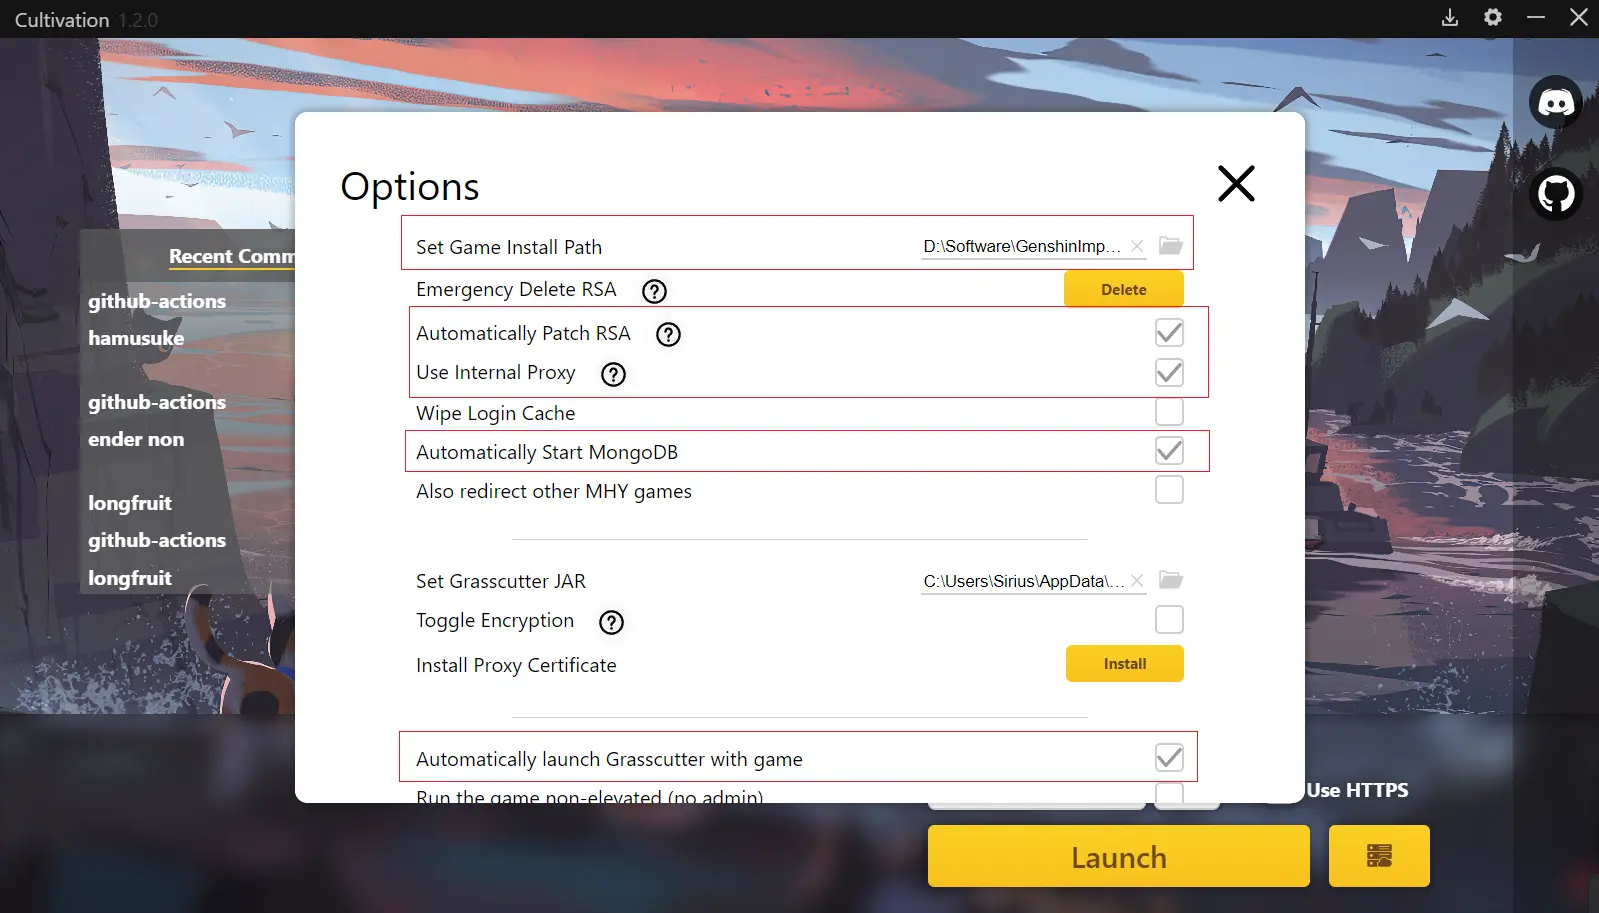
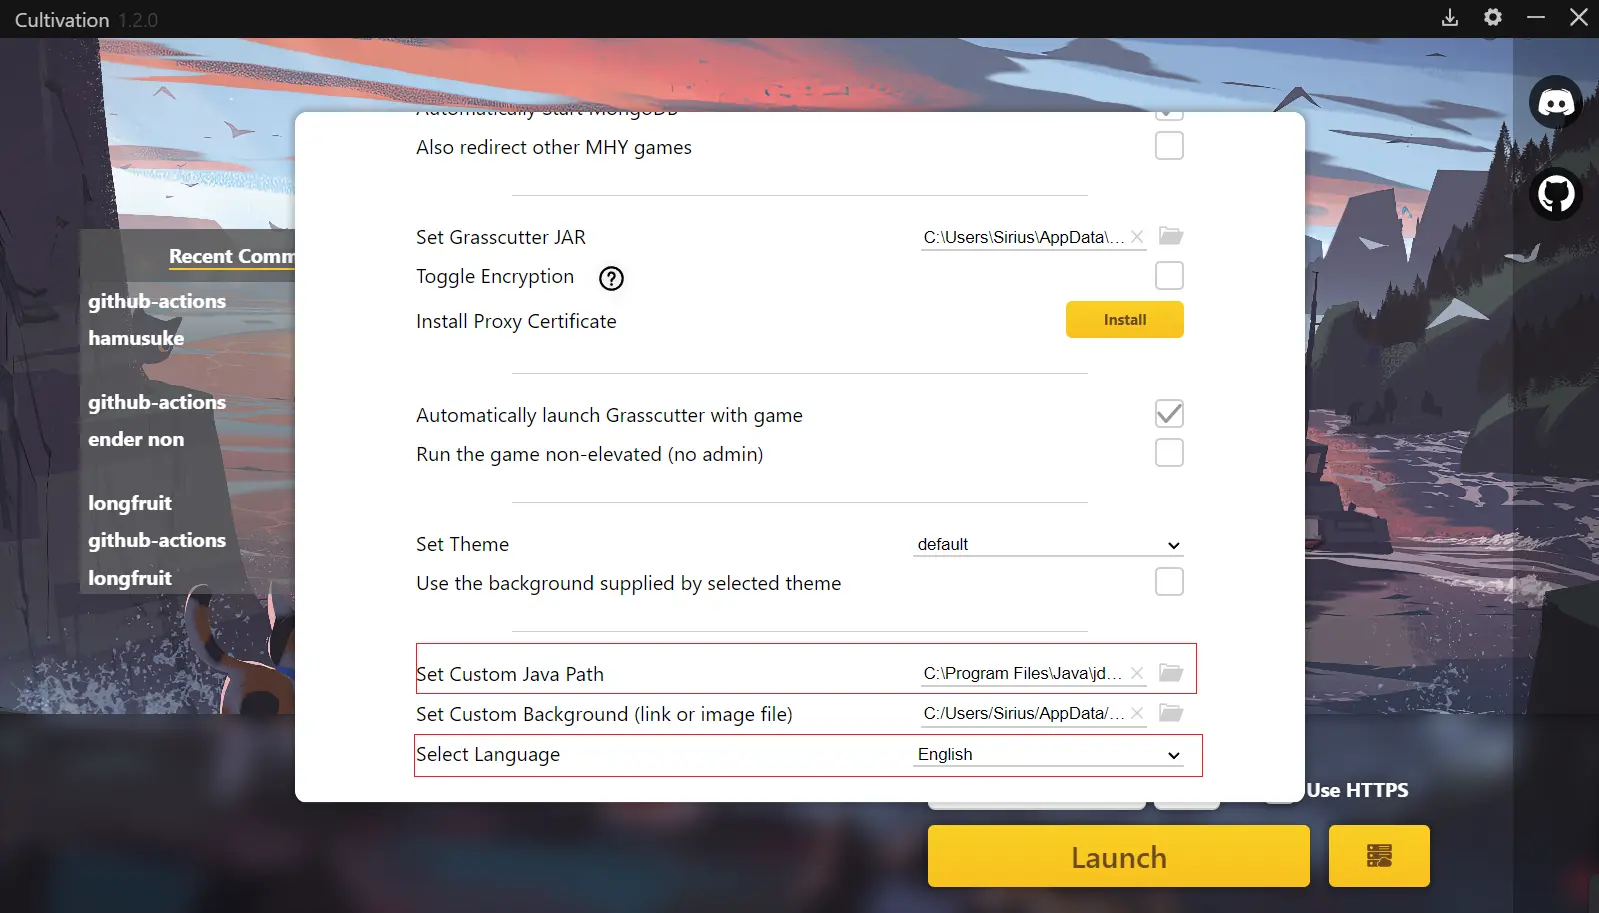
Click on the small gear icon in the top right corner of Cultivation to open the settings page,
- At the bottom is the language settings section, supporting multiple languages.
- For the
game install path, select theGenshinImpact.exefile in the root directory of the client folder. - Confirm that the following four options are checked:
Automatically Patch RSAUse Internal ProxyAutomatically Start MongoDBAutomatically launch Grasscutter with game
- Set the custom Java path to
C:\Program Files\Java\jdk-17\bin\java.exe. - Keep other options as default.
XX, Launch!
The server is now configured. XX, launch!
- Open Cultivation.
- Click on the
small buttonto the right of the launch button to run Grasscutter.- Windows Firewall-related prompts may appear; allow them.
- Click the
Launchbutton to launch the game. - Enter any username and password; the system will automatically create an account.
- The password is not essential; you can enter any number when logging in next time.
Commands
For commonly used commands, refer to C:\Users\[Username]\AppData\Roaming\cultivation\grasscutter\GM Handbook. Additionally, in the Grasscutter window, you can use the help command to view detailed usage for each command.
When running commands directly in Grasscutter, you generally need to specify UID. For example, the following command is used to remove the stamina limit for a user with UID 10001:
1 | /prop ns on @10001 |
Moreover, you can execute commands in the client using the built-in chat feature:
- Press
Enterin the client. - Click on the
Add Conversationin the bottom left corner. - Click the
plus iconto the right of the friend banner to start a conversation. - Enter the command in the dialog box and send it.
When directly entering commands in the chat box, keep in mind:
- Commands like account creation cannot be used in the chat box.
- Commands generally do not require specifying UID and apply to the current user by default.
- Note that commands entered in the chat box should start with
/. - For example,
/give 223 x1gives the current user 1 pink ball.- 223 is the ID of the pink ball.
- The number after
xrepresents the quantity of the item.
Tools
Entering commands one by one can be tedious. I recommend using the following tools to generate commands directly. After installing the relevant plugins, you can even execute commands within the tools, eliminating the need for manual copy-pasting.
Plugins
Grasscutter supports the installation of plugins. I’ve installed the following two plugins:
Grasscutter-Rollbackgc-opencommand-plugin
Place the plugins in the C:\Users\[Username]\AppData\Roaming\cultivation\grasscutter\plugins folder.
gc-opencommand-plugin
gc-opencommand-plugin is a plugin that opens the GC command execution interface for third-party clients. It can be used with Grasscutter Tools to execute relevant commands directly without the need to input them into the in-game chat window.
Configuration steps:
- Start Grasscutter.
- Open the folder in the
pluginsdirectory with the same name as the plugin JAR file and findconfig.json. - Copy the
tokenfromconfig.json. Normally, this token is automatically generated. If not, you can randomly create a 32-character one. - Open
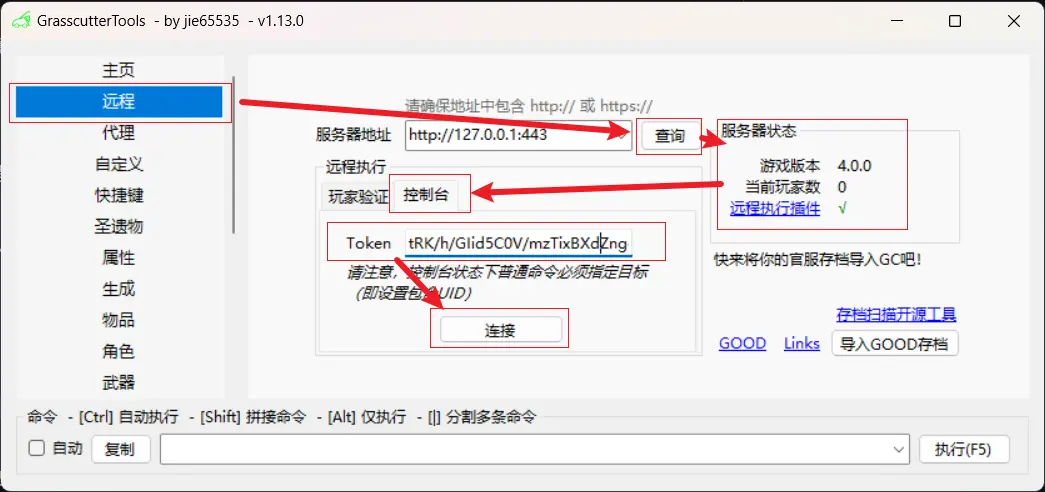
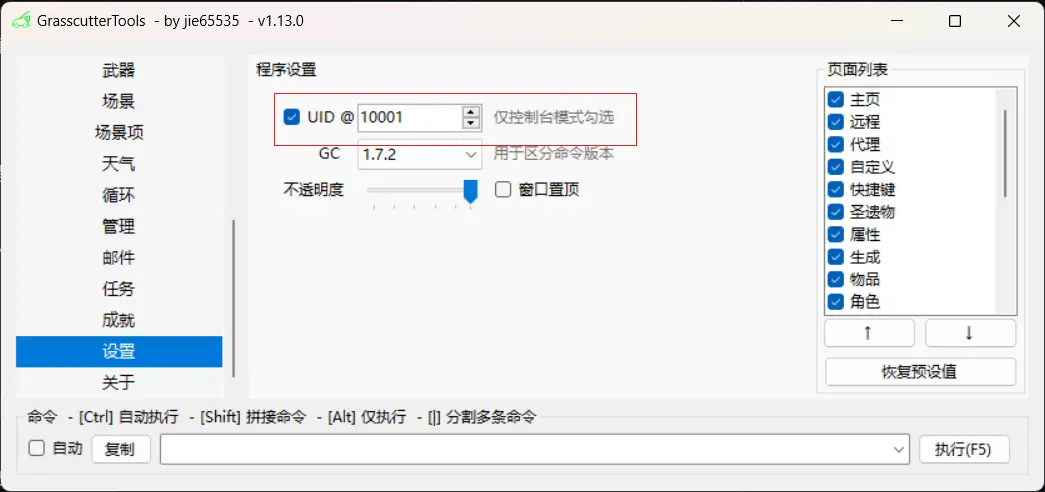
Grasscutter Tools. - Switch to the
Settingstab. - Check the
UIDoption in the program settings. - Enter the UID for the current account.
- Switch to the
Remotetab. - Click the query button next to the server address.
- Confirm that there is a green checkmark after
Server Status - Remote Execution Plugin. - Click
Console, paste thetokencopied in step 3. - Click
Connect.
Grasscutter-Rollback
Grasscutter-Rollback is a database backup and rollback plugin. It can be used when there are issues with the game data, allowing you to rollback to a previous state.
Usage:
- Backup the current database:
bk - Rollback to the previous database:
rb - Backup the current database and rename it:
bk [name] - Rollback to a specified database:
rb [name]
Banner Replacement
The Grasscutter_Banners repository contains information on all banners from the server’s launch until now. Download the corresponding file, copy it to C:\Users\[Username]\AppData\Roaming\cultivation\grasscutter\data\, replace the original Banners.json file, and then execute the reload command in Grasscutter to change the current banner.
Edit Shop Items
By default, the shop contains no items. You need to add a shop.json file to C:\Users\[Username]\AppData\Roaming\cultivation\grasscutter\data\.
It is recommended to use the Shop Editor in the previously mentioned Grasscutter Tools for editing related files. Here’s how:
- Copy
C:\Users\[Username]\AppData\Roaming\cultivation\grasscutter\resources\ExcelBinOutput\ShopGoodsExcelConfigData.jsonto another folder. - Open the
Shop Editorin Grasscutter Tools. - Paste the copied file path into Grasscutter Tools and click
Load. - Edit the file. Note that after completing each item, click the
Add or Updatebutton at the bottom; otherwise, the changes won’t take effect. - Click
Save. You will be prompted to overwrite the file; allow it. - Rename the file to
shop.json. - Copy the file to
C:\Users\[Username]。\AppData\Roaming\cultivation\grasscutter\data\.
Character Model Replacement
Character model mods can be downloaded from Gamebanana and injected into the game using GI-Model-Importer.
Here are the specific steps:
- Download
GI-Model-Importerfrom the Release page and unzip it.- Generally, choose
3dmigoto-GIMI-for-playing-mods.zip. - If you want to create your own mod, choose
3dmigoto-GIMI-for-development.zip.
- Generally, choose
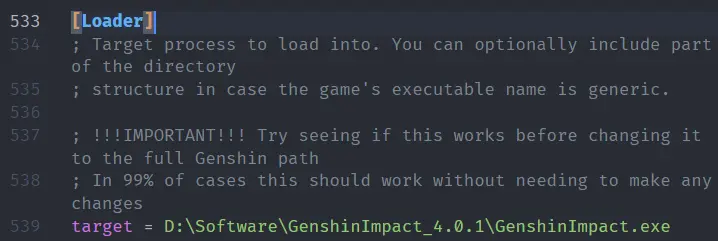
- Open
d3dx.iniwith VSCode. - Quickly locate by searching
[Loader]and modify thetargetunder[Loader]to your game installation location, for example,D:\Program Files\GenshinImpact_4.0.1\GenshinImpact.exe. - Save the file.
- Unzip the downloaded mod file and copy it to the
Modsfolder of GI-Model-Importer.- Note: Only one mod can be enabled for each character.
- Start
3DMigoto Loader.exefirst. - Then start the game through
Cultivation. - If a popup window appears in the lower-left corner of the screen during the loading process as shown in the image below, it indicates a successful launch.

For more details, please refer to the Genshin-Impact-Model-Importer documentation.