Solution to No Bootable Device Issue After Installing Linux on Acer Laptop
Once again, I’m tinkering with my poor 8-year-old Acer laptop. Because it doesn’t support TPM 2.0, it can’t install Windows 11. Even if I forcefully install it, it won’t update automatically, and Windows 10 will stop receiving support in October 2025. More importantly, the 8-year-old dual-core CPU can’t handle the latest Windows operating systems. So, I decided to keep only a Linux system on it. I’ve tried Fedora and Ubuntu before, but neither suited my taste. This time, I opted for Linux Mint. However, during the restart process after the system installation, I encountered that very familiar screen: “No Bootable Device.” 😝
“Note: This solution is based on the Linux Mint system, UEFI boot, and GPT disk partitioning. The installation method is for a fresh install, installing only the Linux Mint system. Additionally, please note that different BIOS versions and various Linux distributions may have slightly different operational steps.
Solution
The solution is straightforward—no bootable device? Just add one!
- Press
F2orDelduring startup to access the BIOS (UEFI BIOS firmware).- If you’re currently stuck on the “No Bootable Device” screen, simply use the
Ctrl + Alt + Delkey combination to reboot. - Some quick tips for navigating the BIOS menu:
- Use the left and right arrow keys to switch between menus.
- Utilize the up and down arrow keys to move between different menu items.
- Confirm selections with Enter and backtrack with Esc.
- If you’re currently stuck on the “No Bootable Device” screen, simply use the
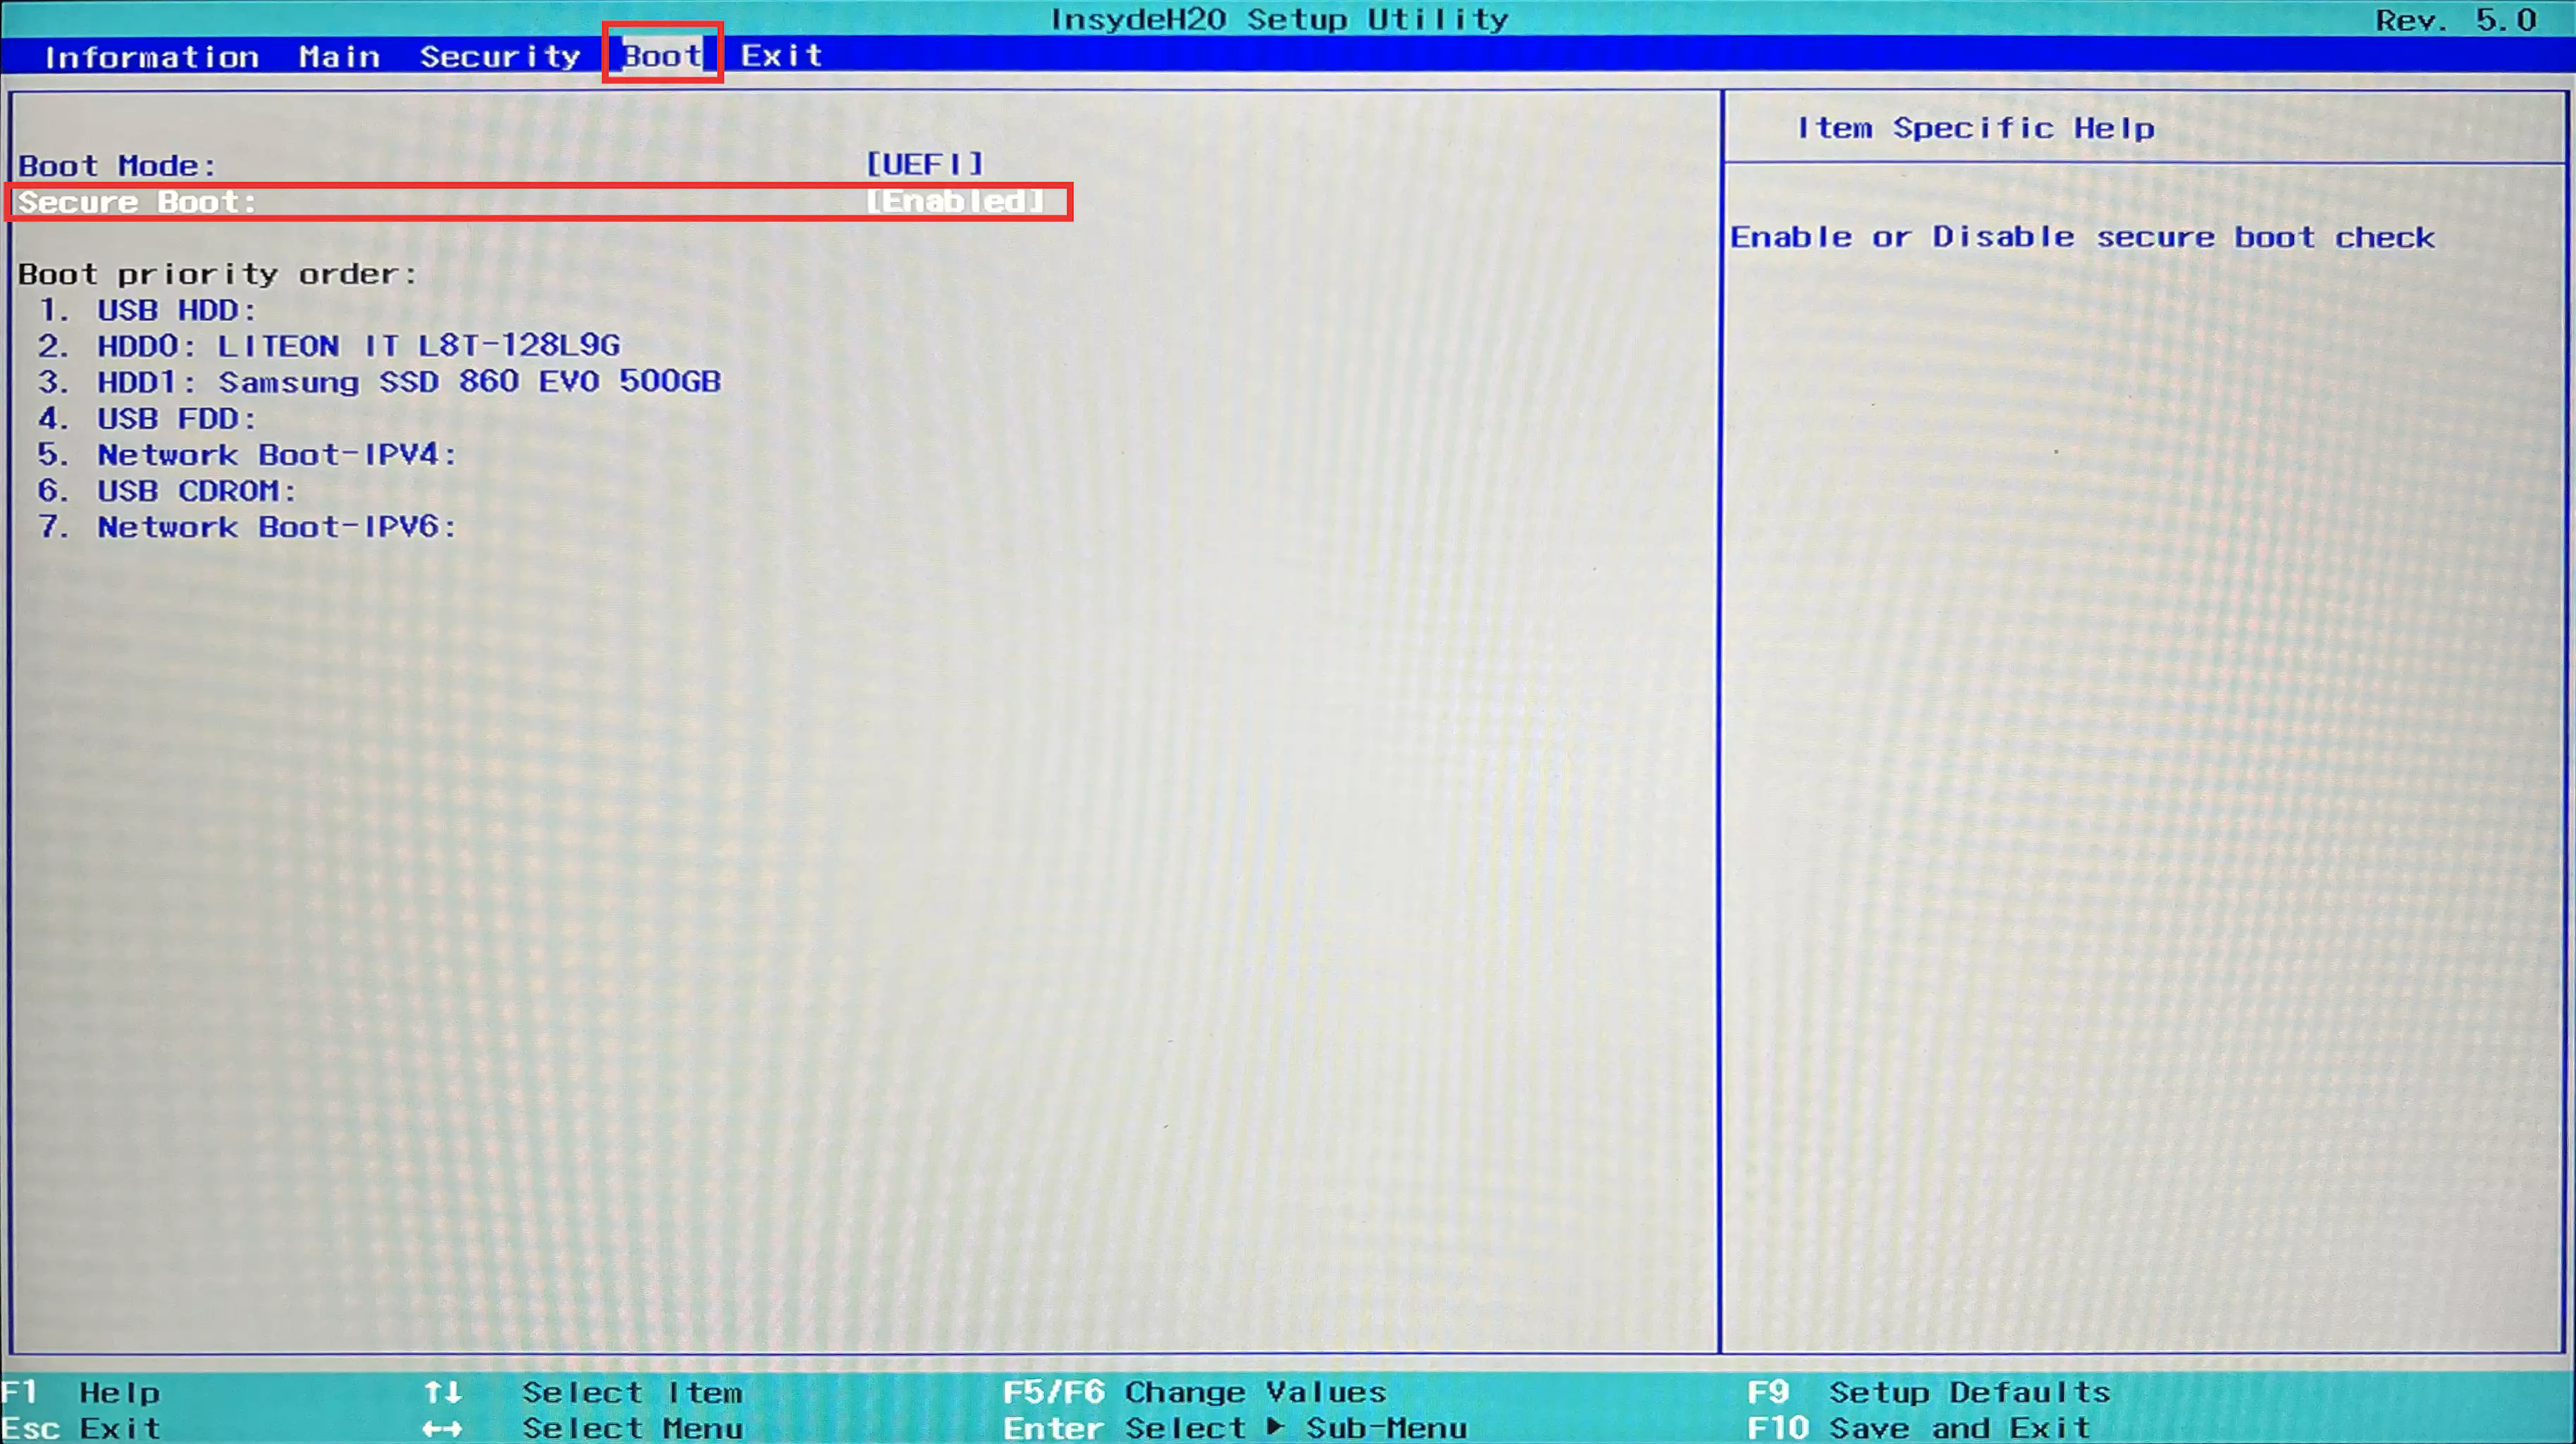
- Navigate to the
Bootmenu using the left and right arrow keys, ensuring thatSecure Bootis set toEnabled.![Enable Secure Boot.webp]()
- Move to the
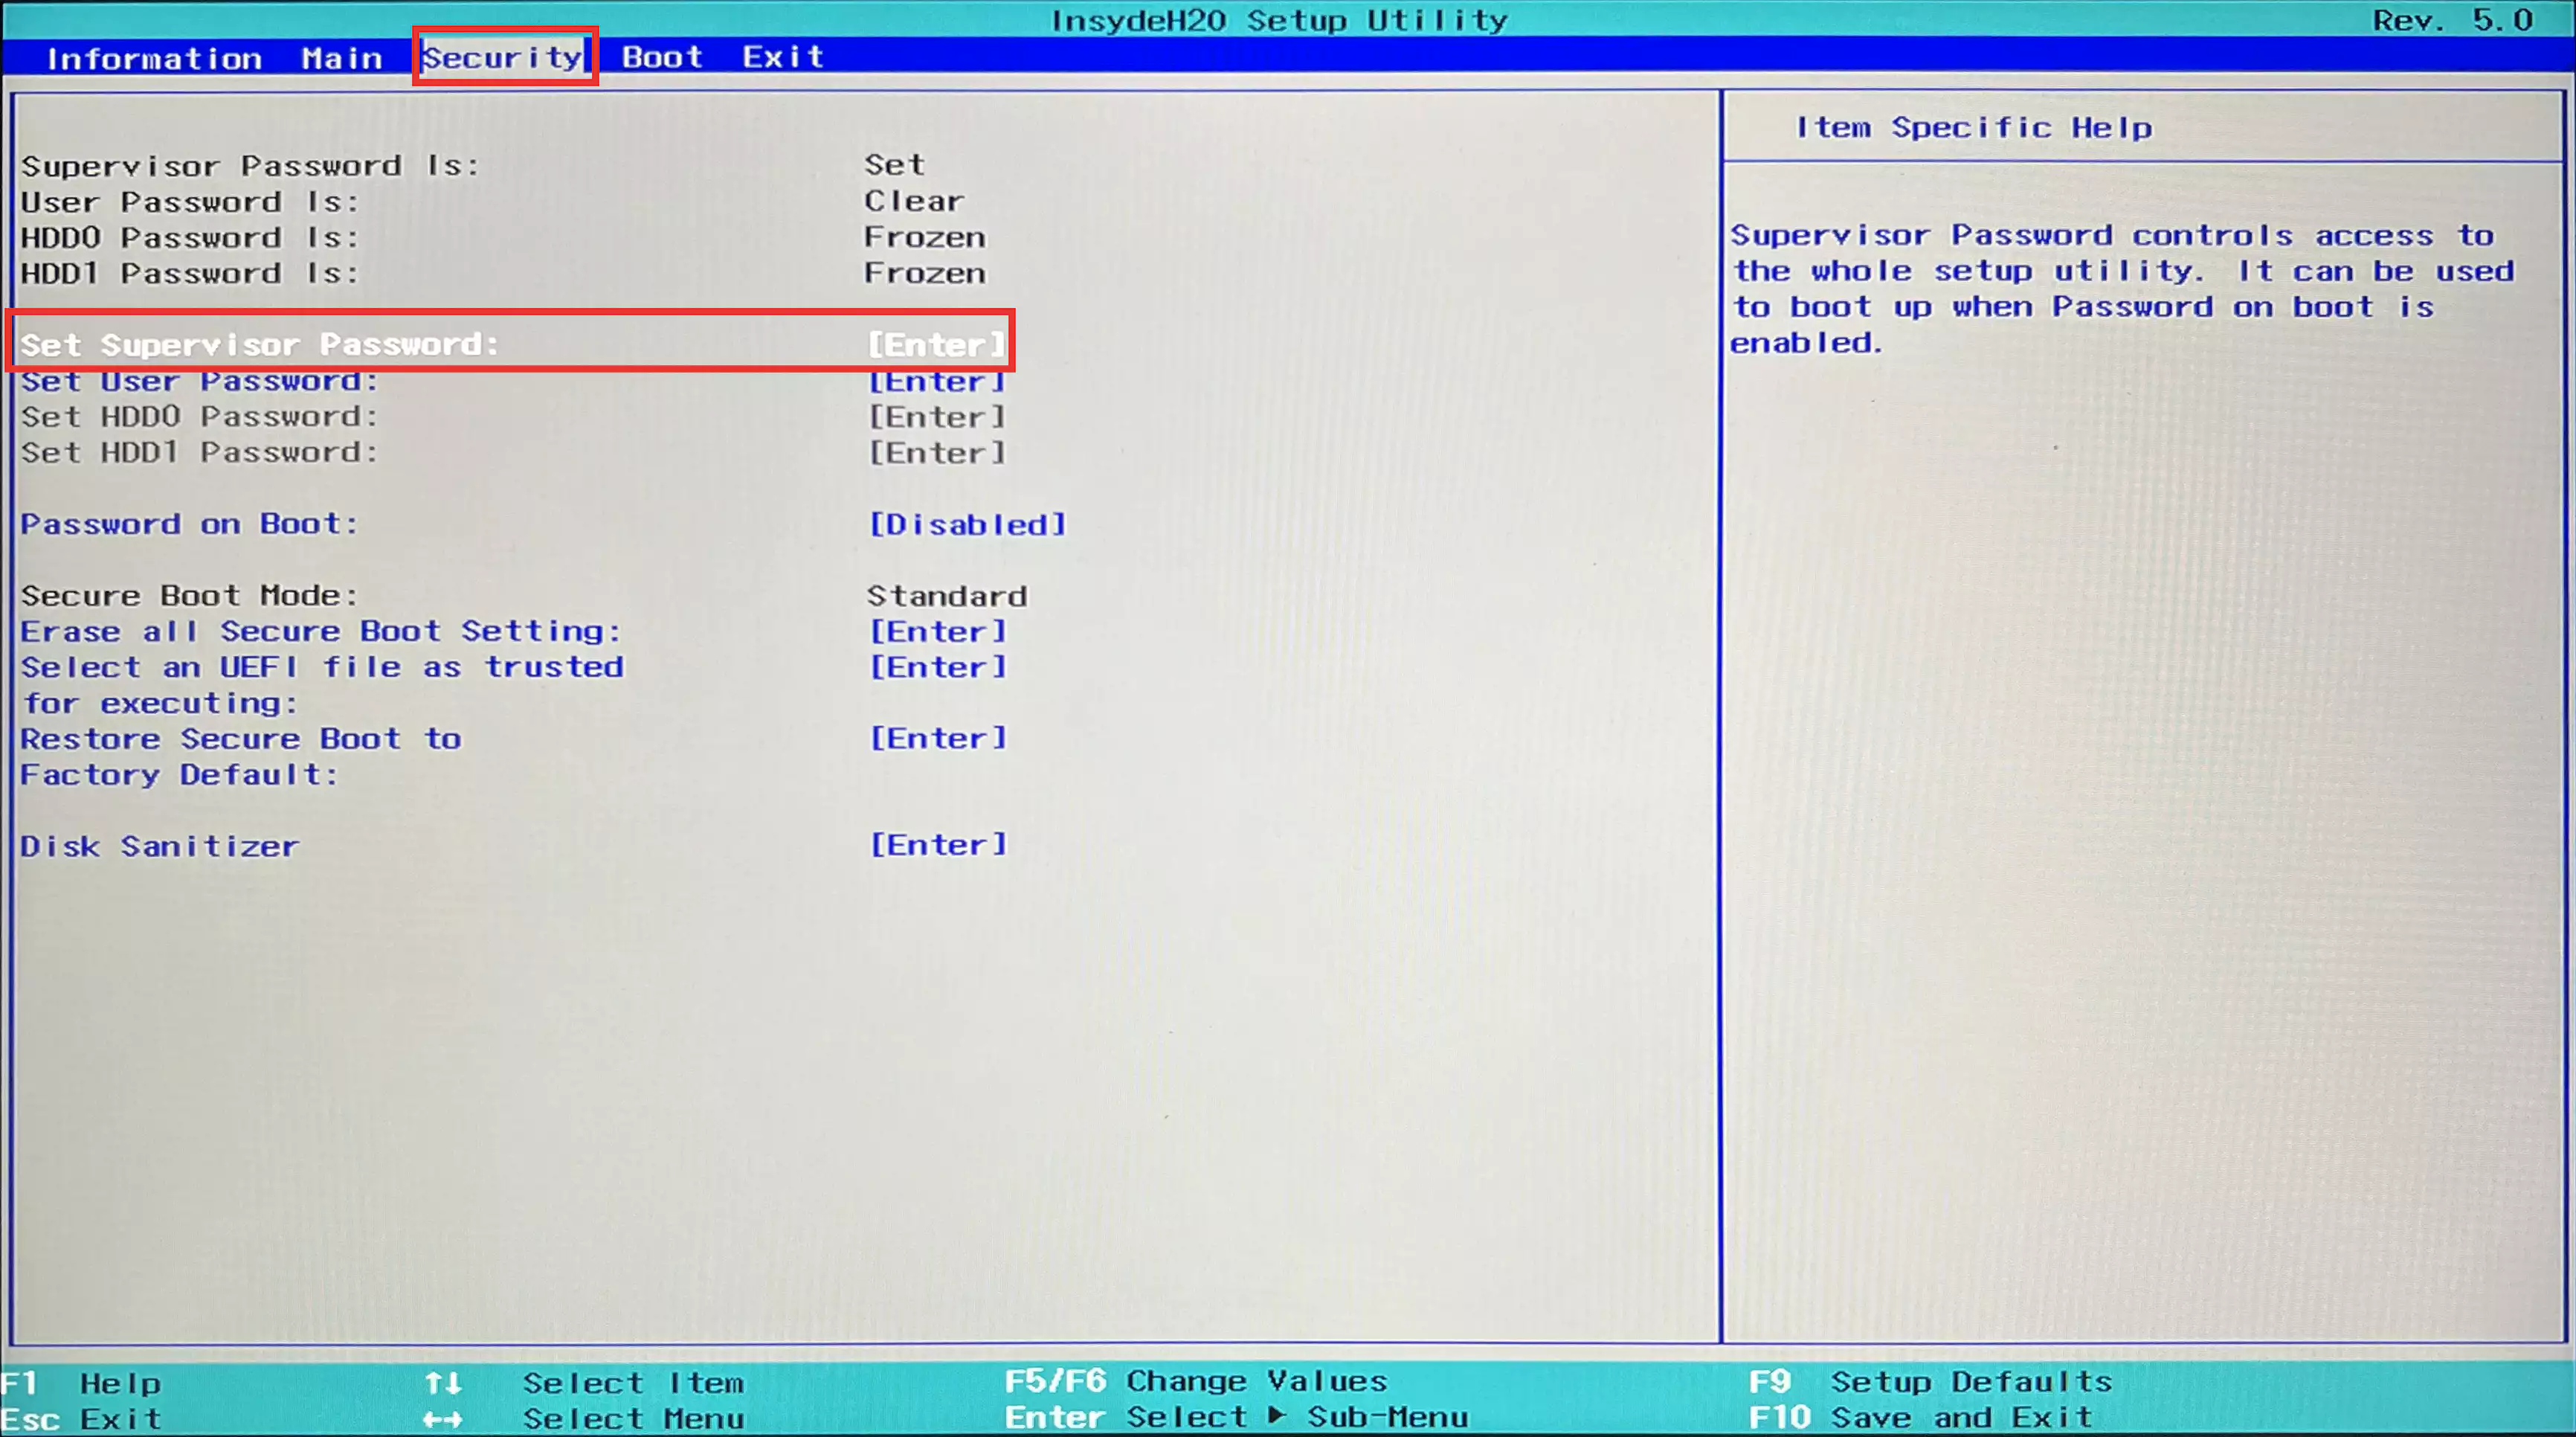
Securitymenu using the left and right arrow keys. - Before adding a trusted UEFI file, set a BIOS password. Move to the
Set Supervisor Passworditem using the up and down arrow keys and press Enter.- Remember this password, as you’ll need it to access the BIOS in the future.
![Set Supervisor Password.webp]()
- Remember this password, as you’ll need it to access the BIOS in the future.
- Move to the
Select an UEFI file as trusted for executingitem and press Enter.![Select an UEFI file as trusted for executing.webp]()
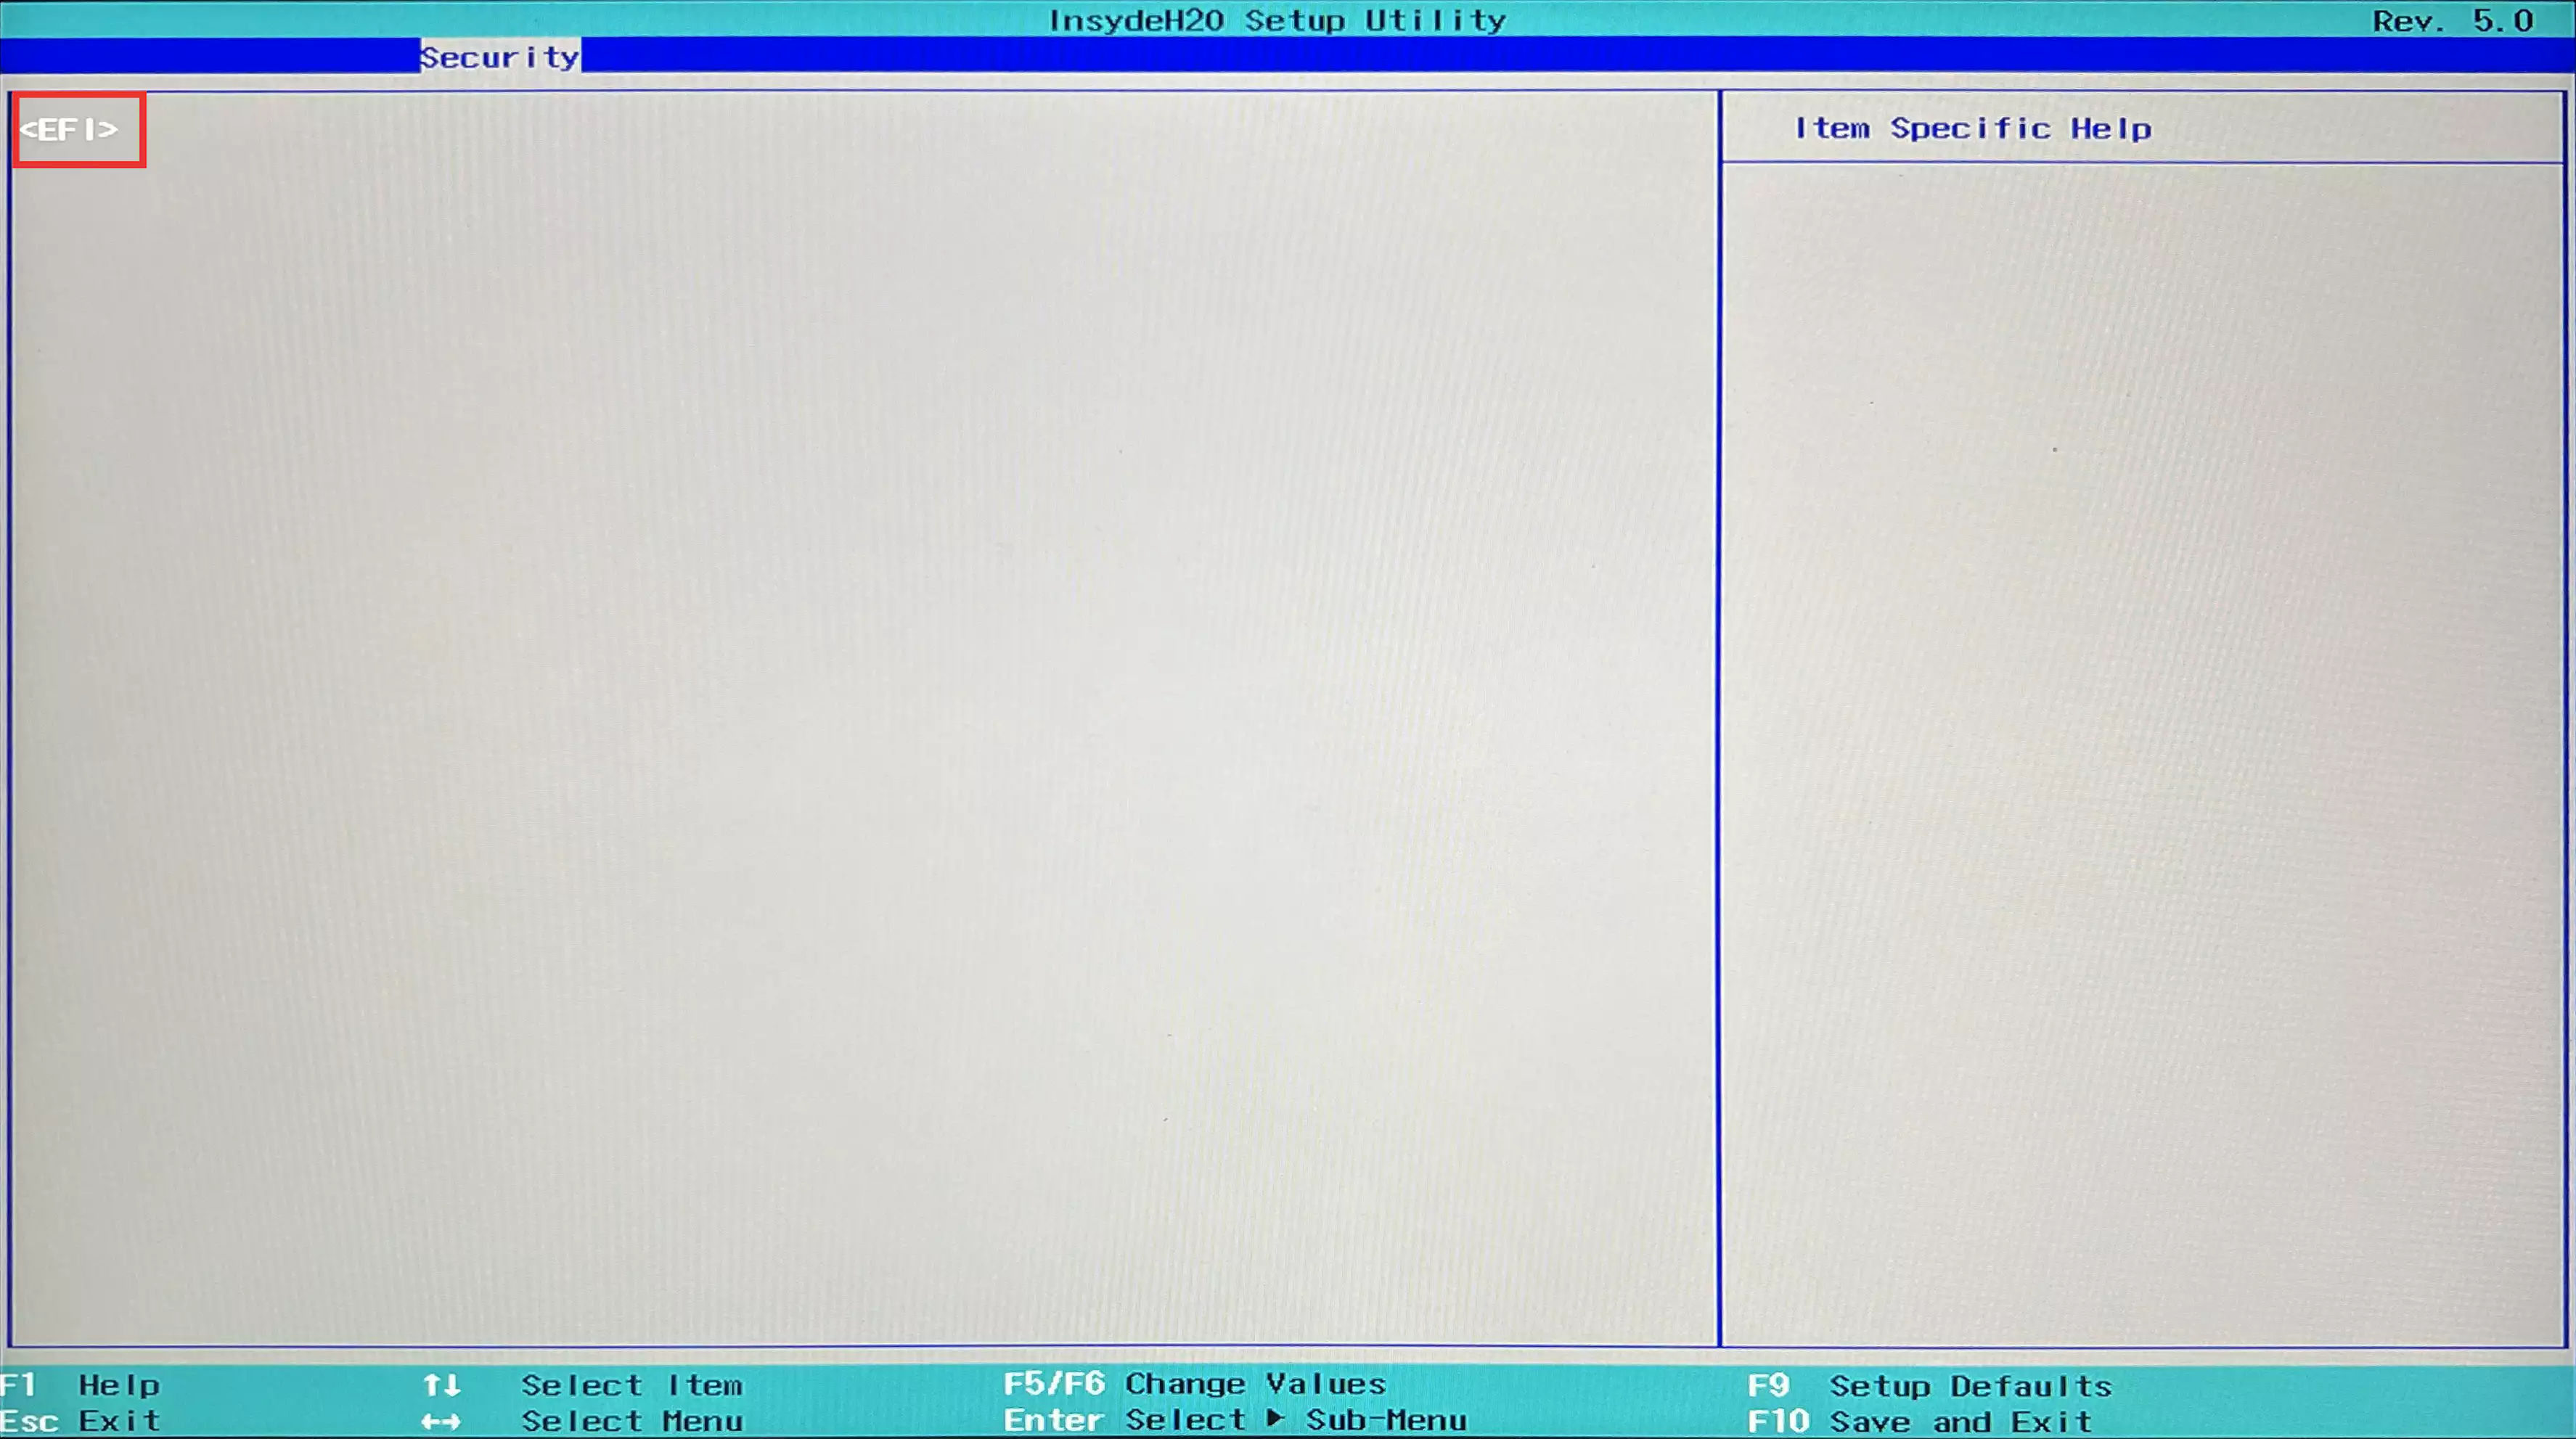
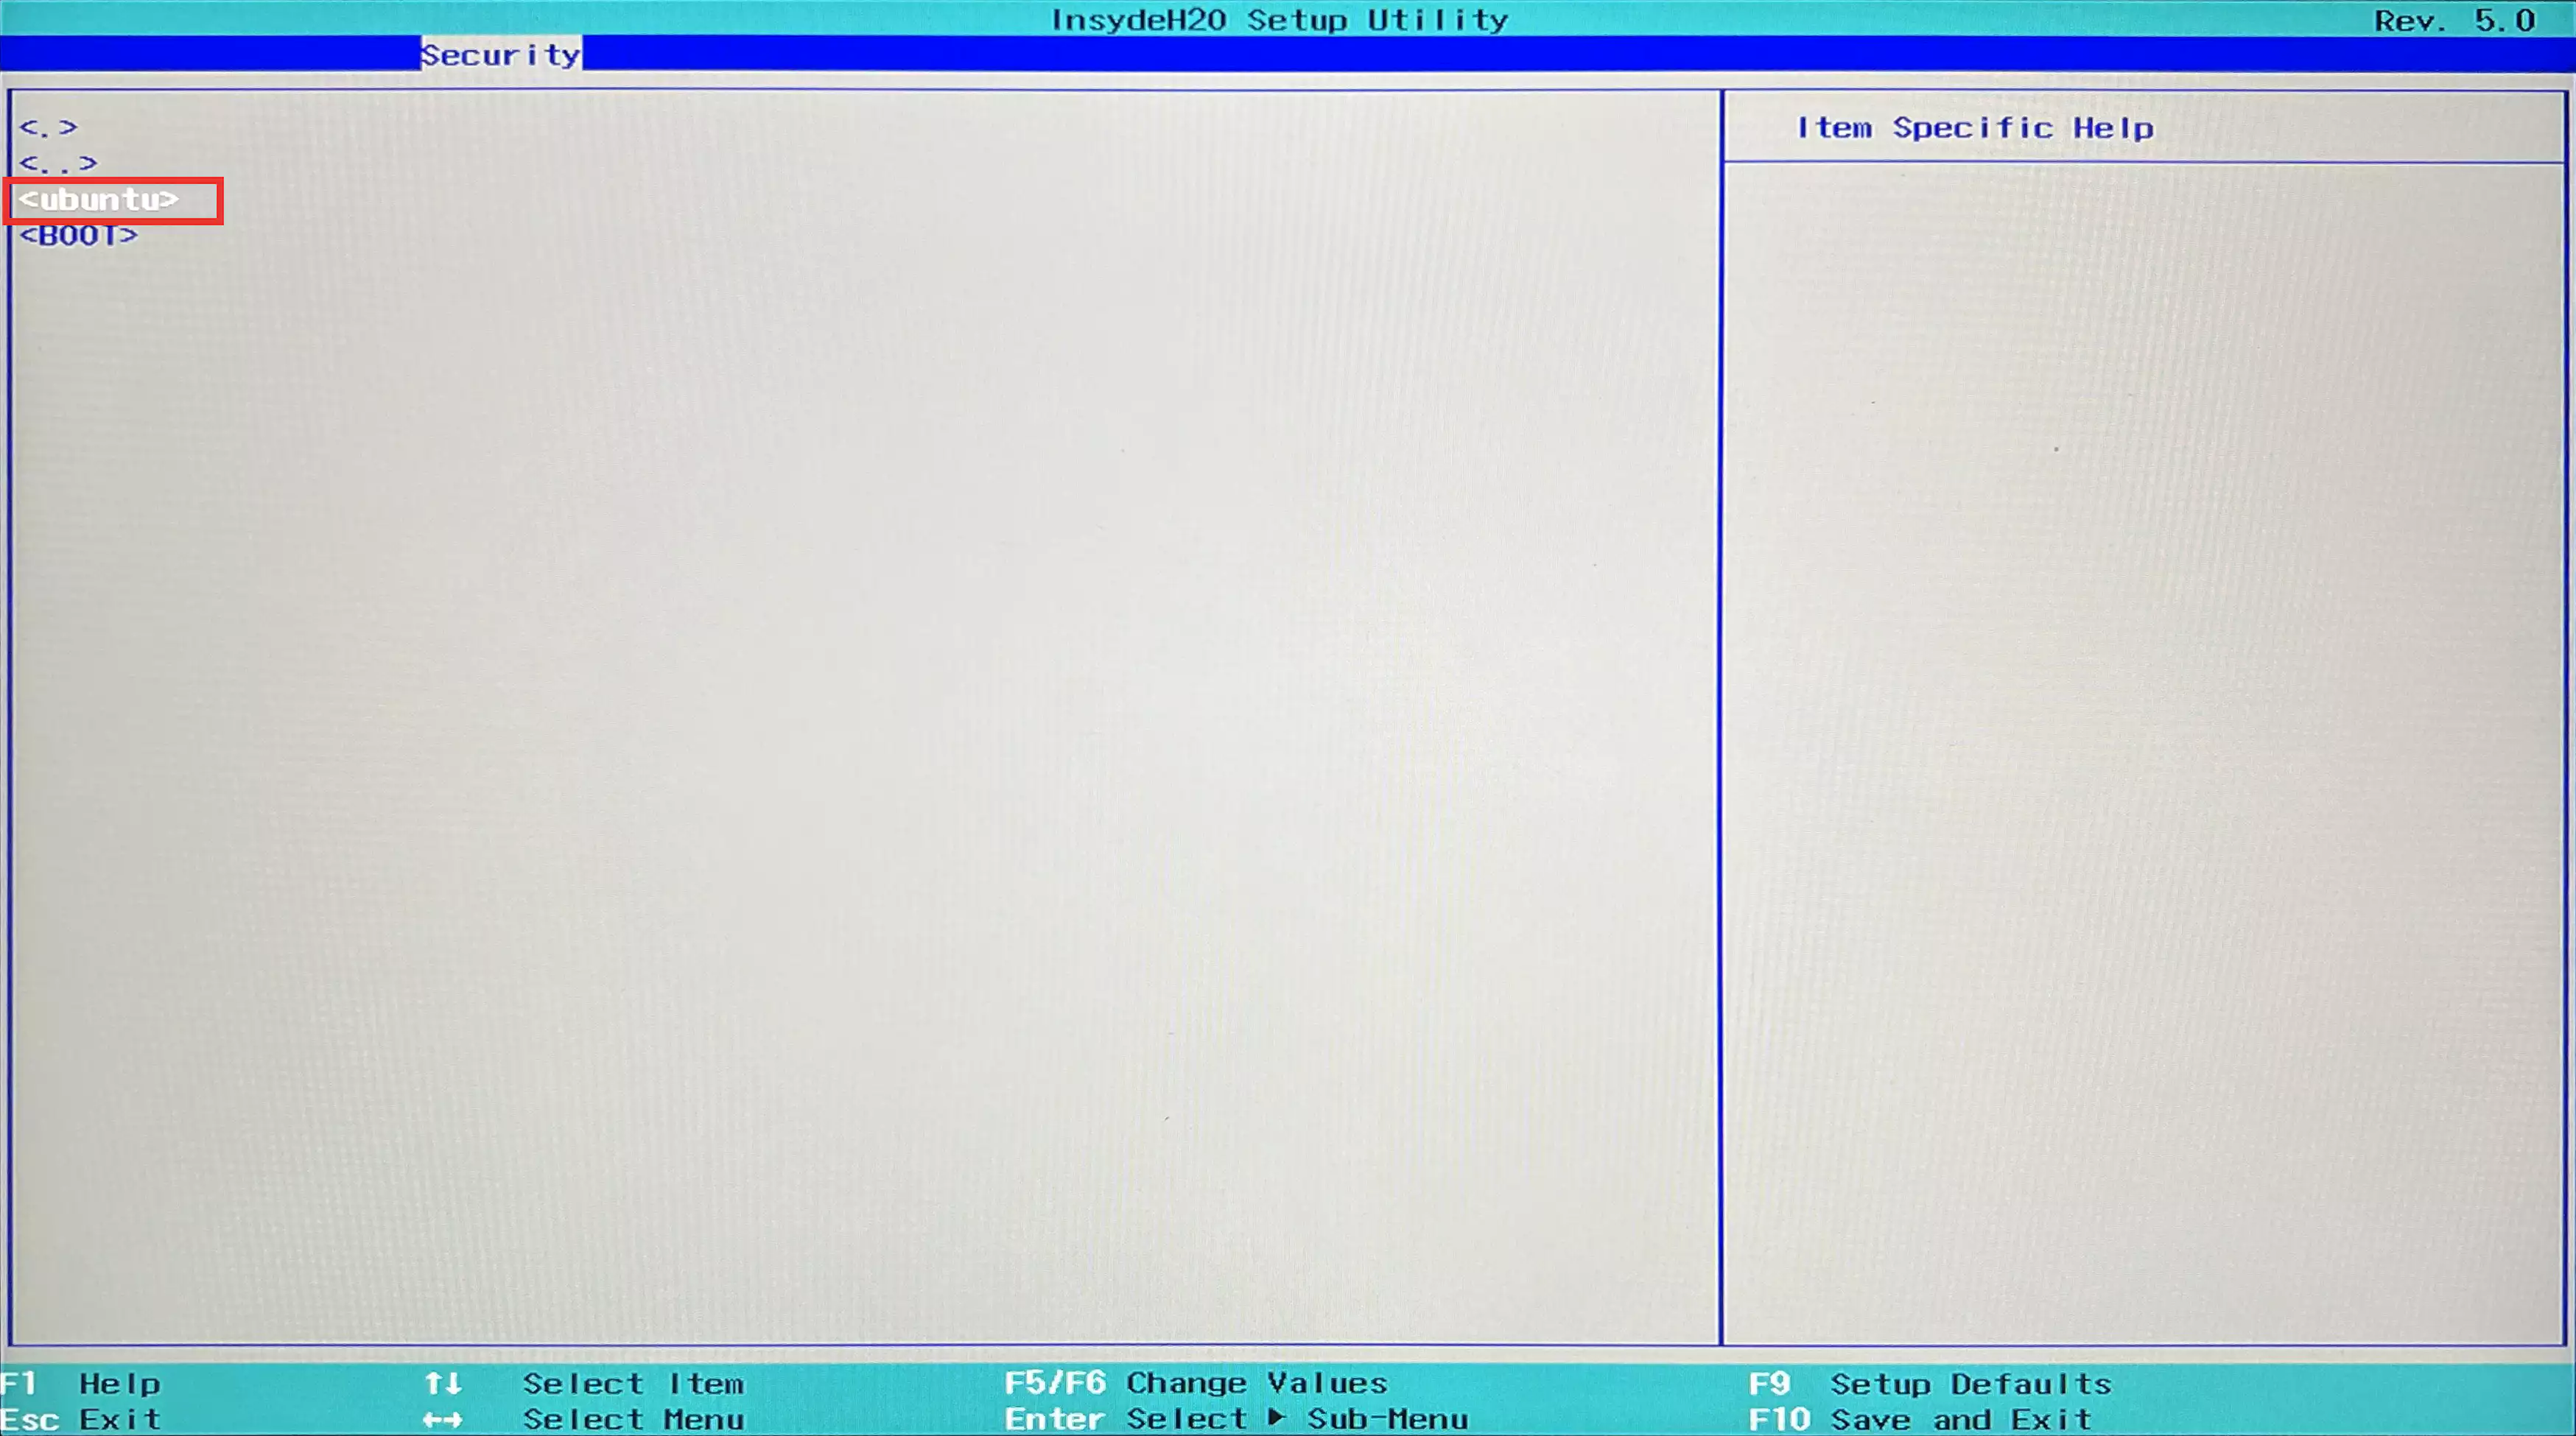
- Use Enter to select
HDD0/EFI/ubuntu/shimx64.efisequentially.![HDD0.webp]()
![EFI.webp]()
![ubuntu.webp]()
![shimx64.efi.webp]()
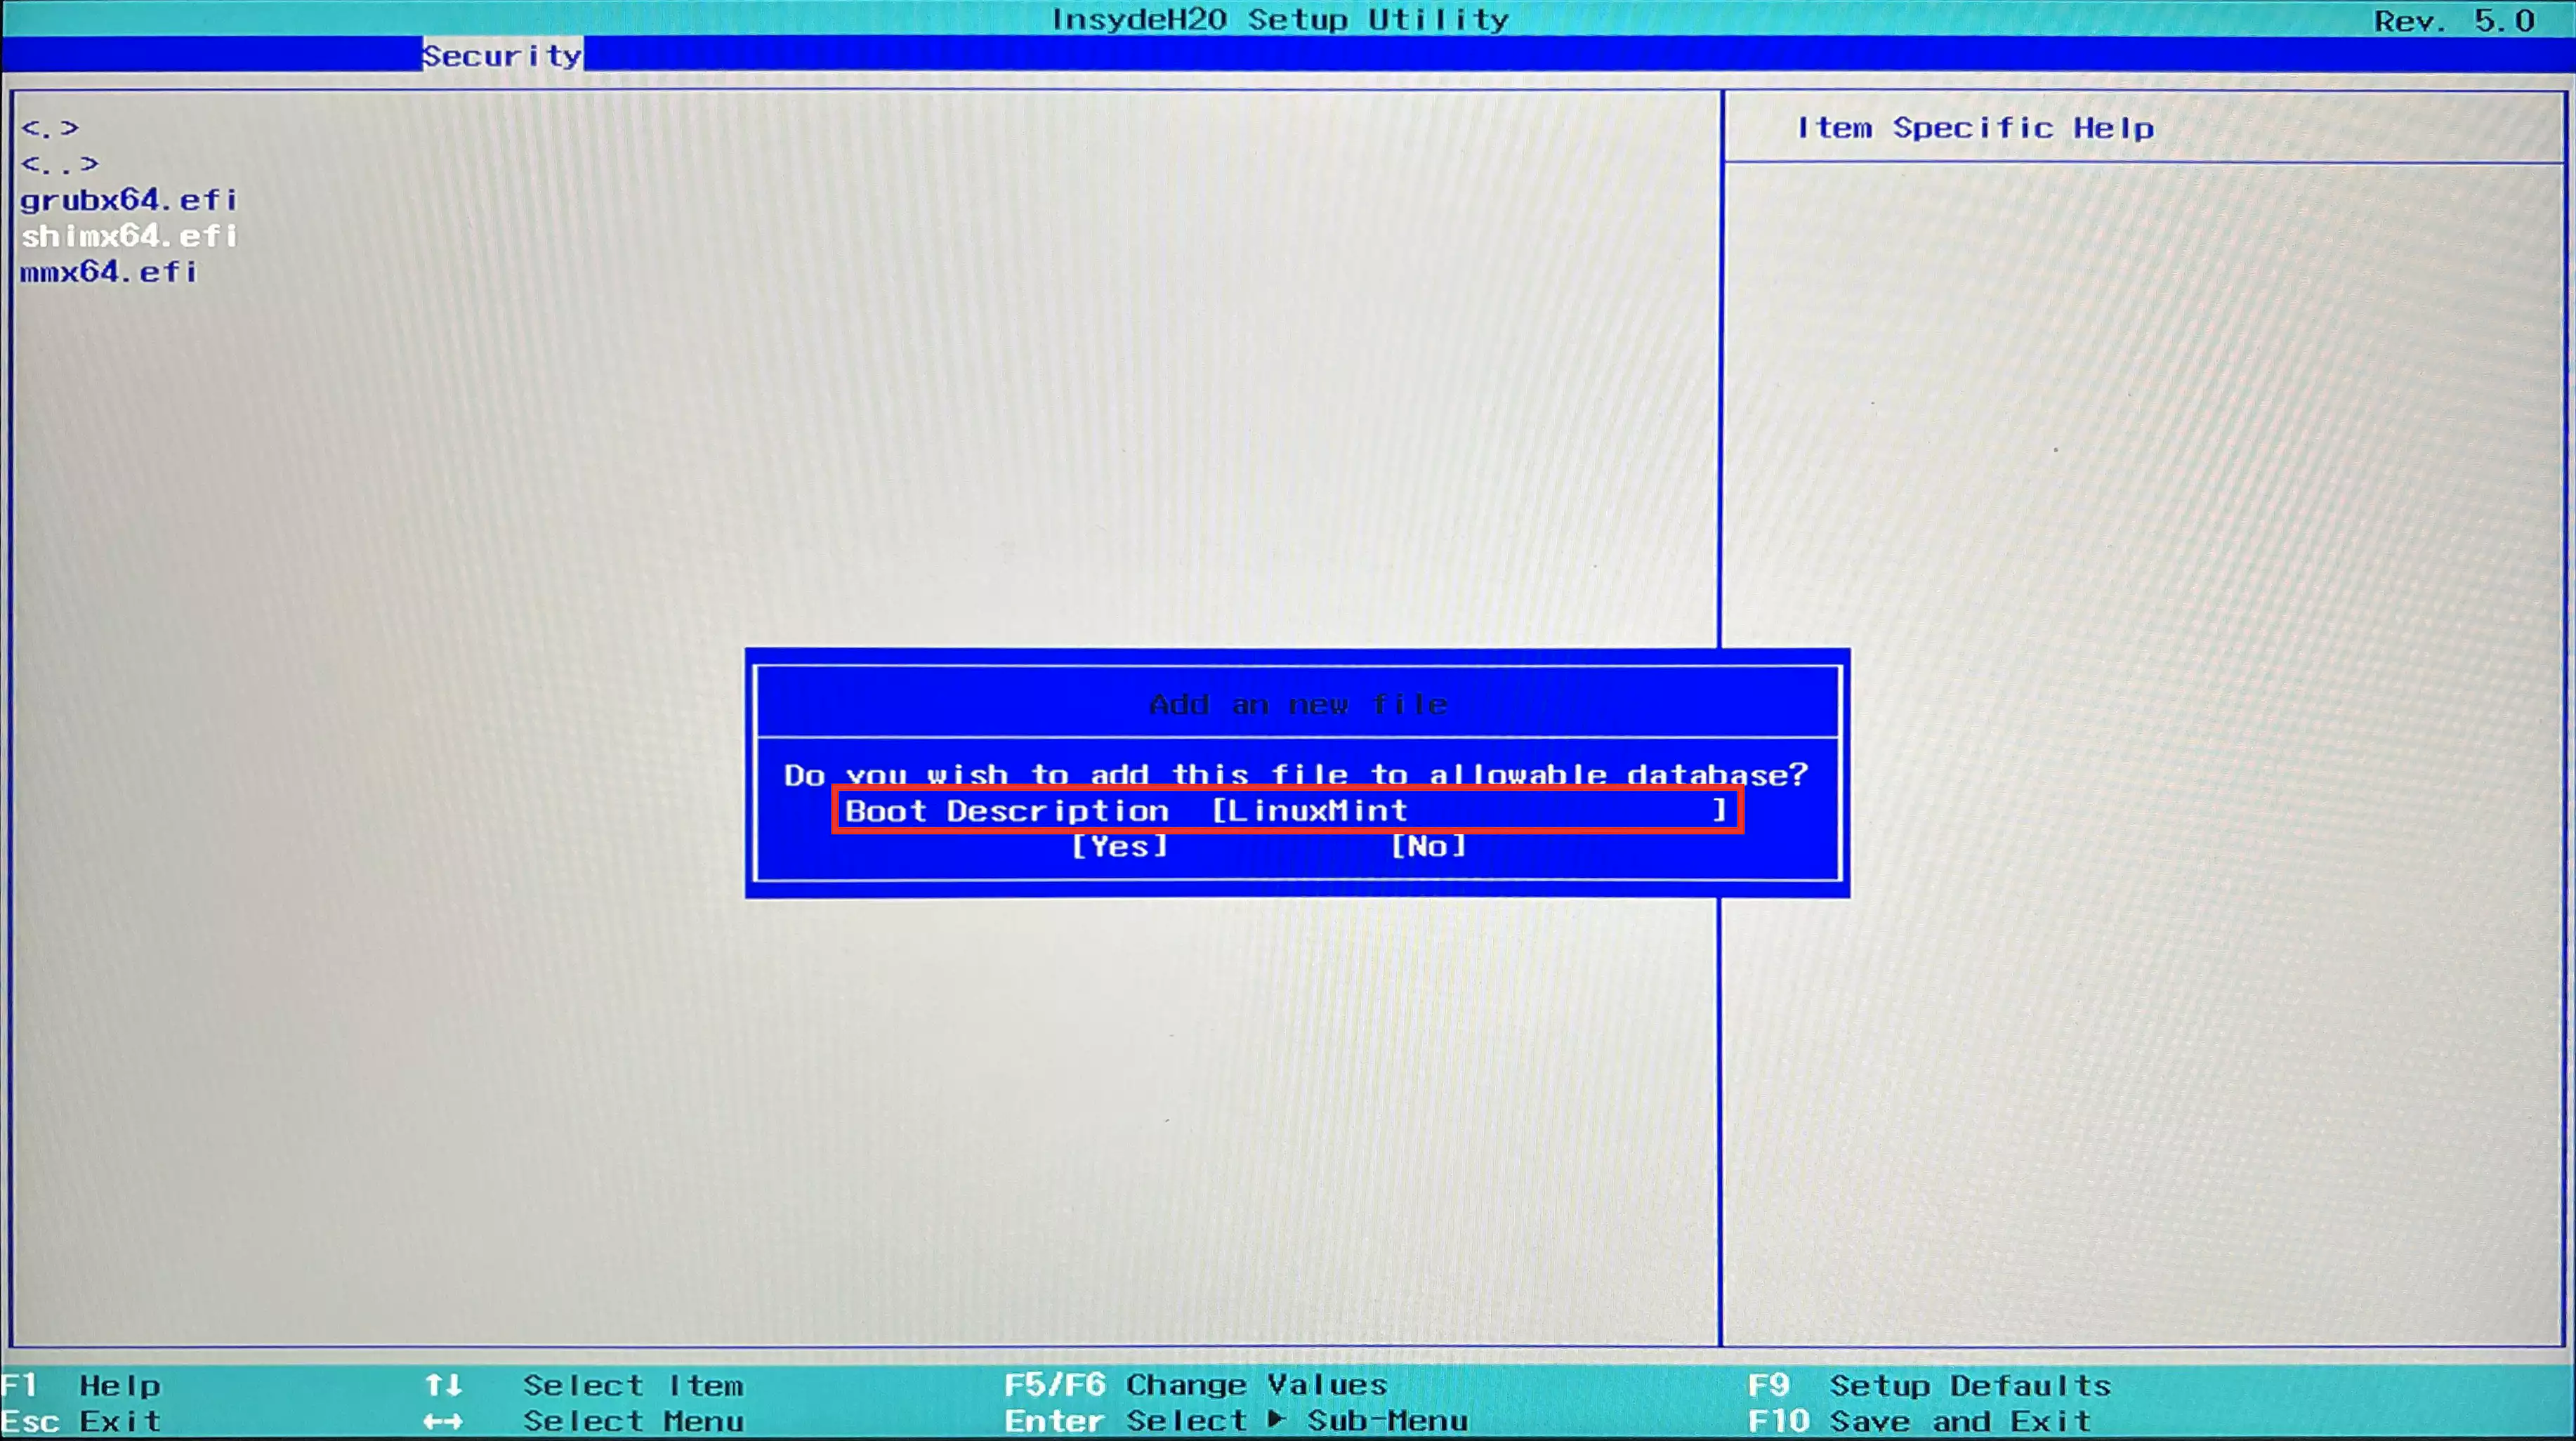
- Assign an alias for this EFI file in
Boot Description, such as LinuxMint.![Boot Description.webp]()
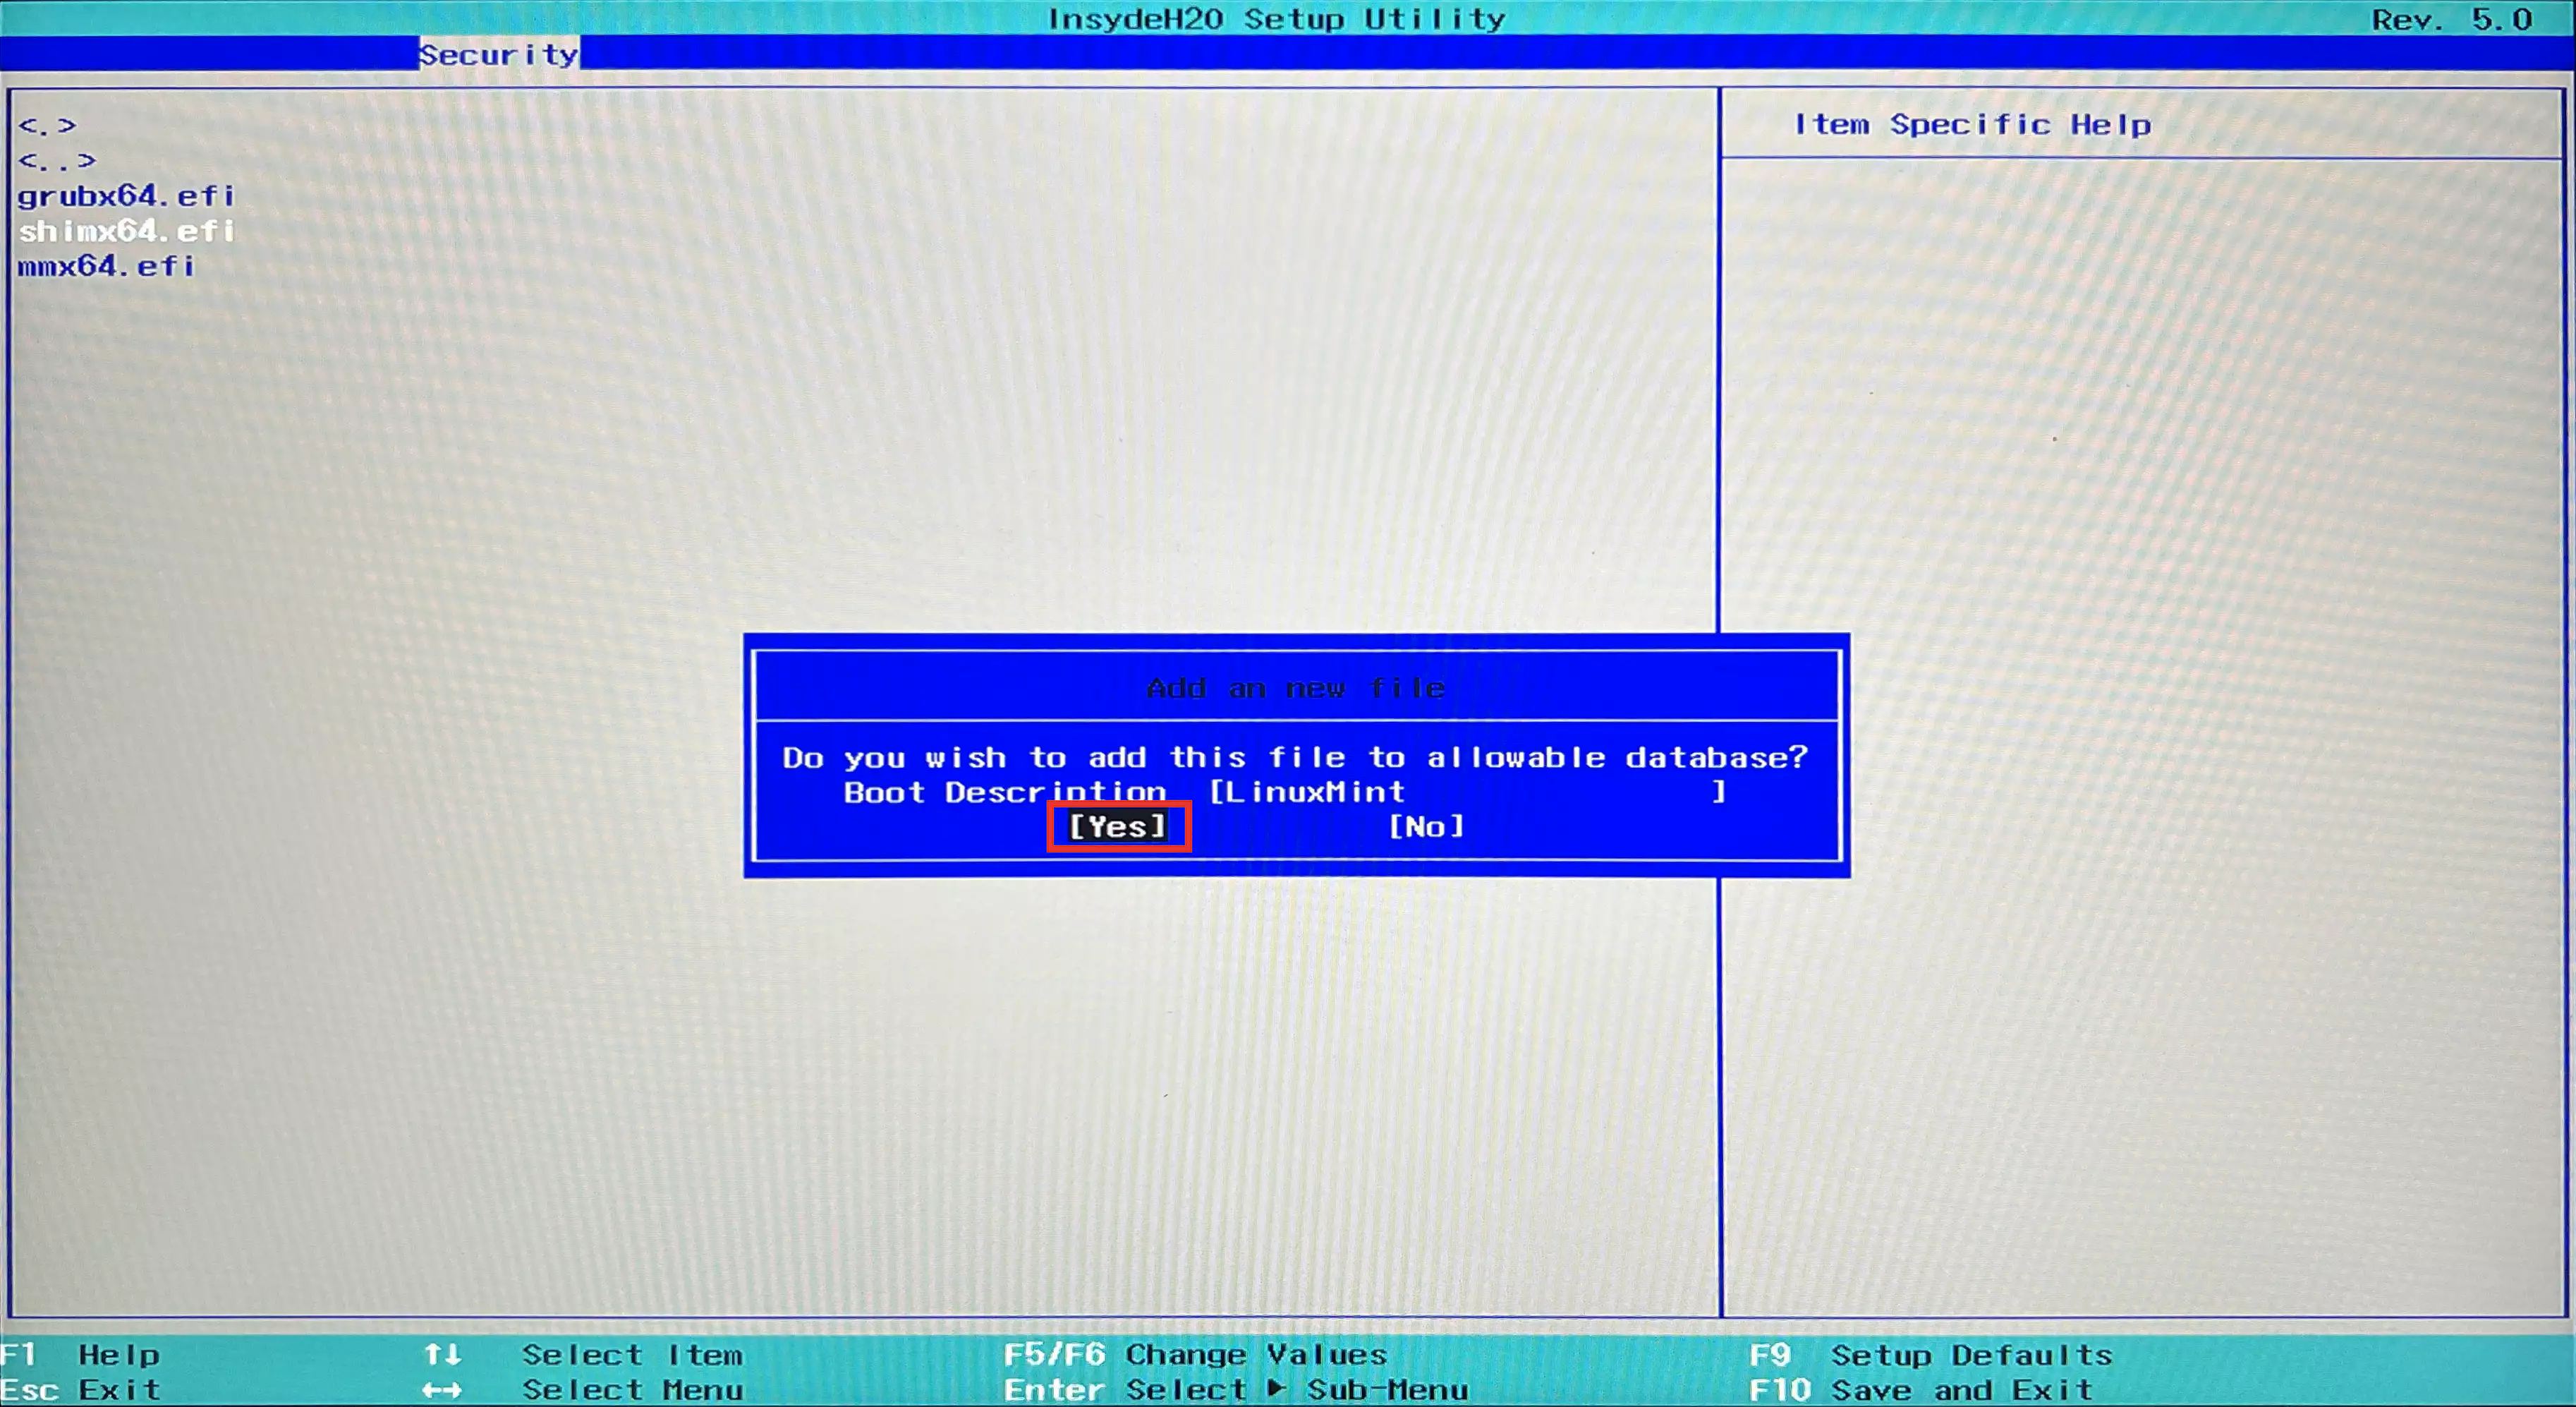
- Select
Yesand press Enter.![Yes.webp]()
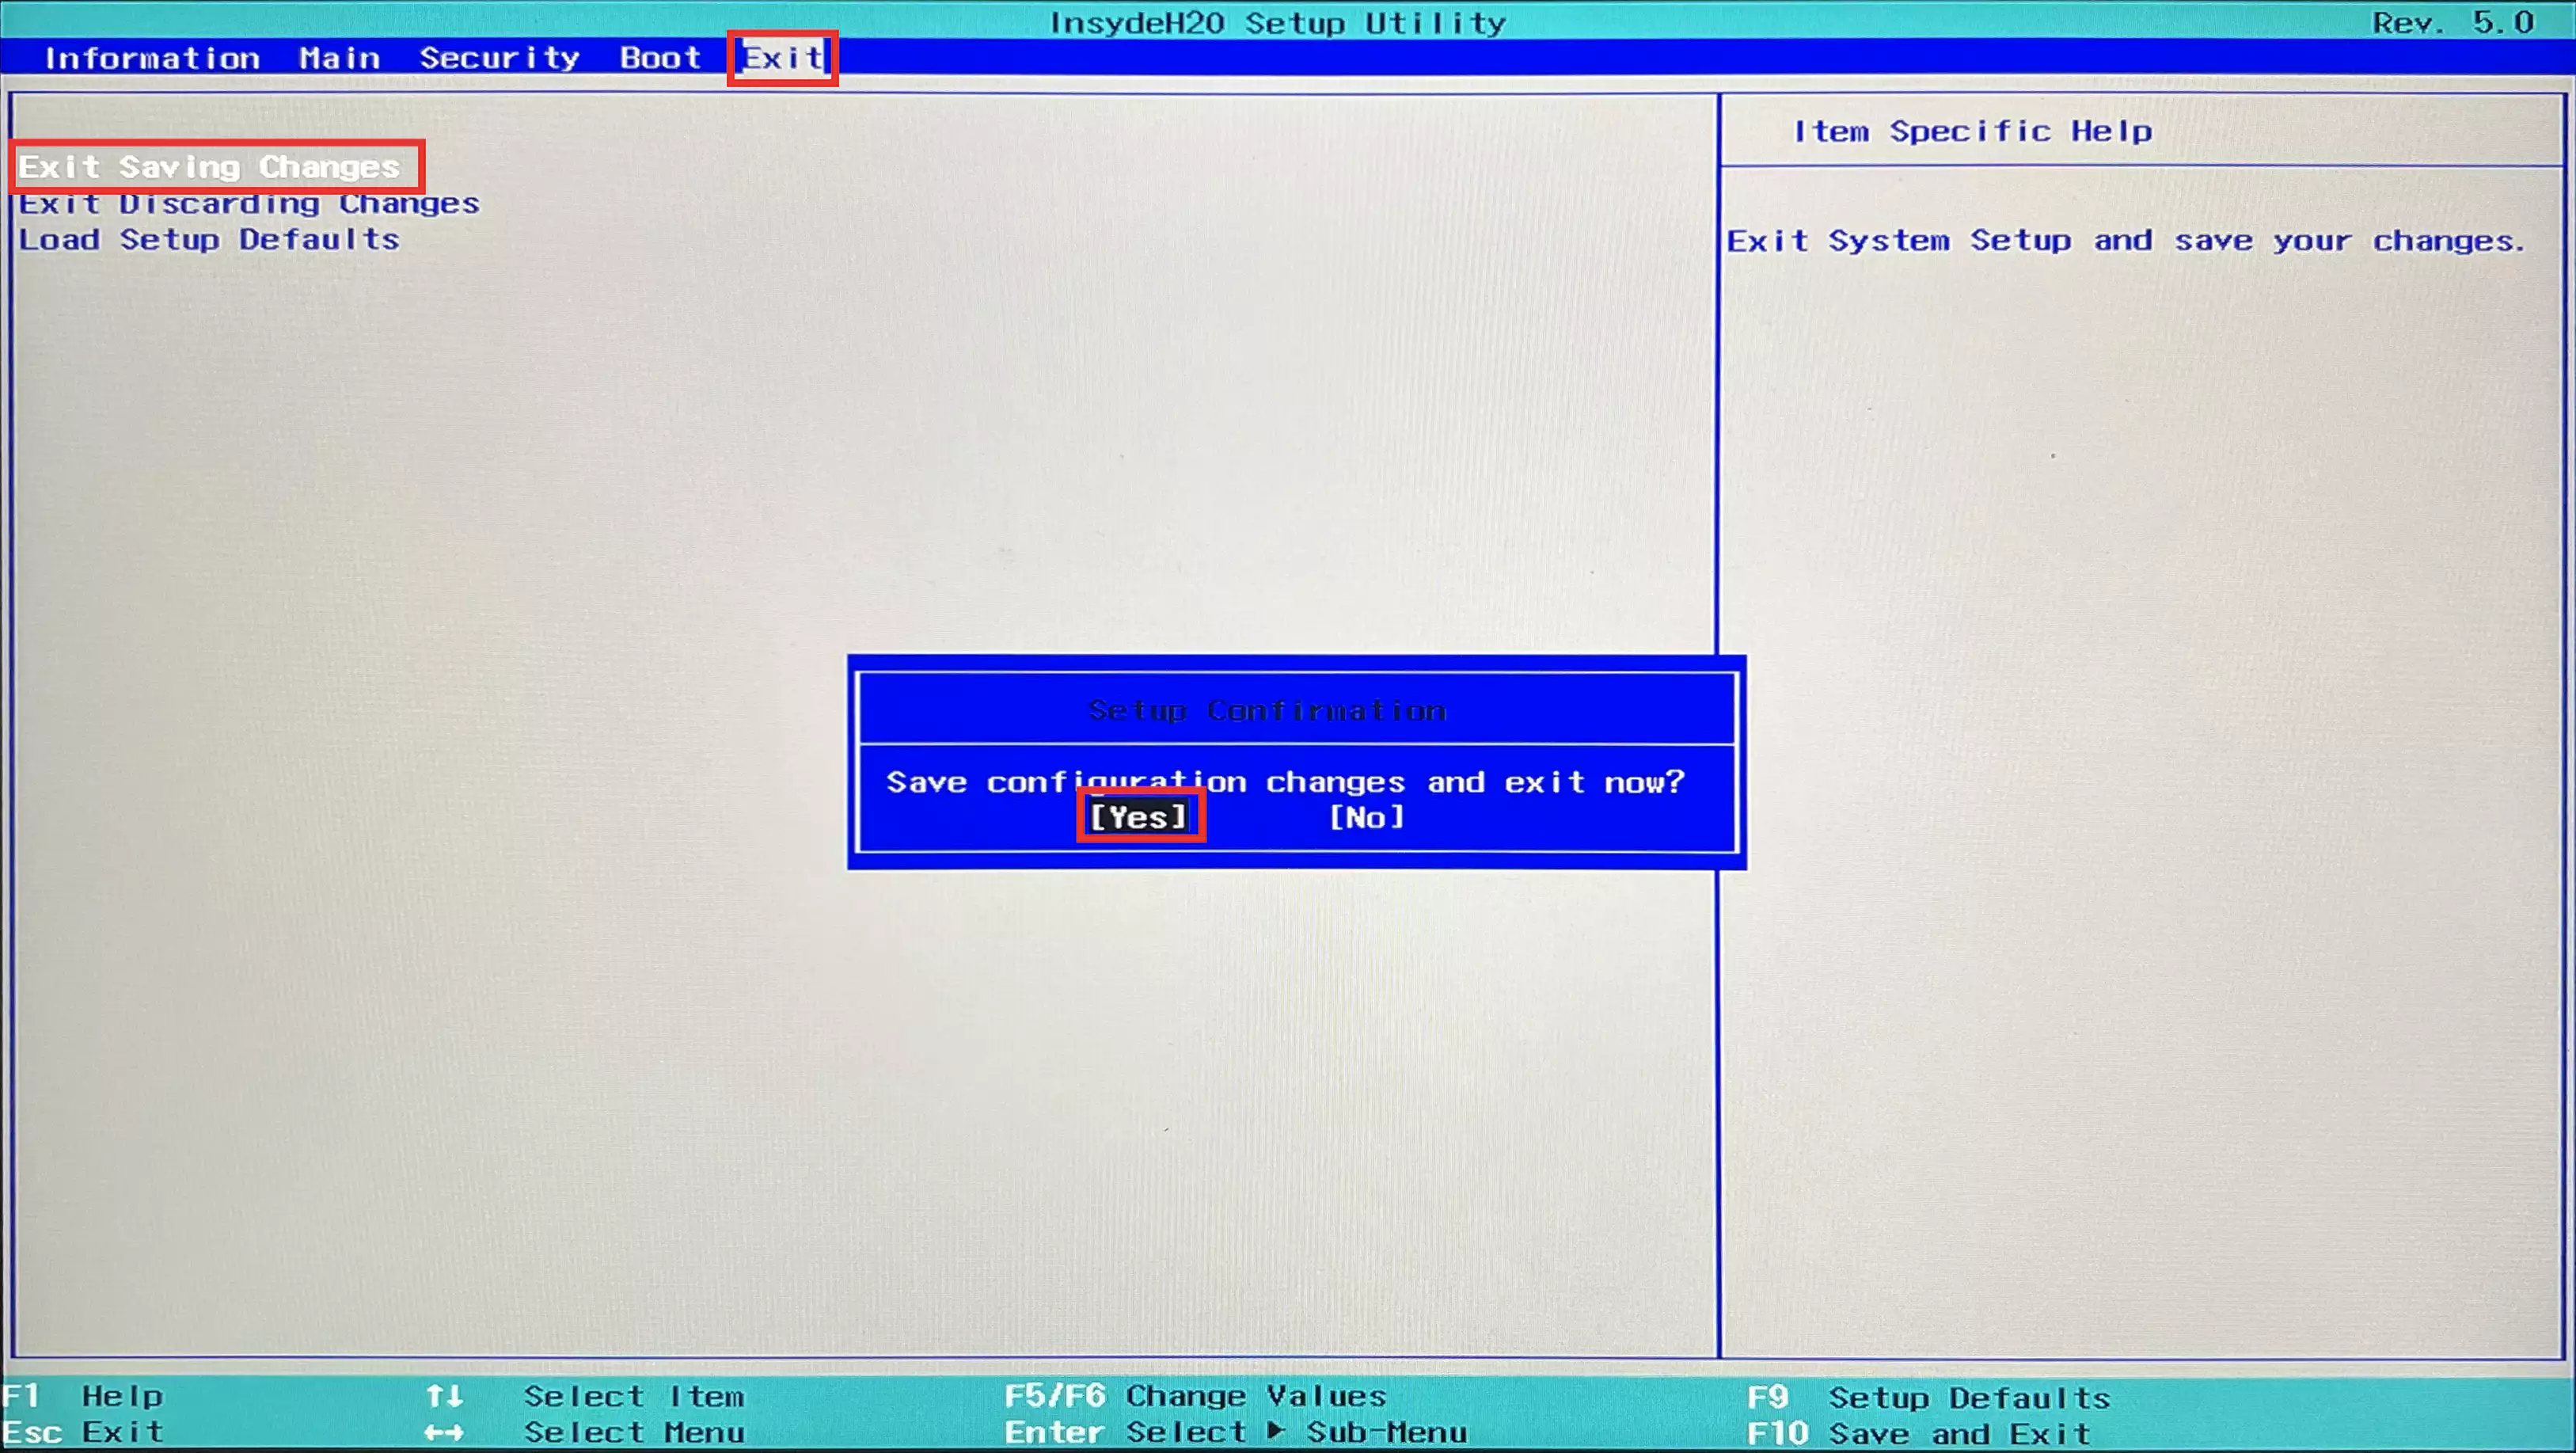
- Switch to the
Exitmenu using the left and right arrow keys. - Move to the
Exit Saving Changesitem using the up and down arrow keys, then press Enter.![Exit Saving Changes.webp]()
- Select
Yesand press Enter; your computer will reboot automatically. - If all goes well, you’ll now enter your operating system.


How to access the BIOS again
Once your boot settings are configured, accessing the BIOS through hotkeys might be tricky. Here’s a command for you: open the terminal and execute the following command. After a reboot, your computer will automatically enter the BIOS.
1 | sudo systemctl reboot --firmware-setup |
Cause
In a nutshell, the No Bootable Device issue arises when your computer employs UEFI boot with the Secure Boot feature enabled. Secure Boot mandates that the bootloader possesses Microsoft’s signature. However, the bootloader used by most Linux distributions, namely GRUB, lacks this signature, rendering it untrusted and consequently preventing its loading. What we’ve done above is manually added another bootloader, shim, signed by Microsoft, into the trusted UEFI database. Subsequently, shim undergoes Secure Boot authentication and loads GRUB, allowing Linux to boot successfully on a system with Secure Boot enabled.
PS: If your intention is to install Linux as the sole operating system, enabling the Legacy Boot function and disabling Secure Boot should serve as a simple workaround for this issue.
To be candid, my understanding of this topic is somewhat incomplete, so I’m taking this opportunity to consolidate my knowledge and jot down some notes. If you’re keen on delving deeper, feel free to read on! Additionally, given my limited expertise, any corrections or insights are warmly welcomed.
UEFI
UEFI (Unified Extensible Firmware Interface) is a firmware interface standard designed for initializing and managing the hardware and software of computer systems. It serves as a replacement for the traditional BIOS (Basic Input/Output System). Its primary functions include:
- Booting the Computer and Loading the Operating System: UEFI is responsible for starting up the computer and loading the operating system. It performs the task of executing the Boot Loader, which, in turn, loads the operating system kernel and transfers control to the operating system.
- Initializing Computer Hardware Components: UEFI initiates various hardware components of the computer, such as the CPU, memory, graphics card, and others.
- Allowing User Configuration of System Settings: Users can configure various system settings through UEFI, including boot order, hardware settings, date, and time.
- Managing Boot Devices: UEFI handles the management of boot devices, supporting a variety of options such as hard drives, optical drives, USB drives, and more. It can detect and identify available boot devices, loading the operating system according to a predefined boot sequence.
- Enhancing System Security: UEFI introduces the Secure Boot feature, requiring the operating system and drivers to be digitally signed for verification. This prevents unauthorized malicious software from loading during system startup.
GRUB
GNU GRUB (short for GNU GRand Unified Bootloader, commonly referred to as GRUB) is a boot loader package from the GNU Project. GRUB is the reference implementation of the Free Software Foundation’s Multiboot Specification, which provides a user the choice to boot one of multiple operating systems installed on a computer or select a specific kernel configuration available on a particular operating system’s partitions.
GNU GRUB was developed from a package called the Grand Unified Bootloader (a play on Grand Unified Theory[6]). It is predominantly used for Unix-like systems.
However, certain versions of GRUB may lack Microsoft’s signature, leading to issues on computers with Secure Boot enabled.
Secure Boot
Secure Boot is a security verification mechanism introduced by the UEFI standard. Its purpose is to ensure that during the boot process, a computer can only load bootloader and operating system kernels signed by trusted signing authorities, protecting the system from the impact of malicious code loaded and executed early in the boot process, such as Rootkits and Bootkits.
Secure Boot mandates that the bootloader and operating system kernel undergo verification using digital signatures. Digital signatures are generated by a private key and then verified using the public key of the relevant authority. Only bootloaders and operating systems signed with trusted keys can pass the verification.
Most x86-based computers come pre-installed with Microsoft keys. Consequently, the firmware of these computers trusts binary files signed by Microsoft. Microsoft, being the certification authority (CA) for Secure Boot, can also issue signatures for programs from other trusted organizations. The shim bootloader, used by many Linux distributions, includes a certificate signed by Microsoft, enabling Linux to smoothly boot on systems with Secure Boot enabled.
shim
shim is a bootloader designed to launch operating systems on computers with Secure Boot enabled, even if the default bootloader of these operating systems is not directly pre-installed or signed by the hardware manufacturer. It provides a universal solution for booting different operating systems in a Secure Boot environment while maintaining support for open-source and unsigned kernel modules.
To pass Secure Boot verification, shim includes a certificate signed by Microsoft. The public key of this certificate is embedded in many UEFI firmwares, allowing the code signature of shim to pass Secure Boot validation.
Once shim successfully undergoes Secure Boot verification, it loads the default bootloader of the Linux operating system, typically GRUB2. This process establishes a secure boot chain, ensuring that trusted code controls the system throughout the entire boot process.
The relationship between shimx64 and shim is analogous to that of x86-64 and x86. Shim is used to launch 32-bit operating systems, while shimx64 is employed for launching 64-bit operating systems.
ESP
EFI System Partition, also known as ESP, is an OS-independent partition typically formatted in FAT or FAT32 file systems with a size usually around 100MB. It holds essential components required for UEFI booting, including bootloaders, applications, and drivers provided by the UEFI firmware.
The ESP doesn’t appear in Windows File Explorer but is visible in Disk Management. In Linux, the ESP is treated as a regular partition and can be directly mounted using the mount utility to its corresponding block device, often mounted at /boot/efi.
The EFI System Partition comprises a top-level directory named EFI, which may contain multiple subdirectories, each corresponding to an operating system or bootloader. The names of these subdirectories typically align with the operating system or bootloader identifiers.
EFI Directory Analysis
Here is the EFI directory structure on my laptop:
- HDD0/EFI/
- ubuntu
- grub.efi
- shimx64.efi
- mmx.efi
- boot
- grub.efi
- shimx64.efi
- ubuntu
In most cases, the primary boot entries should be utilized from the /HDD0/EFI/[operating_system] directory(here is ubuntu), while the entries in the /HDD0/EFI/boot directory serve as backups. If the main bootloader becomes damaged, the backup entries can be used as alternatives to ensure the system continues to boot.
Regarding mmx.efi, there is limited information available. According to discussions on Ask Ubuntu, it was originally named MokManager.efi, and Ubuntu renamed it to mmx.efi. It functions as a tool for managing keys in Secure Boot.
Boot Process
In the presence of Secure Boot, the typical boot process unfolds as follows:
- The computer starts, and the UEFI firmware initiates the boot process.
- UEFI initializes system hardware and performs pre-boot self-checks.
- UEFI loads
shimx64.efiand verifies its digital signature. shimx64.efiverifies the digital signature ofgrub.efi.- If the signature of
grub.efiis valid,shimx64.efiloads and executes it. grub.efifurther loads the operating system kernel and other necessary components, initiating the system.grub.efiloads and launches the Linux kernel, transferring control to the operating system.- The operating system kernel initializes and loads the root file system, booting the Linux Mint operating system.
MBR and GPT
MBR (Master Boot Record) and GPT (GUID Partition Table) are two different disk partition table formats.
| Difference | MBR | GPT |
|---|---|---|
| Structure | A 512-byte sector located at the first sector of the disk (LBA 0), containing the partition table, boot code, and a disk signature | Each disk sector contains a GPT header and one or more GPT entry arrays. The GPT header includes metadata about the disk, such as the location and size of the partition table, and the disk’s unique identifier (GUID) |
| Capacity | Uses 32-bit addressing (LBA) to represent the starting position and size of partitions, limiting support to disks smaller than 2TB | Uses 64-bit addressing (LBA), allowing support for larger disks (up to 18TB) |
| Partitions | Supports up to four primary partitions, or three primary and one extended partition | Supports more partitions, the limit depends on the operating system and implementation, with Windows supporting up to 128 primary partitions |
| Partition Identification | Each partition has a 1-byte identifier indicating the partition type (e.g., FAT32, NTFS) | Each partition has a globally unique identifier (GUID) to identify the partition type, eliminating the need for MBR’s partition identifier |
| Booting | Contains code for the bootloader used to initiate the operating system. Booting is handled by the traditional BIOS | Uses an EFI partition to store the bootloader, eliminating the need for boot code at the beginning of the disk. Booting is typically managed by UEFI |
If you are using the combination of UEFI and MBR, you would need to enable the Legacy Boot/CSM feature to emulate the traditional BIOS boot process, but this approach is not recommended.