Tutorial for Making a Paint Job Mod in Euro Truck Simulator 2
You may not believe it, but I started playing ETS2 because I wanted to learn how to drive in the UK, but I couldn't find the perfect paint job for the game, so I made my own.
This post was translated from my Chinese blog post with the aid of ChatGpt.
Preparation
Before creating a MOD, you need to download some tools and templates:
- Paint Job Packer, used to generate MOD folders, including dds files for some paint job templates. It’s recommended to choose the installation package with templates:
Windows with included templates. - ETS 2 Template Pack, containing all the paint job templates you might need, including various truck and trailer models. It supports truck tuning DLCs and trailer DLCs. It serves as a complement to the Paint Job Packer because the templates generated by the Paint Job Packer might not cover everything.
- PhotoShop DDS Plugin, as Photoshop cannot directly save dds files.
- TOBJ File Editor, TOBJ stands for Texture Object file, which is an SCS file format used to configure texture information. A portion of the TOBJ file is written in hexadecimal, making it inconvenient for manual modification. Hence, a tool has been developed by gaming enthusiast to ease this process.
The texture files used for the paint job are in DDS format. The following software can edit DDS files, and I’m using PhotoShop:
- PhotoShop (requires additional installation of DDS plugin)
- GIMP
- Paint.NET
Installing the DDS Plugin
Place the downloaded plugin file (.8bi) into the “ /Required/Plug-ins/File Formats” folder within the Photoshop directory. Then, open Photoshop and if you see DDS listed under Help -> About Plug-in..., it indicates a successful installation.
Creating Local MOD Files
Below, I will guide you step by step through the process of creating a paint job that supports Scania R and S series trucks, default trailers, and trailers from the Krone DLC, for demonstration purposes.
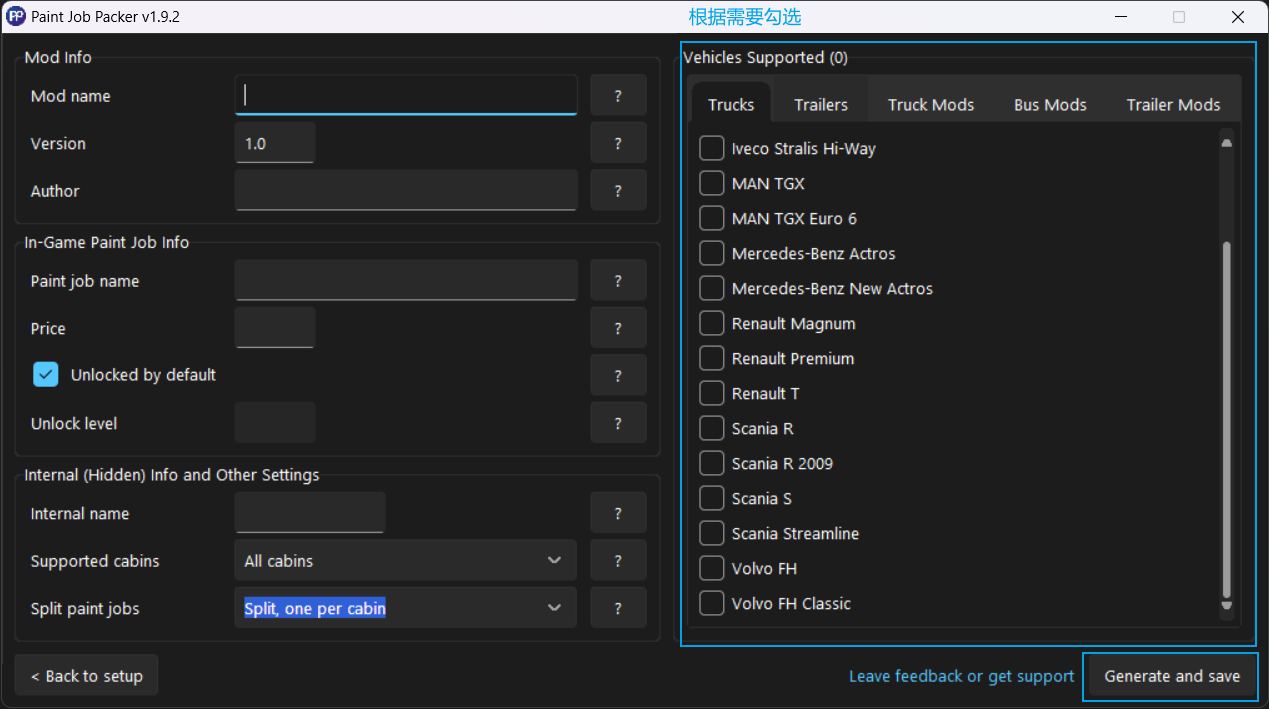
Start by installing and opening the Paint Job Packer. This tool supports both Euro Truck Simulator 2 and American Truck Simulator. For this demonstration, I will choose Euro Truck Simulator 2 and proceed.
Here, you can choose to create paint jobs for a single truck model (such as Scania R series) or a single trailer (like the Krone refrigerated trailer). Alternatively, you can opt to create a collection of paint jobs for multiple truck models and various trailers. In this case, I’ve chosen the latter option, the Paint Job Pack.
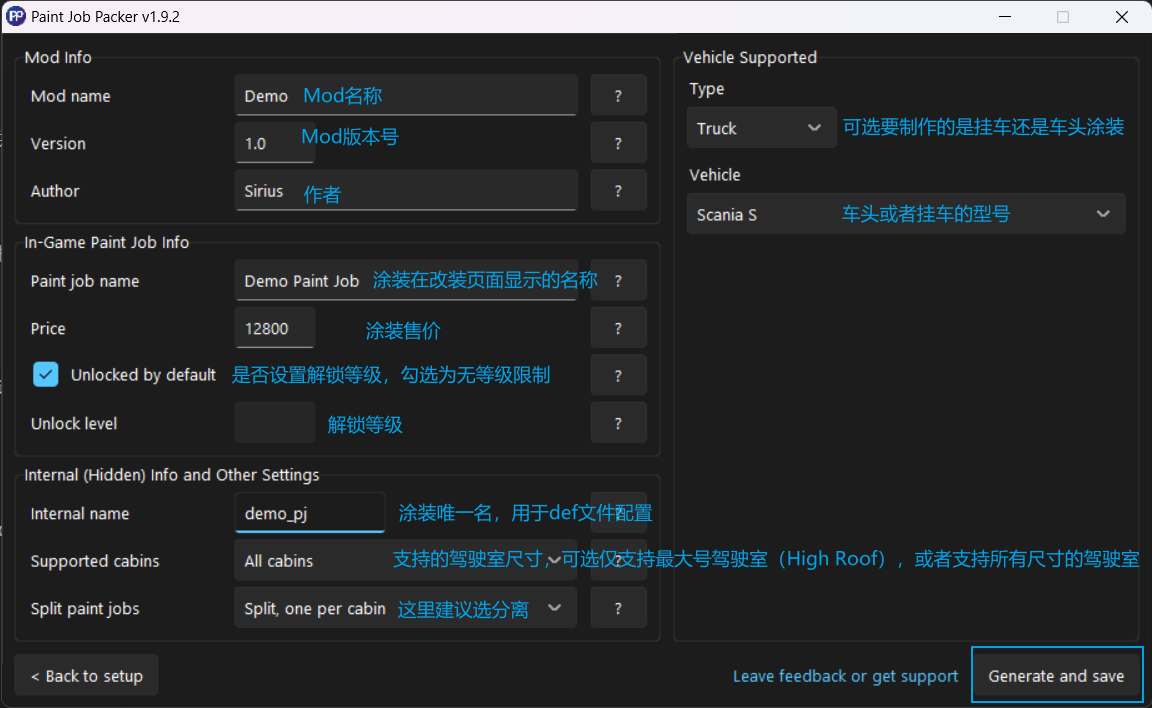
Next, you’ll need to fill in the basic information for your MOD. If there’s anything unclear, you can click the question mark next to each item for explanations. Let’s focus on the following three points:
Internal Name: This is like a unique ID for the paint job, so it’s best to make it distinct to prevent conflicts with other paint jobs.
Supported Cabins: If you choose “Large Cabin Only,” only templates for the largest cabin size will be generated. For instance, selecting this for Scania will only generate a template for the High Roof variant, not the Normal Roof. Additionally, paint jobs for the 8x4 truck configuration can only be generated with “All Cabins” selected.
Split Paint Jobs: If you want to create paint jobs for multiple truck models, it’s recommended to choose “Split, one per cabin.” For example, you can select both Scania S series and R series. Since the texture layouts for S and R series are different, if you choose “Don’t split,” the generated template might make S and R series share the same texture layout, which could cause paint jobs to appear in unintended places.
Once you’ve completed the form, click “Generate” to proceed to the next step. Here, you can choose whether to generate files necessary for uploading to the Steam Workshop and whether to use prefab textures instead of blank placeholders. You can also change the output path. For now, you can choose any location as the output path. After that, simply copy the ./Paint Job Packer Output/[MOD Name] folder to Euro Truck Simulator 2’s local MOD folder, which is usually located at C:\Users\[Your Username]\Documents\Euro Truck Simulator 2\mod.
Analysis of MOD File Structure
Now, let’s take a look at the structure of the MOD folder. I recommend opening ./Paint Job Packer Output/[MOD Name] and following along. I will provide explanations as comments after each filename.
1 | Demo |
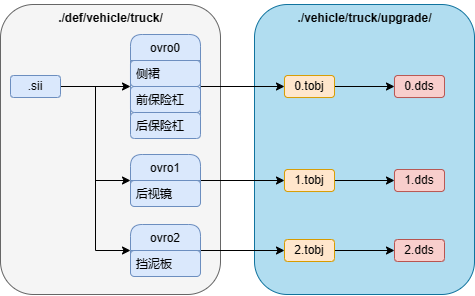
Relationship between sii, tobj, and dds files
- The sii files in the def folder are used to specify the tobj files that control the paint jobs of certain vehicle accessories. For example, it tells the game that the paint job for the box trailer’s container is managed by the box trailer.tobj file. A single tobj file can manage paint jobs for multiple accessories.
- Both tobj and dds files are in the vehicle subfolder.
- Tobj files are used to specify the specific dds texture files to use. For instance, the box trailer.tobj file tells the game that the texture for the box trailer’s container is box trailer.dds. One tobj file corresponds to one dds texture file. The tobj files generated by the Paint Job Packer have the same names as the dds files they control.
- Dds files are the texture files themselves.
Creating a Paint Job
Open the texture folder and drag the automatically generated template DDS file into Photoshop as the base image. Then, you can start creating your paint job. If a template requires a 16x16 pixel placeholder, you can find the corresponding template in the ETS 2 Template Pack mentioned earlier.
Exporting Paint Job Texture
Once you’re done with your design, select File -> Save As, choose DDS as the file type, and click Save. In the pop-up dialog, select Format as DXT5, check Mipmap, and choose None for Alpha Channel. You can directly replace the template texture in the MOD folder with the exported texture. Also, remember to hide the template layer when exporting.
Previewing Paint Job Effects
It’s recommended to use the in-game vehicle viewer to preview the paint job effects. You don’t need to exit the game while making modifications. After editing in Photoshop and exporting, you can return to the game. To see the changes, switch to a different paint job first and then switch back to your paint job.
Modifying Accessory Texture
In the automatically generated configuration files, multiple accessories might be controlled by the same tobj file, and these accessories’ texture templates might have slight differences. This can lead to misalignment in the game. To address this, you can modify the corresponding sii file in the def folder and the tobj file in the vehicle folder to specify a new DDS texture for a particular accessory. For example, below is the sii file that controls the sun visor paint job. All five types of sun visors use the same texture, which might cause misalignment in the game.
1 | //./def/vehicle/truck/scania.s_2016/paint_job/accessory/xxx_a.sii |
If you want to have each visor painted differently, you can modify it this way:
1 | //modified |
Each .ovr file is a set of configurations, and the names after acc_list[] are the names of the accessories. One .ovr file can control multiple accessories.
After modifying, go to the ETS 2 Template Pack to find the corresponding texture template. Once you’ve finished editing, save the DDS file in ./vehicle/truck/upgrade/paintjob/xxx/vehicle folder. It’s recommended to use the same naming convention for the texture as the tobj naming in the sii file.
At this point, you’ve set up the tobj file paths for different sun visors, but these tobj files don’t exist yet. You need to use the TOBJEditor to help create them. Paste the path to the mod folder in the “Mod folder” section of Generate TOBJs, then directly drag and drop the DDS texture files you saved in the previous step into the box below. You can drag and drop multiple DDS files simultaneously. After that, click Generate to create the tobj files.
MOD Description and Cover
To modify the MOD description, directly edit the Mod_Manager_Description.txt file located in the root directory of the MOD folder.
The MOD cover image is the Mod_Manager_Image.jpg file in the root directory. When exporting, ensure that its dimensions are 276x162 pixels, and save it in jpeg format.

Paint Job Icon
The paint job icon refers to the icon seen on the customization page, as shown in the image below:
The path to the icon is ./material/ui/accessory/xxx.dds. Similarly, it’s advisable to use this as a reference in Photoshop. When exporting, hide the base layer, choose Format as DXT5, check Mipmap, select Alpha Channel as Alpha 1, and also check Premultiply.
Including Multiple Paint Jobs in One MOD
Follow the same process as before to create another MOD folder. Then, directly copy the def, material, and vehicle folders from the new MOD folder into the existing one. Ensure that the paint job names are not the same.
Uploading to Steam Workshop
Installing the Upload Tool
In your Steam library, enable “Tools,” then scroll to find SCS Workshop Uploader and install it.
Packaging the MOD
Compress your MOD folder into a .zip file and rename it to universal.zip. Then, copy it to the previously created Workshop uploading folder.
Creating the Cover Image
Before uploading, you also need to create a separate cover image for your mod on the Steam Workshop. This image will be the thumbnail that others see when searching for your mod. The image should be 640x360 pixels, in JPEG format, and no larger than 1MB.
Uploading
Open SCS Workshop Uploader:
- Choose Euro Truck Simulator 2 in the “Game” section.
- For “Mod data,” select the
Workshop uploadingfolder. Choose the previously created Steam Workshop cover image for “Preview image.” - In “Visibility,” you have three options: Private (only visible to you), Friends Only (visible to friends), and Public (visible to everyone).
- Your description must be over 50 characters long. You can refer to Steam formatting guide for syntax.
- In the “Tags” section, select “Truck parts.” The other two options are optional.
- In the “Change note” section, briefly describe any updates.
Once done, click “Upload.”