Building Installation Packages for Various Platforms with Flutter
This article explains how to build installation packages for your Flutter projects for various platforms without spending a single cent on signing certificates. This includes: Android APK, iOS IPA, macOS DMG, Linux DEB, and Windows MSIX.
- This article was written using Flutter version 3.22. Please be aware of the potential for changes in future versions.
- If the app name or package name appears incorrectly after installation, you will need to adjust the configuration files.
- Some parameters in this article use my newly developed app,
Cycle It, as an example, with the package nametop.siriusq.cycleit. - The build environments used for this article are:
- Windows / Android: Windows 11 24H2 26100
- macOS / iOS: macOS 13.7, Xcode 15.2
- Linux: Ubuntu 24.04.2 LTS
Android APK
Build
Building for Android is the easiest, as Flutter’s tooling is designed with Android in mind. Just run the following command:
1 | flutter build apk --release |
Install
The generated APK file is located at build/app/outputs/flutter-apk/app-release.apk. You can copy this file to an Android device and install it directly.
Configure
The basic app information can be adjusted in the application tag of android/app/src/main/AndroidManifest.xml. Example:
1 | <application |
The app’s package name is configured in the android-defaultConfig-applicationId field within android/app/build.gradle.kts. Example:
1 | android{ |
iOS IPA
Building for iOS is the most complex process. If you want to publish to the App Store, you must pay the “Apple tax” for a developer account. For open-source projects that don’t make money, a free approach is to package an unsigned IPA and then use AltServer for sideloading and signing. The only drawback is that the app requires re-signing every 7 days.
Build
Add the --no-codesign parameter to the build command to skip the signing process:
1 | flutter build ios --release --no-codesign |
The generated app file is located at build/ios/iphoneos/Runner.app..
To convert into an .ipa, create a folder named Payload anywhere, move Runner.app into it, and then, in the parent directory of Payload, run the following command to convert it. Replace appname with your app’s name:
1 | zip -qq -r -9 appname.ipa Payload |
Install
Trust Device
- Connect your iPhone to your Mac and trust the device when prompted.
- Open Finder, locate your iPhone in the sidebar, and approve the trust request.
- You may need to install a software update to trust the iPhone. The pop-up for this update may not automatically be in focus, so you might need to drag the Finder window to check if it’s hidden behind it.
- Scroll down to the options and check
Show this iPhone when on Wi-Fito enable it. - Click
Applyat the bottom.
AltServer Setup
AltServer supports both macOS and Windows. This guide uses macOS, as the Windows setup is slightly more cumbersome, requiring separate installations of iTunes and Apple Devices.
- On your iPhone, go to
Settings->Privacy & Security, scroll down, and enableDeveloper Mode. - Download, install, and launch AltServer.
- From the menu bar, choose
Install AltStore, and choose your iPhone as the target. - Enter your Apple ID and password, click
Install, and wait for the installation to complete. You can see the progress on your iPhone. - On your iPhone, go to
Settings->General->VPN & Device Management. - Tap the option under
Developer Appthat has the same name as your Apple ID email. - Tap
Trust.
Source: AltStore Docs
Install IPA
- Transfer the packaged IPA file to your iPhone. Do not use AirDrop, as it will try to install the IPA directly, which will fail since it’s unsigned. I used iCloud to sync the file.
- Open AltStore, and navigate to
My Apps. - Tap the
+icon in the top left corner. - Select the IPA you just transferred.
- Enter your Apple ID and password again.
- Wait for the sideloading process to complete.
Configure
App-related information is configured in iOS/Runner.xcodeproj. Open it with Xcode to edit.
The app name is adjusted in the CFBundleDisplayName and CFBundleName fields in ios/Runner/Info.plist. Example:
1 | <key>CFBundleDisplayName</key> |
macOS DMG
Build
First, build the app in the .app format with this command:
1 | flutter build macos |
Next, install Node.js and create-dmg.
The generated app file is located at build/macos/Build/Products/Release/AppName.app. Copy it to any directory, open a terminal in that directory, and run the following command to convert the app to a DMG:
1 | create-dmg 'AppName.app' |
There’s not much to say about installing a DMG.
Configure
App-related information is configured in macos/Runner/Configs/AppInfo.xcconfig. Open it with Xcode to edit.
Linux DEB
Build
The build command is:
1 | flutter build linux --release |
The resulting files are located at build/linux/x64/release/bundle/.
Next, prepare to create the DEB package:
- Create a new folder anywhere, for example,
cycle_it. Then, inside thecycle_it/folder, create the following subdirectories and files:DEBIAN/:control: Contains package metadata (name, version, dependencies, etc.).postinst(optional): A script that runs after installation.prerm(optional): A script that runs before uninstallation.
usr/bin/cycle_it/: Place the files generated by the build process here.usr/share/applications/: Place the desktop shortcut file (cycle_it.desktop) here.usr/share/icons/hicolor/256x256/apps/: Place the application icon here.
- Edit the
./DEBIAN/controlfile. Example:1
2
3
4
5
6
7Package: cycle-it
Version: 1.0.0
Section: utils
Priority: optional
Architecture: amd64
Maintainer: siriusq <eargon.skyle@gmail.com>
Description: some words - Edit
usr/share/applications/cycle_it.desktop. Example:1
2
3
4
5
6
7
8
9[Desktop Entry]
Name=Cycle It
Comment=Track your items with Cycle It
Exec=/usr/bin/cycle_it/cycle_it
Icon=cycle_it
Terminal=false
Type=Application
Categories=Utility;
StartupWMClass=top.siriusq.cycleit - Copy the files from
build/linux/x64/release/bundle/into./usr/bin/cycle_it/. - Copy the application icon to
debian/usr/share/icons/hicolor/256x256/apps/and rename it tocycle_it.png, matching theIconname in the.desktopfile. - Use the
dpkg-debtool. From the parent directory of your new folder, run the command to build the.debpackage:1
dpkg-deb --build cycle_it cycle_it.deb
There’s also not much to say about installing a DEB package.
Configure
App-related information is configured in linux/CMakeLists.txt. Example:
1 | set(BINARY_NAME "Cycle It") |
Windows MSIX
Since I needed to use notification-related APIs, I chose to package the app as an MSIX, which requires a signature and is more complex to configure.
Signing Certificate
- First, install OpenSSL.
- Add the
binpath of the installation (e.g.,C:\Program Files\OpenSSL-Win64\bin) to your system’s PATH environment variable. You can check if it was successful by runningopenssl versionin the terminal. - Generate a private key using the command:
openssl genrsa -out mykeyname.key 2048. Replacemykeynamewith a name of your choice, for example, forsiriusq_self_signed_private_key, the command is:1
openssl genrsa -out siriusq_self_signed_private_key.key 2048
- Use the private key you just generated to create a CSR (Certificate Signing Request) file with the command:
openssl req -new -key mykeyname.key -out mycsrname.csr. Replacemykeynameandmycsrnamewith your desired filenames, for example:You will be prompted to enter some basic information. You can use a1
openssl req -new -key siriusq_self_signed_private_key.key -out siriusq_self_signed.csr
.for fields you don’t want to fill out. You will also be asked to set a passphrase for the private key at the end. - Run the command
openssl x509 -in mycsrname.csr -out mycrtname.crt -req -signkey mykeyname.key -days 10000to create a CRT self-signed certificate file from the CSR file. Make sure to replacemycsrname,mycrtname, andmykeynamewith consistent names, for example:1
openssl x509 -in siriusq_self_signed.csr -out siriusq_self_signed.crt -req -signkey siriusq_self_signed_private_key.key -days 10000
- Use the private key and CSR file to generate a
.pfxfile. The command isopenssl pkcs12 -export -out CERTIFICATE.pfx -inkey mykeyname.key -in mycrtname.crt. ReplaceCERTIFICATE,mykeyname, andmycrtnameaccordingly. Example:This will prompt you to enter an export password for the PFX file twice for verification. Note that this password is not related to the private key passphrase you set earlier.1
openssl pkcs12 -export -out siriusq.pfx -inkey siriusq_self_signed_private_key.key -in siriusq_self_signed.crt
- The generated files are, by default, saved in the
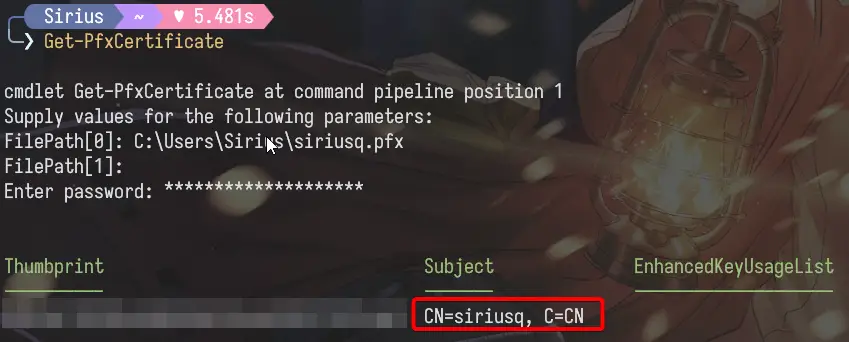
C:\Users\usernamedirectory. The full terminal output looks like this: - To get the publisher information for the PFX file, run the
Get-PfxCertificatecommand and then:- Enter the path to your generated PFX file, such as
C:\Users\Sirius\siriusq.pfx. - You do not need to enter
FilePath[1]. - Enter the file export password.
- Copy the output. You will need to add it to the
publisherfield undermsix_configinpubspec.yamllater.
- Enter the path to your generated PFX file, such as

Difference between the two passwords
- Private Key Passphrase (
reqcommand): This password encrypts the private key file itself (siriusq_self_signed_private_key.key). Its purpose is to prevent unauthorized use of the private key file on your disk. - PFX File Export Password (
pkcs12command): This password encrypts the.pfxcontainer file. Its purpose is to protect the entire.pfxfile, which contains both the private key and the certificate.
Install Plugin
Flutter doesn’t support building MSIX packages directly, so you will need to install the msix | Dart package plugin. Run the following command in the project’s root directory:
1 | flutter pub add --dev msix |
Then, using the output from the previous step, add the relevant configuration to pubspec.yaml:
1 | msix_config: |
Note: You must enter the PFX file export password in the certificate_password field. If you’re publishing this as an open-source project, remember to remove the password.
Build
Run the following command in the project’s root directory:
1 | dart run msix:create |
The generated .msix file is located at build/windows/x64/runner/Release/output_name.msix.
Install
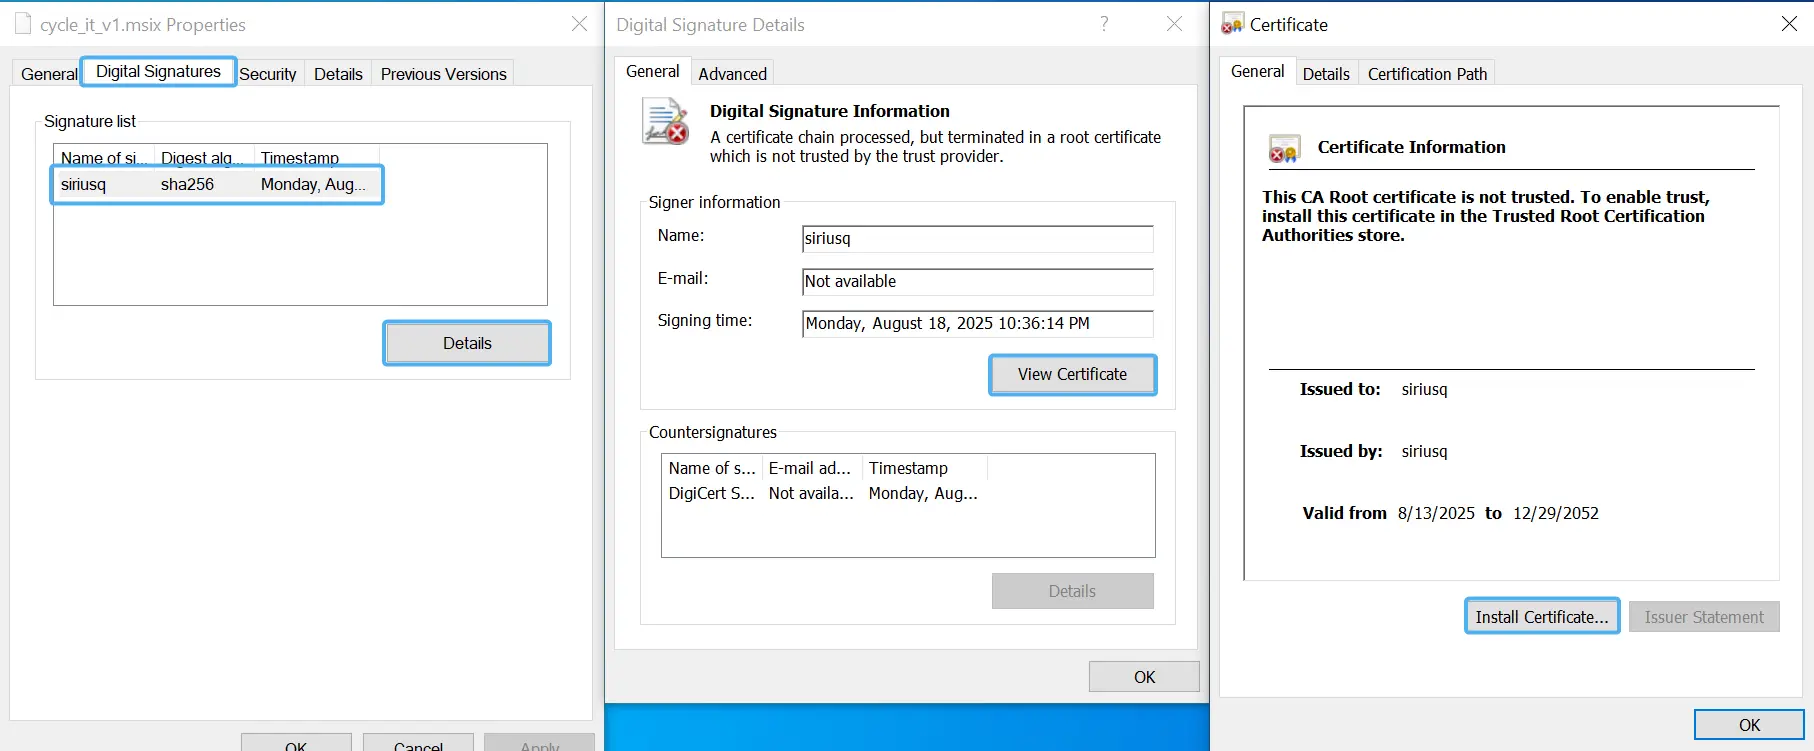
An MSIX package cannot be installed directly. You will get a warning that the publisher’s certificate cannot be verified. You need to manually install the certificate by following these steps:
- Right-click the MSIX installation package and select
Properties. - Click
Digital Signatures, thenDetails, thenView Certificate, and finallyInstall Certificate. - Choose the storage location as
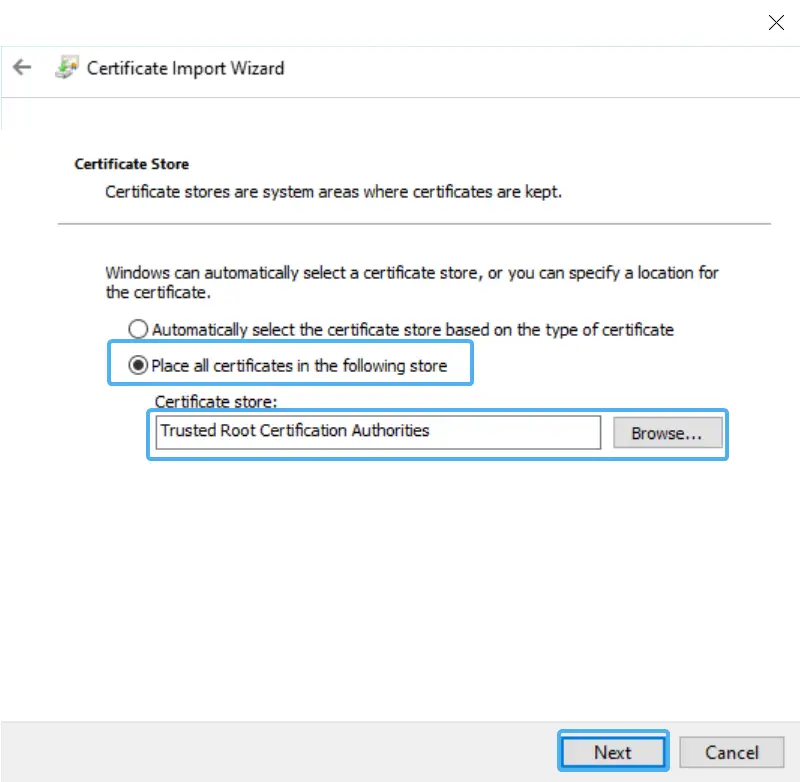
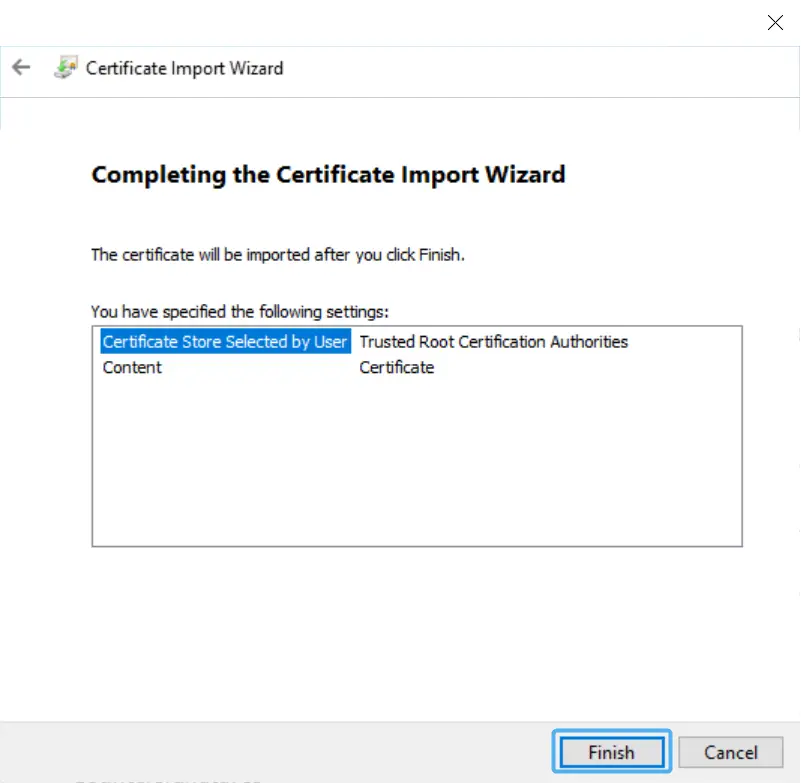
Local Machineand clickNext. - Select
Place all certificates in the following store. - Click
Browse, selectTrusted Root Certification Authorities, then clickNextandFinish.

Configure
The app’s package name is adjusted in windows/runner/Runner.rc. Example:
1 | VALUE "InternalName", "top.siriusq.cycleit" "\0" |
The app’s name is adjusted in windows/runner/main.cpp. Example:
1 | if (!window.Create(L"Cycle It", origin, size)) { |
Reference: Shirley的隨手筆記