Quick Setup Guide for LaTeX in VSCode
A guide on installing the TeX environment and quickly configuring LaTeX in VSCode.
TeX Live Installation
First, go to the TeX Live official website to download the installation files. The links below provide the download pages for both Windows and Mac versions.
Windows
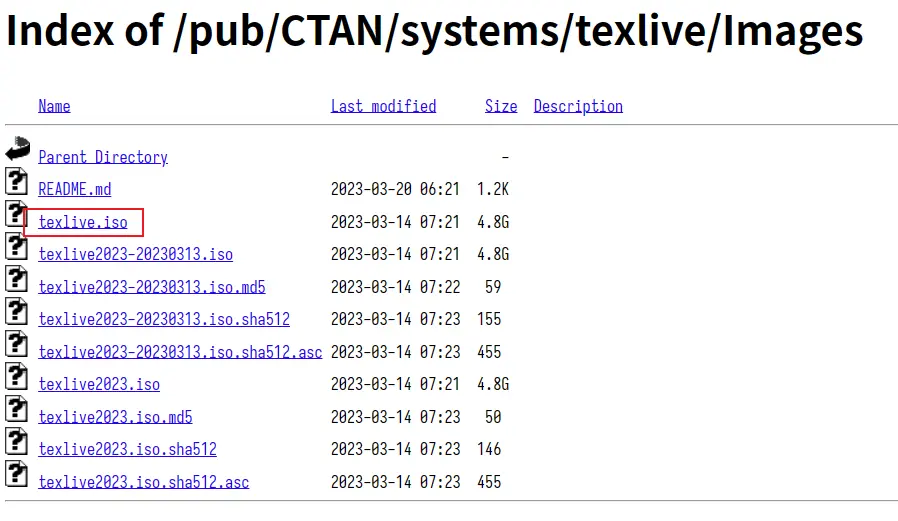
For Windows users, it’s recommended to use the ISO file for installation. The ISO file is approximately 4GB and contains all the necessary files, so there’s no need for an online installation. If you have a good internet connection, you can also choose to download install-tl-windows.exe, which is only 20MB. Simply double-click it to start the online installation, which is more convenient. However, please note that when using install-tl-windows.exe, the program estimates that it may take several hours to complete the download and installation, whereas downloading the ISO file only takes a few minutes.
After opening the download page, choose download from a nearby CTAN mirror to go to the nearest mirror site, then click to download texlive.iso.

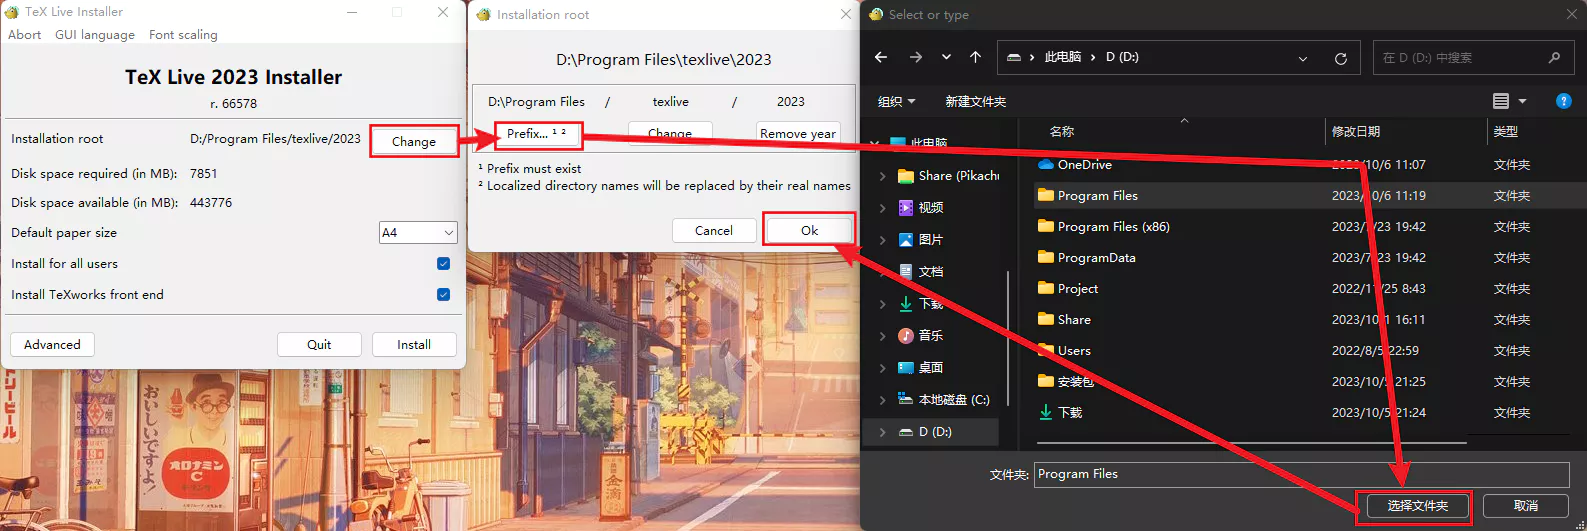
Once the download is complete, mount the ISO file and run install-tl-windows.bat as administrator. After the installation program finishes loading, click the “Install” button. The installation time depends on your computer’s performance, but it typically takes around 30 minutes. After a successful installation, click the “Close” button to exit the installation program.


macOS
For macOS users, simply click the download link for MacTeX.pkg on the download page. The size of the installation package is 5.2GB. After downloading, double-click the package to open it, and then follow the on-screen instructions to complete the installation.


VSCode Extensions Installation
Search for and install the LaTeX Workshop and LaTeX Utilities extensions in the VSCode Extension Marketplace. The former adds LaTeX support to VSCode, while the latter provides useful features such as automatic formatting for pasted text and integration with Zotero.

LaTeX Workshop Configuration
Open VSCode’s settings using the shortcut Ctrl + ,. For the following operations, it’s recommended to use the search bar in the settings to quickly locate them.
Auto Build
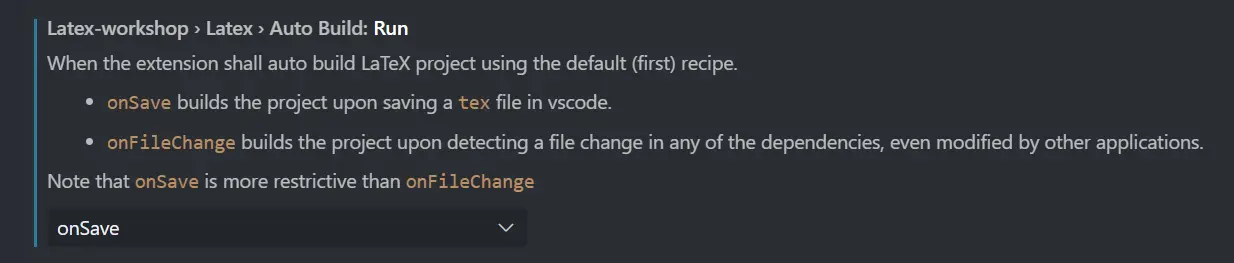
Search for latex run and adjust the Latex-workshop > Latex > Auto Build: Run option. I recommend choosing OnSave.
never: No automatic build .OnSave: Automatically build when saving a.texfile.OnFileChange: Automatically build when any file in the dependencies changes, including changes made outside of VSCode.
Auto Clean
This option automatically cleans (deletes) compiled auxiliary files and output files to ensure that each LaTeX compilation starts from scratch without being affected by previous compilations.

Search for latex run and adjust the Latex-workshop > Latex > Auto Clean: Run option. I recommend choosing OnFailed.
never: No automatic cleaning.OnFailed: Only clean automatically when compilation fails.OnSucceeded: Only clean automatically when compilation succeeds.OnBuilt: Clean automatically after compilation, regardless of success.
Detailed Explanation
Specifically, this option serves the following purposes:
- Auto Cleaning: When you build a LaTeX document, it generates auxiliary files (e.g.,
.aux,.log,.bbl,.blg, etc.) and the resulting PDF file. These files are typically used to record compilation information, aid in cross-referencing, and generate references, among other tasks. When the “Auto Clean: Run” option is enabled, the plugin automatically deletes these auxiliary files and previously generated PDF files each time you run a LaTeX compilation. - Avoiding Interference from Old Files: If you’ve made modifications to your document between different compilations, old auxiliary files might cause issues, such as cross-reference errors or incorrect references. By automatically cleaning these files, you ensure that each compilation starts from a clean slate, reducing potential interference and errors.
- Saving Disk Space: LaTeX compilations generate many temporary files, and over time, these files can consume a significant amount of disk space. Auto cleaning helps you regularly remove these no longer needed files, saving disk space.
Please note that when using the “Auto Clean: Run” option, make sure you don’t need to retain the compiled auxiliary files or output files for other purposes (e.g., generating references) because they will be deleted. If you need to keep these files, you can disable this option and manage them manually.
By ChatGPT
Add Compilation Recipe
In LaTeX Workshop’s default compilation recipe, there is only one compilation chain that includes bibtex, which is pdflatex -> bibtex -> pdflatex * 2. Now, let’s add another compilation chain containing bibtex: xelatex -> bibtex -> xelatex*2.
Difference Between PdfTeX and XeTeX
PdfTeX and XeTeX are two TeX engines used for typesetting documents, and they have some important differences:
- Font Support:
- PdfTeX: PdfTeX primarily supports traditional TeX fonts like Computer Modern. Using other fonts often requires complex configuration and font mapping.
- XeTeX: XeTeX is more flexible and can directly use fonts installed on your system, including TrueType and OpenType fonts. This makes handling documents with multiple languages and different font styles easier.
- Character Encoding:
- PdfTeX: PdfTeX typically requires specific input encodings (e.g., UTF-8) to handle non-ASCII characters and has limited support.
- XeTeX: XeTeX natively supports Unicode encoding, making it easy to work with various languages and symbols without additional configuration.
- Multilingual Support:
- PdfTeX: It supports multiple languages but requires careful configuration for handling specific language requirements.
- XeTeX: Provides more direct and straightforward support for multilingual documents, especially those containing multiple languages and scripts.
- Output Formats:
- PdfTeX: Generates output in PDF format.
- XeTeX: Can also generate PDF but supports other formats like DVI and PostScript.
In summary, PdfTeX is suitable for traditional TeX document typesetting tasks, while XeTeX is better for handling multilingual documents, complex font requirements, and Unicode characters. The choice of which engine to use depends on your specific needs and project requirements.
By ChatGPT
About BibTeX
BibTeX is a tool for managing citations and references in LaTeX documents. It is typically used alongside LaTeX to create a well-formatted list of references and citations automatically.
Here’s how BibTeX works:
- Create a Bibliography Database: You create a BibTeX database file (usually with a
.bibfile extension) that contains information about all the references you want to use. Each reference entry includes metadata such as authors, title, publication details, etc. - Reference Citations in LaTeX: In your LaTeX document, you use the
\cite{key}command to reference these entries, wherekeyis the identifier for a particular reference in your BibTeX database. - Compile the Document: You compile your LaTeX document, and then run BibTeX, which looks up the citations in the
.auxfile generated during the first LaTeX compilation. BibTeX uses this information to create a list of references and format the citations. - Generate the References: BibTeX generates a formatted list of references based on your citations, applying the appropriate citation style (e.g., APA, MLA) and sorting.
BibTeX’s advantage is its ability to automatically handle citations and formatting, making it convenient for longer papers and academic articles. However, it’s essential to choose the right bibliography style and perform any necessary customizations according to the requirements of your journal or publishing institution.
By ChatGPT

Search for Latex: Recipes, find Latex-workshop > Latex: Recipes and then click on Edit in settings.json. Use Ctrl+F to locate latex-workshop.latex.recipes in settings.json and add a new compilation chain as follows, making sure not to miss the trailing ,:
1 | { |
Why Multiple XeLaTeX Compilations?
In LaTeX’s compilation chain, it’s common to perform two xelatex compilations for documents that involve bibliographic references (using bibtex or biblatex). Here’s why two xelatex compilations are typically necessary:
- First
xelatexCompilation:- The first compilation is primarily for processing the document’s content, generating reference labels, and inserting placeholders for citations.
- When you use the
\cite{key}command to reference a bibliography entry, the first compilation inserts placeholders like[?]to indicate the citation’s position. - This step also generates an auxiliary file (usually a
.auxfile) that contains information about the citations.
- Running
bibtex:- Next, you run the
bibtextool, which reads the citation information from the.auxfile and generates the reference list and detailed citation information based on your BibTeX database (typically a.bibfile). - The information generated by
bibtexis stored in a.bblfile.
- Next, you run the
- Second
xelatexCompilation:- The purpose of the second compilation is to insert the generated reference list and detailed citations into the document to replace the placeholders.
- During this compilation, LaTeX knows the details of each citation and formats them correctly in the document.
- This compilation also updates the citation labels in the document.
- Third
xelatexCompilation (Optional):- If your document contains cross-references (such as referencing sections or figures), you may need to run
xelatexagain to ensure all cross-reference numbers are correct.
- If your document contains cross-references (such as referencing sections or figures), you may need to run
So, the multiple xelatex compilations are necessary to ensure that the bibliographic citations and reference list are correctly integrated into the document. This is the standard workflow for handling citations in LaTeX. In some cases, if there are no cross-references or if citations do not affect other parts of the document, only two compilations may be needed without the third.
By ChatGPT
Default Recipe
This option defines the default recipe to be used when no other compilation recipe is explicitly specified, including the automatic compilation set earlier.
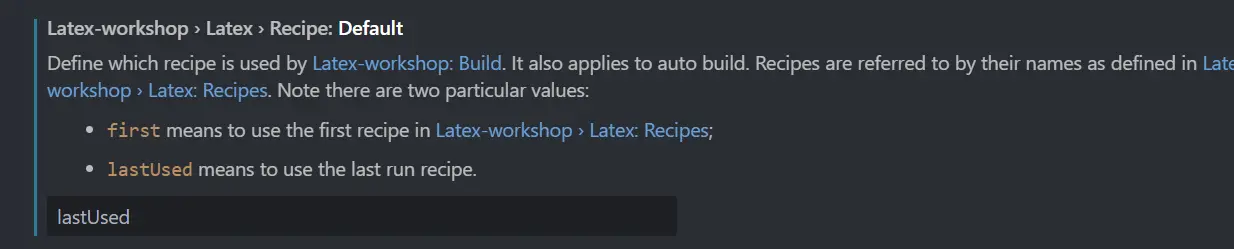
Search for latex recipe default, and adjust the Latex-workshop > Latex > Recipe: Default option. I recommend choosing lastUsed.
first: The first compilation option in the configuration file.lastUsed: The compilation option used last time.
Disable Warning & Error Message
By default, VSCode displays message pop-ups in the lower-right corner when the build fails, which need to be manually closed. Since these messages are also visible in the terminal, you can choose to disable these pop-ups.
Search for latex message show and uncheck the Latex-workshop > Message > Error: Show and Latex-workshop > Message > Warning: Show options.


Usage
When you open a .tex file using VSCode, you will see a TEX option in the left sidebar. You can use this option to select compilation options and view the PDF output, among other operations.


References: