Windows 11 IoT LTSC Reinstallation Guide
I heard that Microsoft released the public version of Windows 11 LTSC earlier this month, and I was so done with Microsoft stuffing the system with AI clutter every other day! Without hesitation, I immediately installed the new system on all three of my computers. My last Windows reinstallation guide was written four years ago, and many contents are now outdated. So, I decided to take this opportunity to write a new guide focused specifically on reinstalling Windows 11 IoT LTSC.
LTSC VS. IoT LTSC
LTSC, or the Long-Term Servicing Channel, is a streamlined version of Windows designed for long-term stability by removing many built-in apps like Photos, Videos, Copilot, and others. It also lacks the Microsoft Store (though it can be installed manually). Future updates for LTSC focus only on security and bug fixes, without feature updates, preventing the addition of unnecessary features (and bugs) from Microsoft. While IoT LTSC is tailored for IoT devices but can be installed on regular home PCs as well. Below is a detailed comparison between the two:
| Feature | Enterprise LTSC | IoT Enterprise LTSC |
|---|---|---|
| Hardware restrictions (TPM / Secure Boot / UEFI / 4GB+ memory) | Restricted | Unrestricted |
| BitLocker encryption | Enabled | Disabled |
| Update support duration | 5 years | 10 years |
| Digital license activation | Not supported | Supported |
| Ability to uninstall Edge browser | Yes | Region must be set to a European country |
| Multi-language support | Supported | English only by default; other languages can be added after installation |
File Backup
The methods provided in this guide will erase all disk contents for a fresh installation, so be sure to back up everything!
A fresh install has the advantage of not carrying over any strange issues from the old system (like files that can’t be deleted). However, it will erase all content on the disk.
If possible, use a spare USB drive or external hard drive to copy all important data. For an extra measure, you can go as far as physically disconnecting additional drives, leaving only the system drive connected to avoid formatting the wrong drive by mistake.
System Image Download
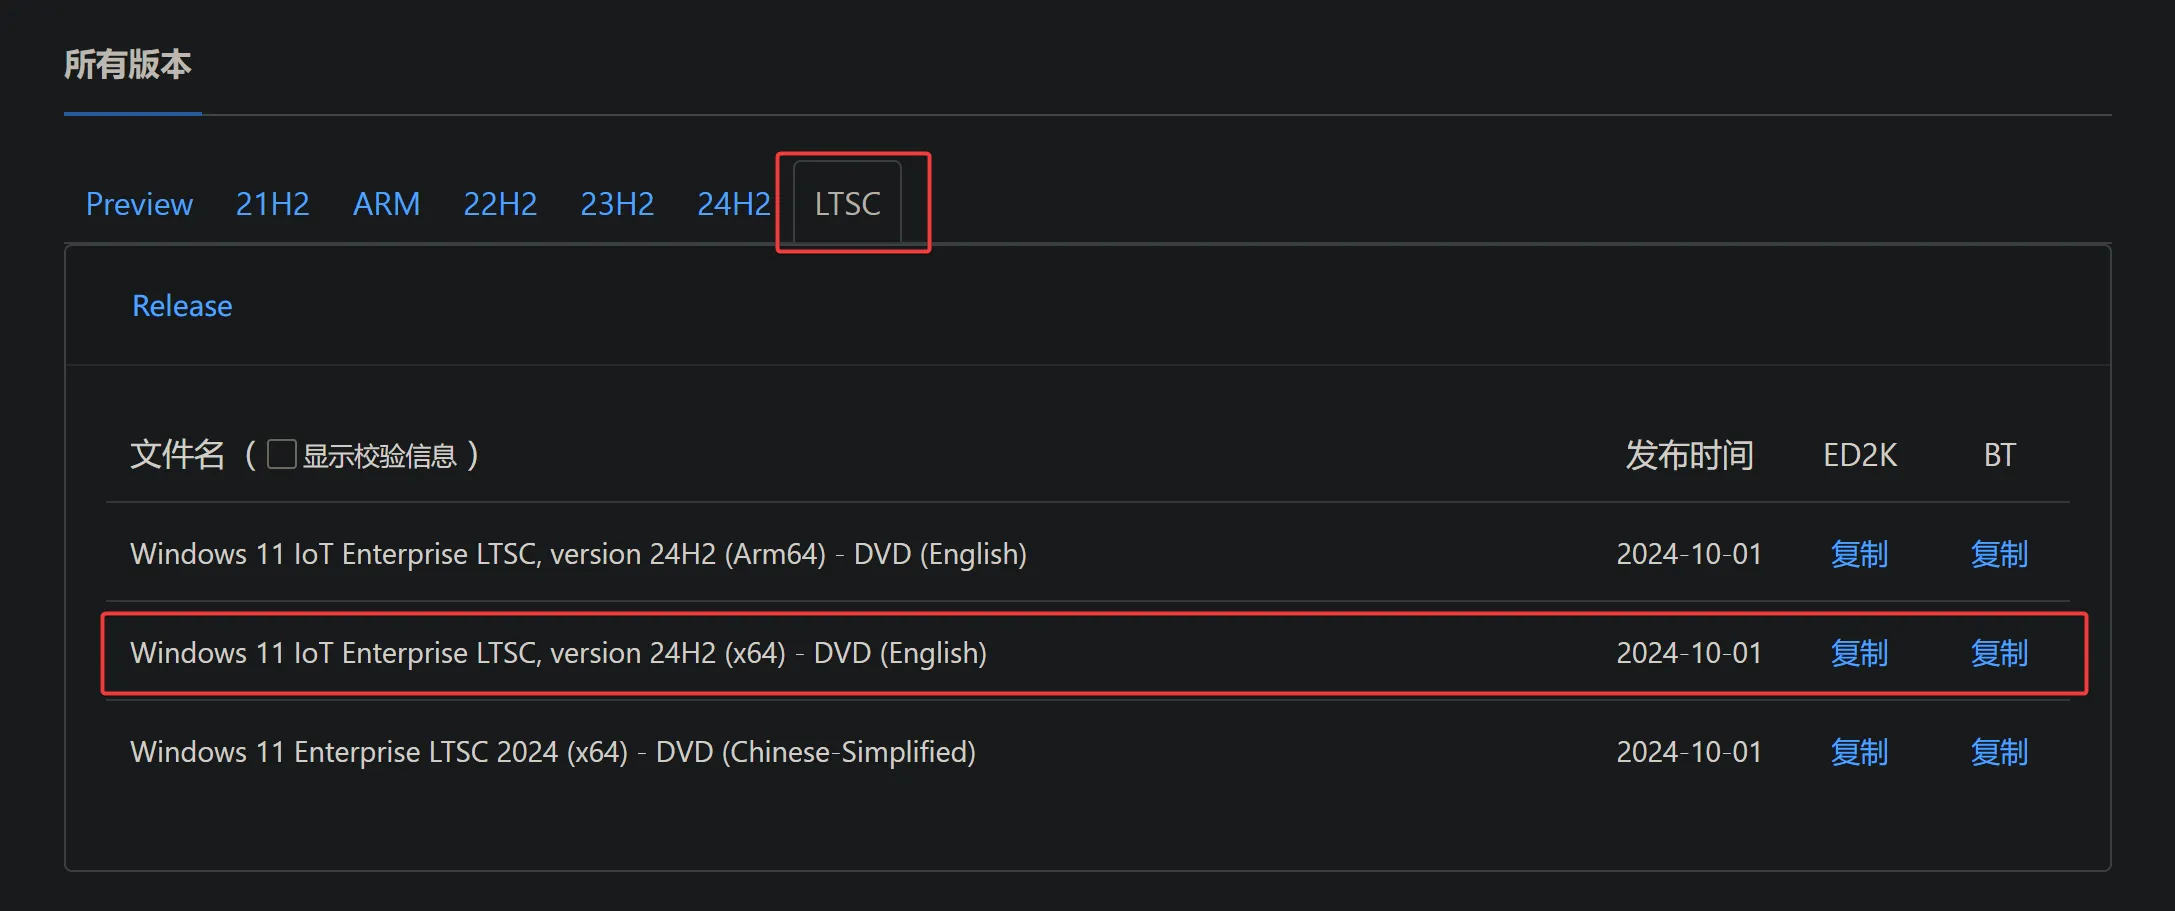
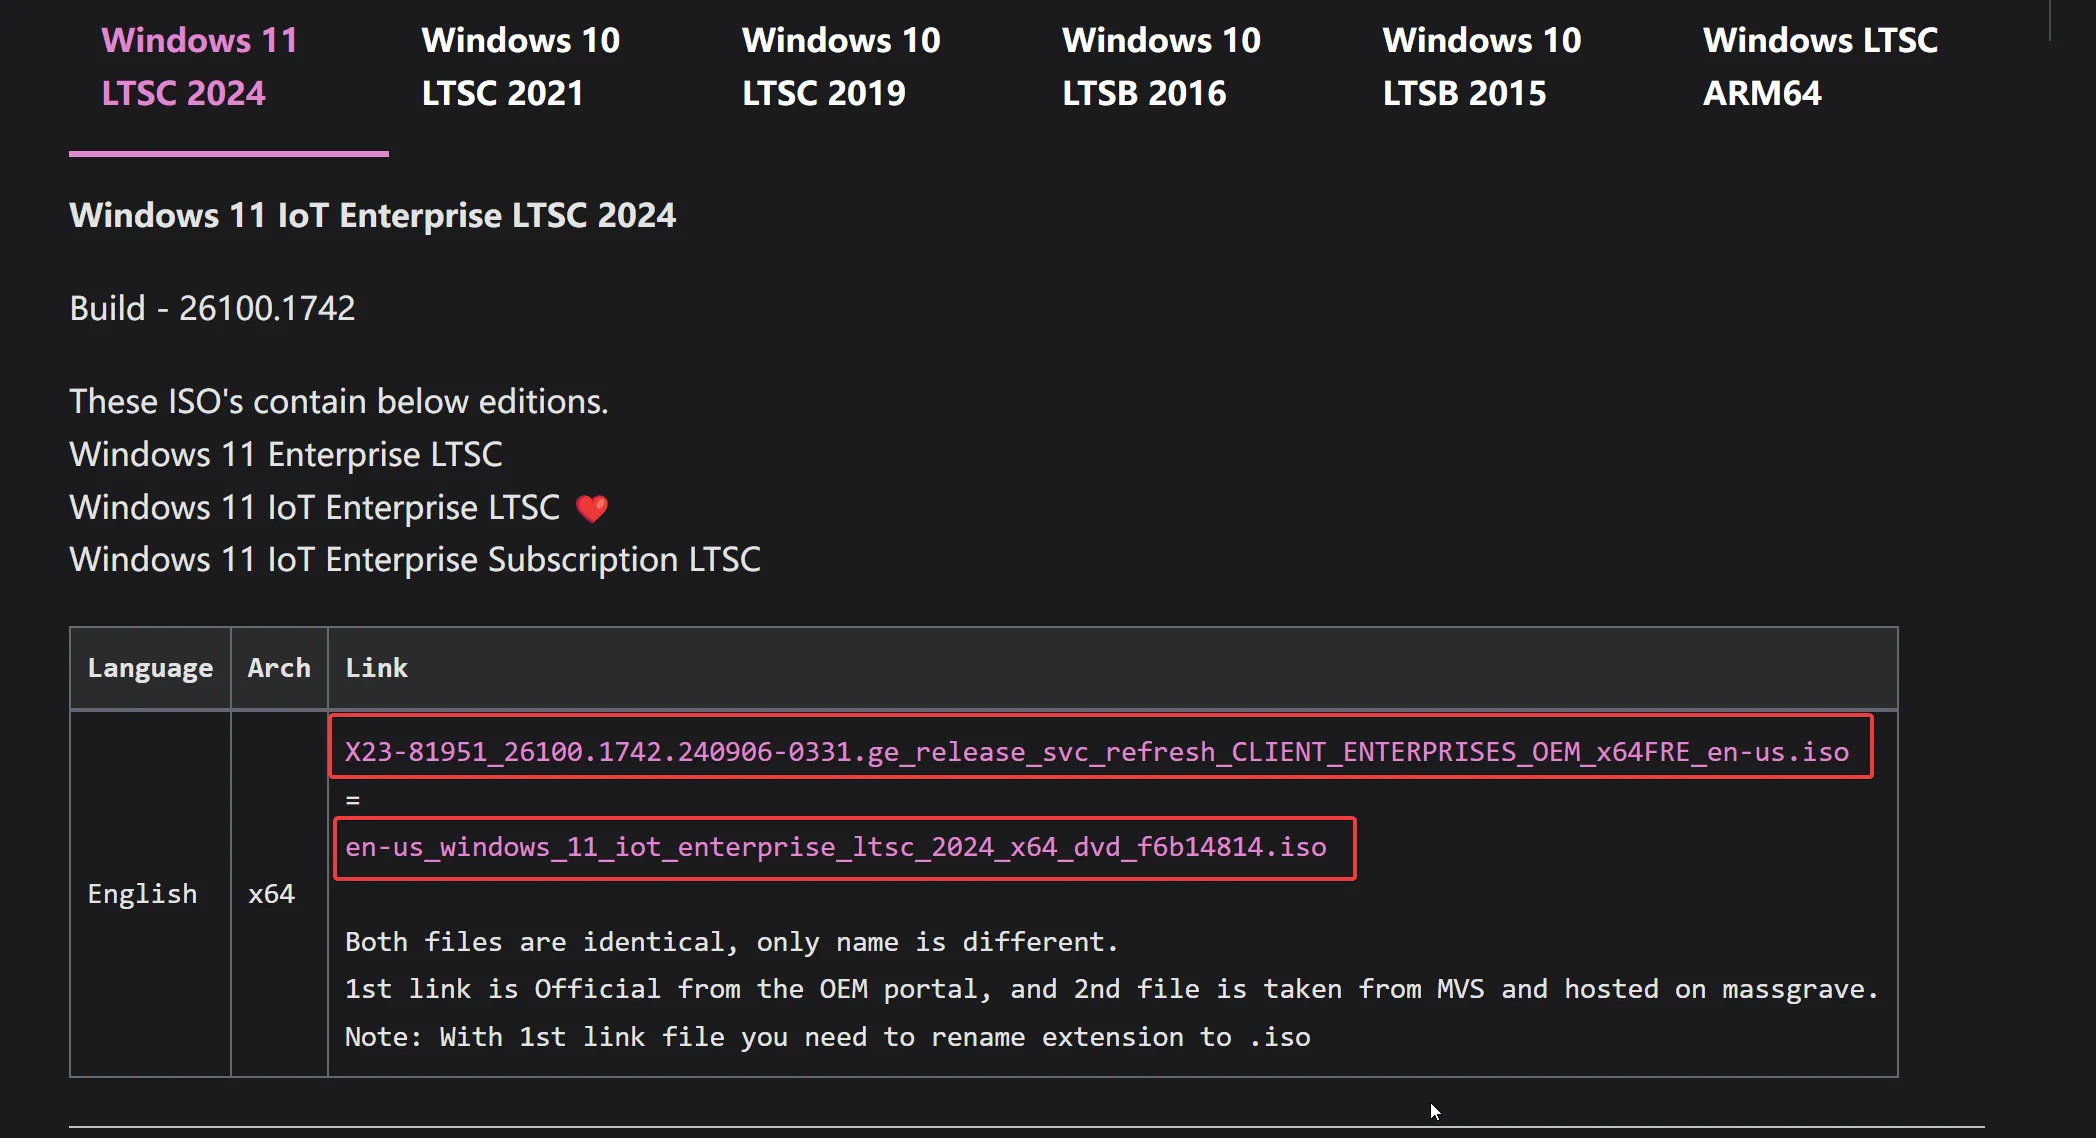
First, we need to download the system image. You can obtain it from the following two websites. NEXT, I TELL YOU offers BT and ED2K download links, while MAS provides download options from Microsoft’s official sources as well as their own cloud storage. Try both sites and choose the one with the faster download speed.
Create a Bootable USB Drive
Next, we need to create a bootable USB drive for the new system installation. Follow these steps:
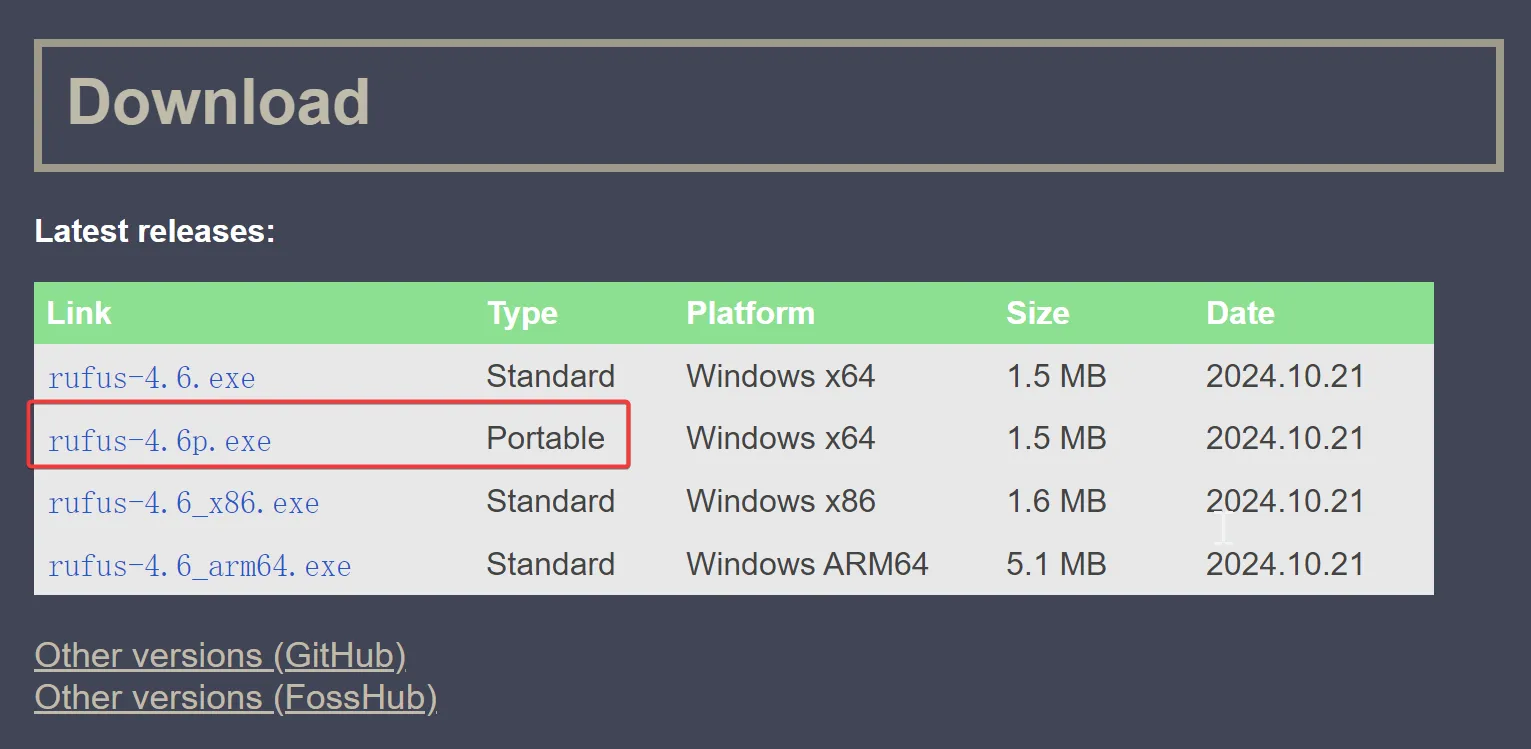
- First, download and install the Rufus tool for creating bootable USB drives. It’s recommended to use the portable version since the system will be reinstalled shortly.
- Insert an empty USB drive with at least 8GB of space into your computer. Note that this USB drive will be formatted, so make sure to back up any important data.
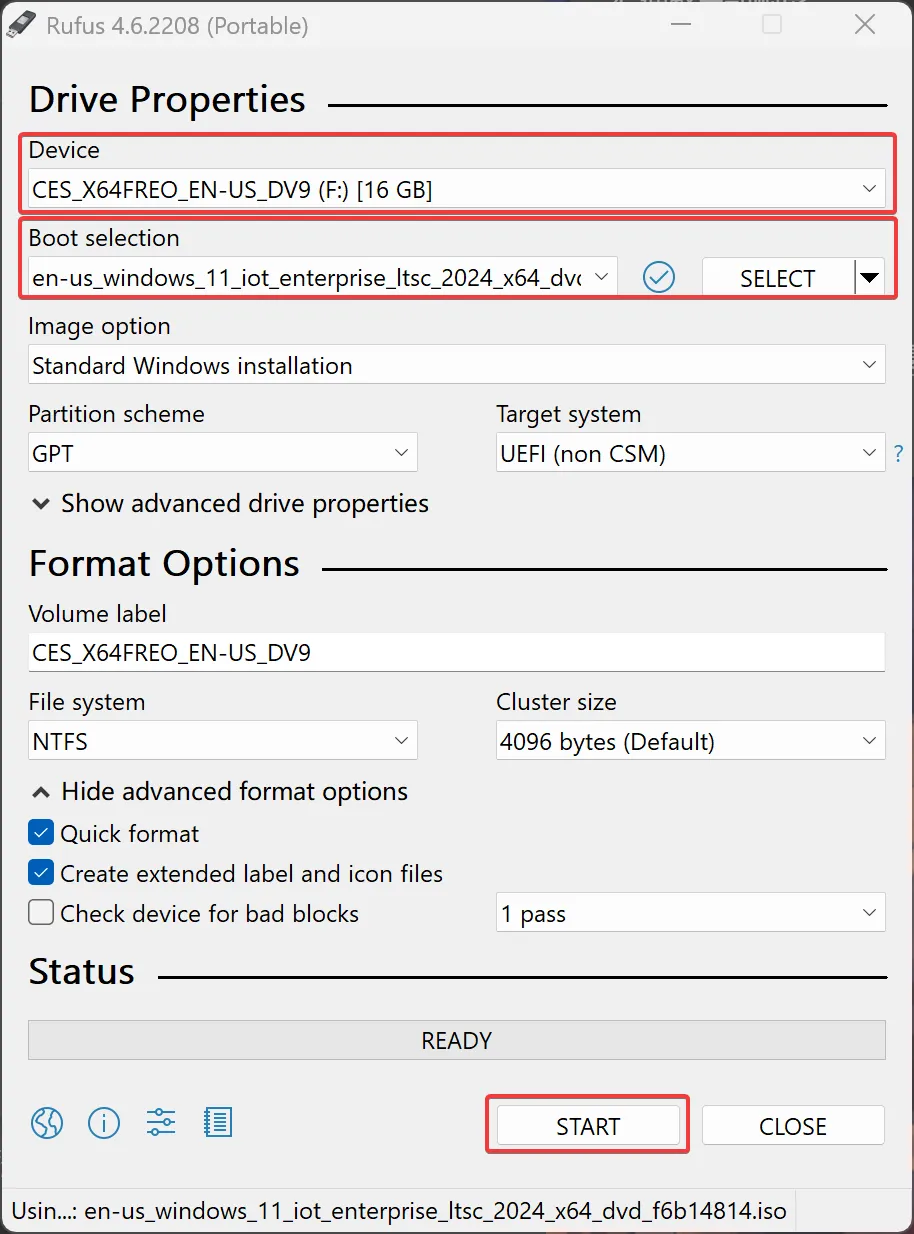
- Open Rufus. Set the device to the USB drive, select the system image you just downloaded as the boot selection, and leave the other settings as default. Then, click
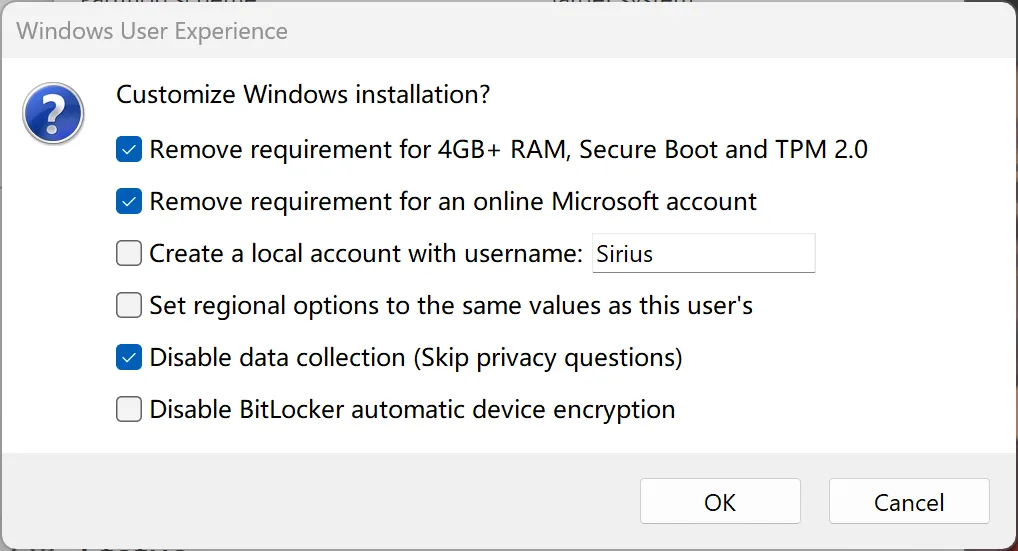
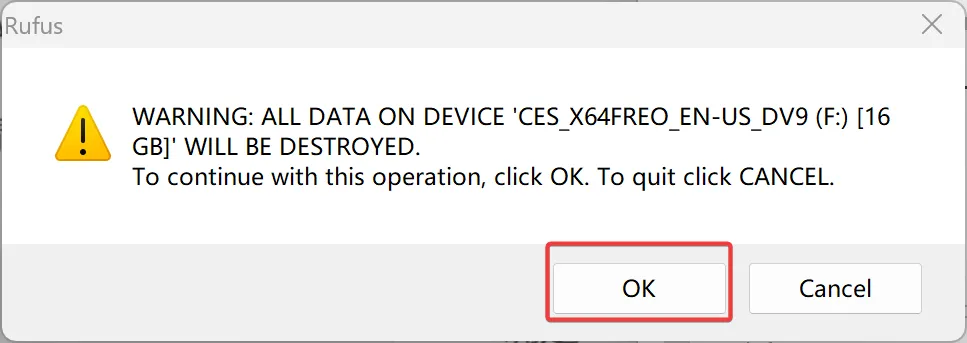
START. - Rufus will prompt you to customize the installation options, such as bypassing hardware restrictions. Since the IoT LTSC version doesn’t have these restrictions, you can simply click
OKto skip this. Rufus will then warn about formatting the USB drive; clickOKto continue. - Finally, wait for the process to complete, which usually takes around ten minutes.
Adjust Boot Order
Next, we need to enter the BIOS to adjust the boot order. This is one of the most challenging steps in the reinstallation process—successfully completing it means you’re 80% done. Follow these steps:
- Different motherboard brands have various shortcut keys to access the BIOS, typically one of F2, F10, F12, or Del. Continuously press these keys during startup until you reach the BIOS setup page.
- The default language of the BIOS page is usually English. Once inside, use the Tab key to navigate to the
Bootsubmenu. Then, set the bootable USB drive as the first boot option (Boot Option 1). The exact settings may vary by device. - After configuring the boot order, use the Tab key to switch to the
Save & Exitsubmenu, chooseSave Changesor a similar option, and press theEsckey to exit the BIOS. You may see a prompt to confirm the changes; choose to save.
Adjust Boot Order on Surface Devices
If your device is a Surface (like my old Surface 3), there’s no need to enter the BIOS. When only a USB drive is inserted, Surface devices will automatically prioritize it as the boot option. Here’s how to proceed:
- Disconnect all USB devices, including any TF card in the back slot.
- Insert the system USB drive.
- Hold down the volume-down button, and then press the power button.
- Keep holding the volume-down button until the Windows spinning circle icon appears.
- The system will enter the installation program, ready for reinstallation.
- During the installation process, you’ll need to use the Surface’s magnetic keyboard and trackpad, as the touchscreen and stylus will be unavailable until the drivers are installed.
Installation
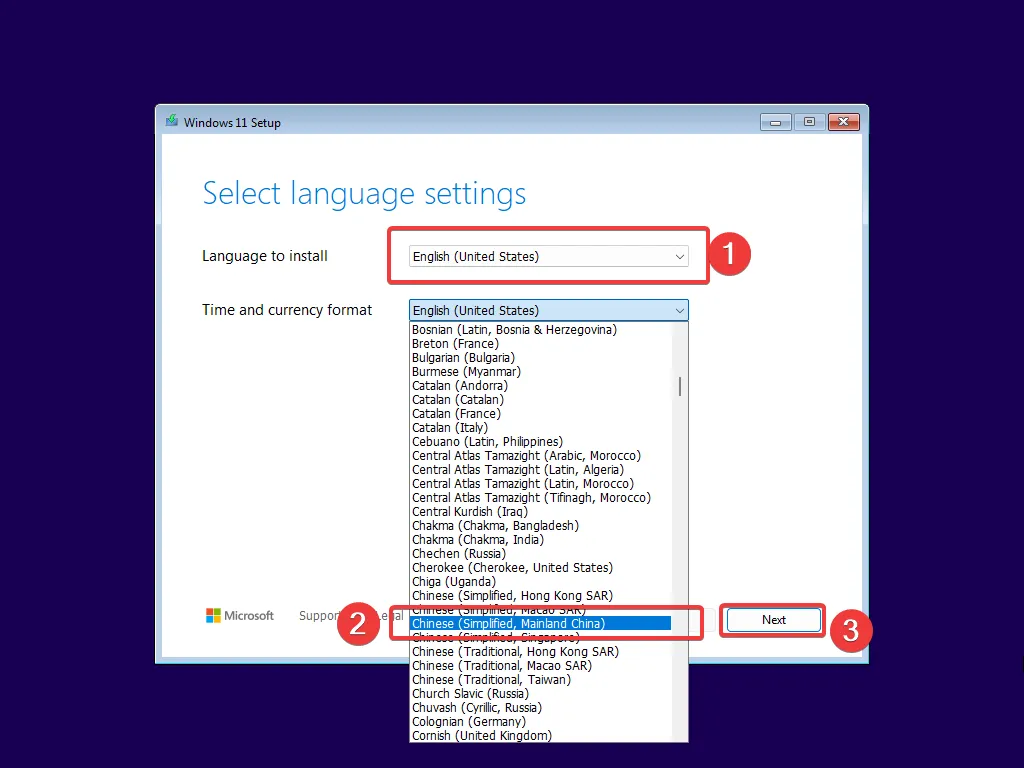
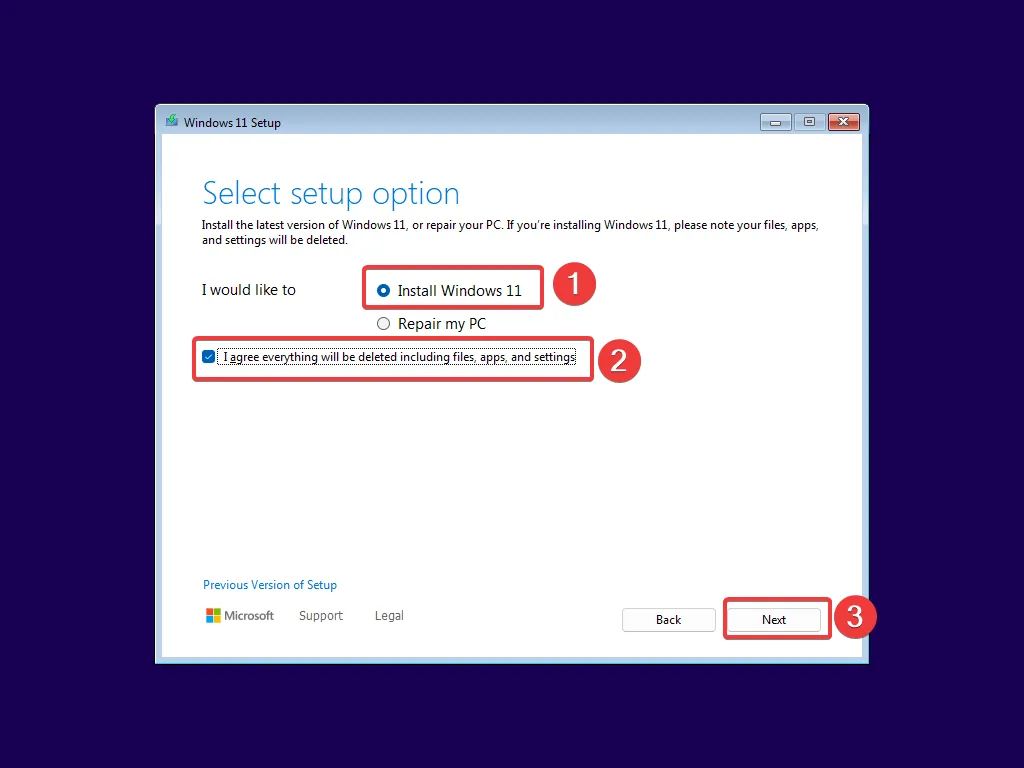
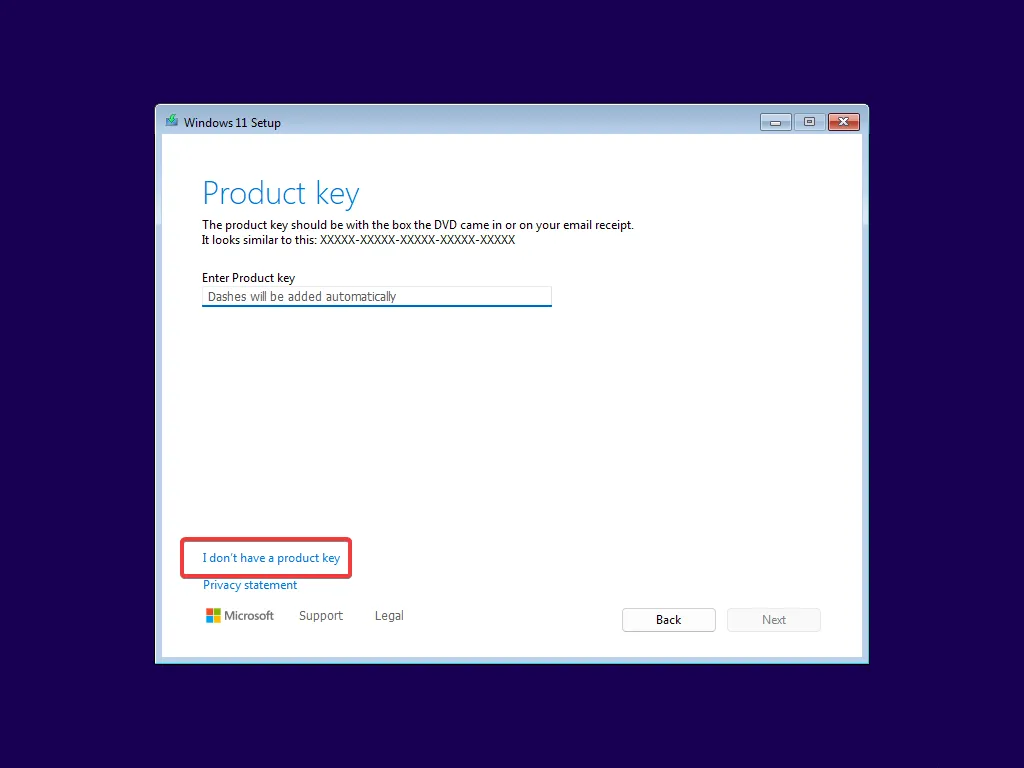
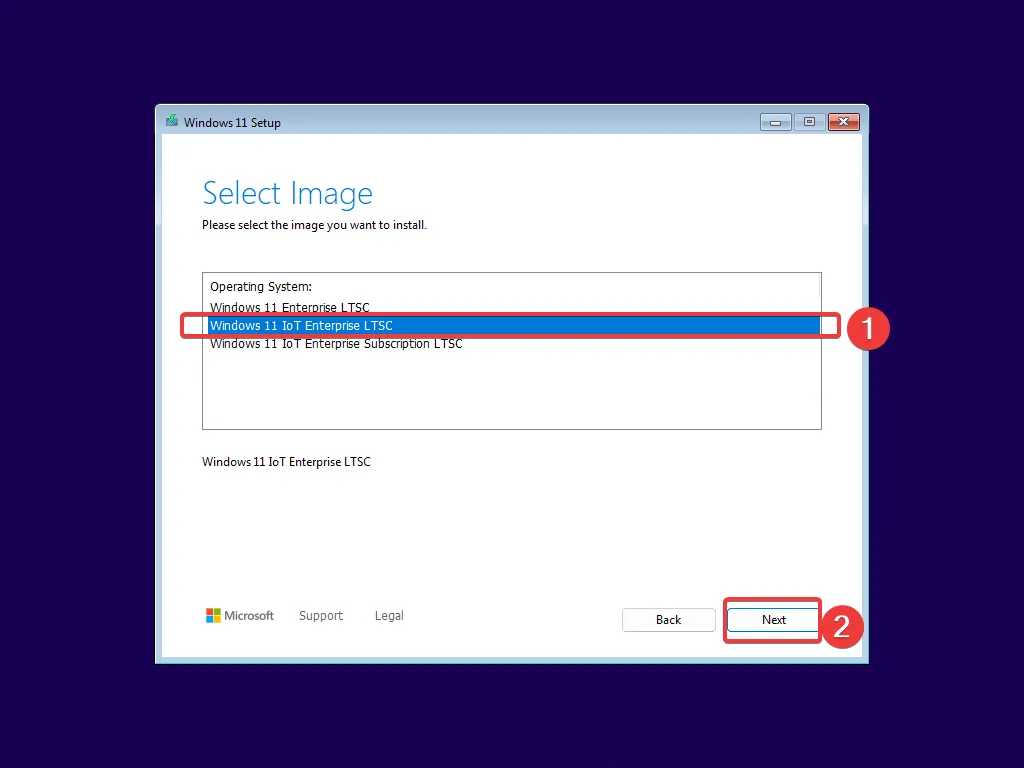
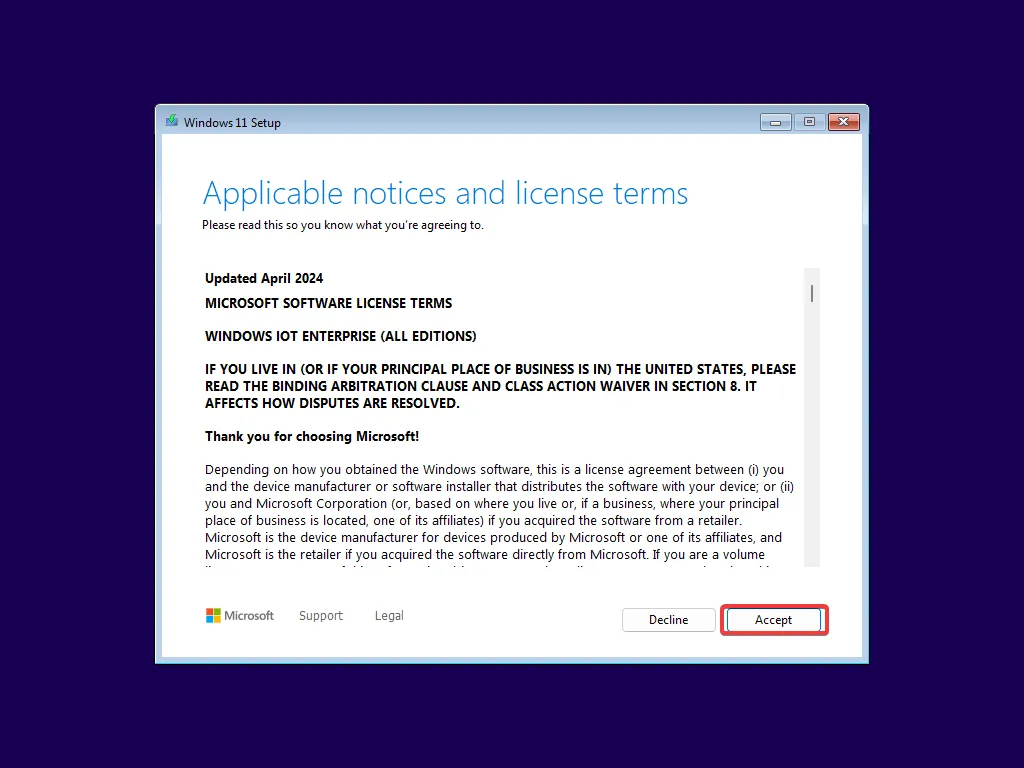
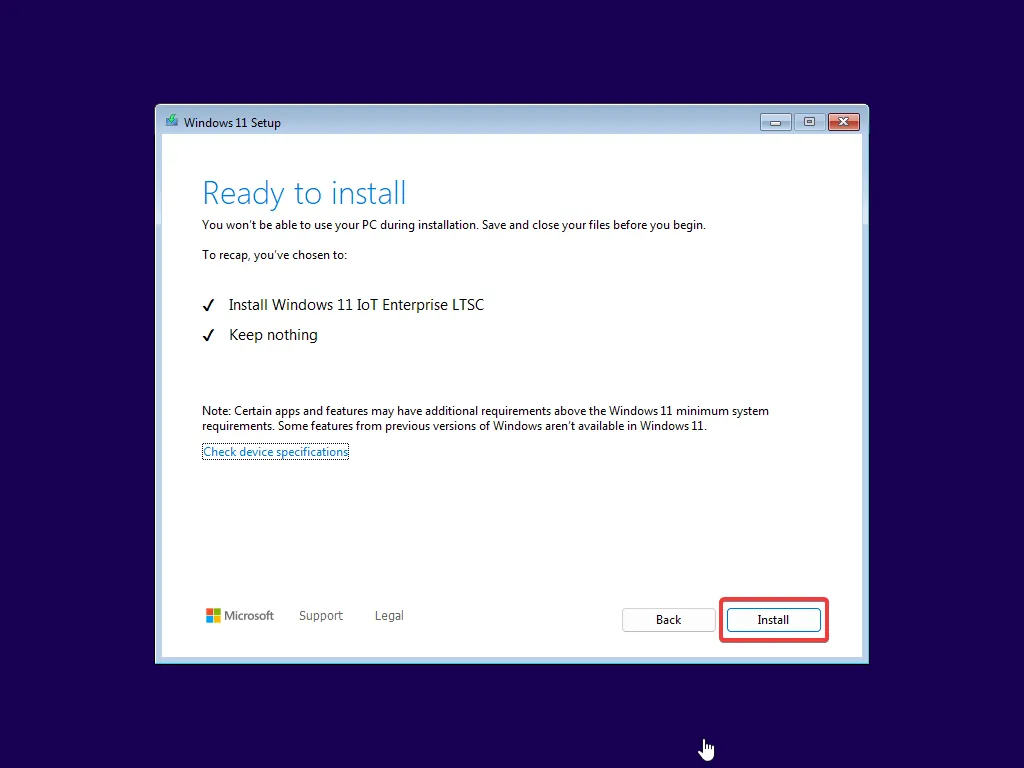
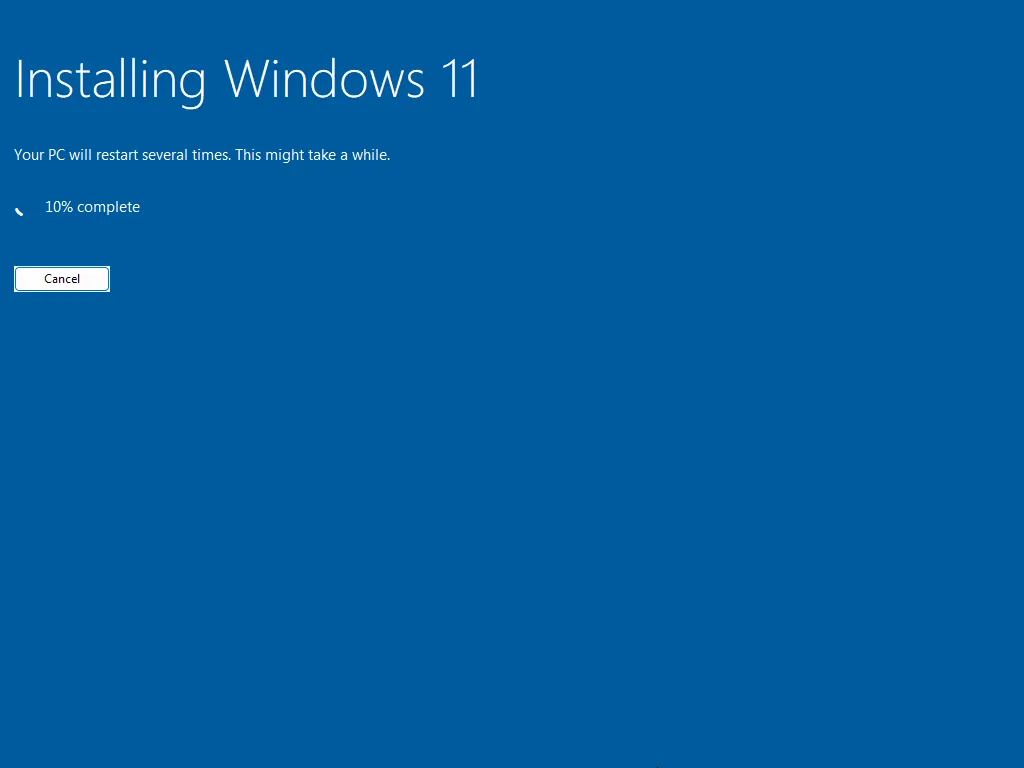
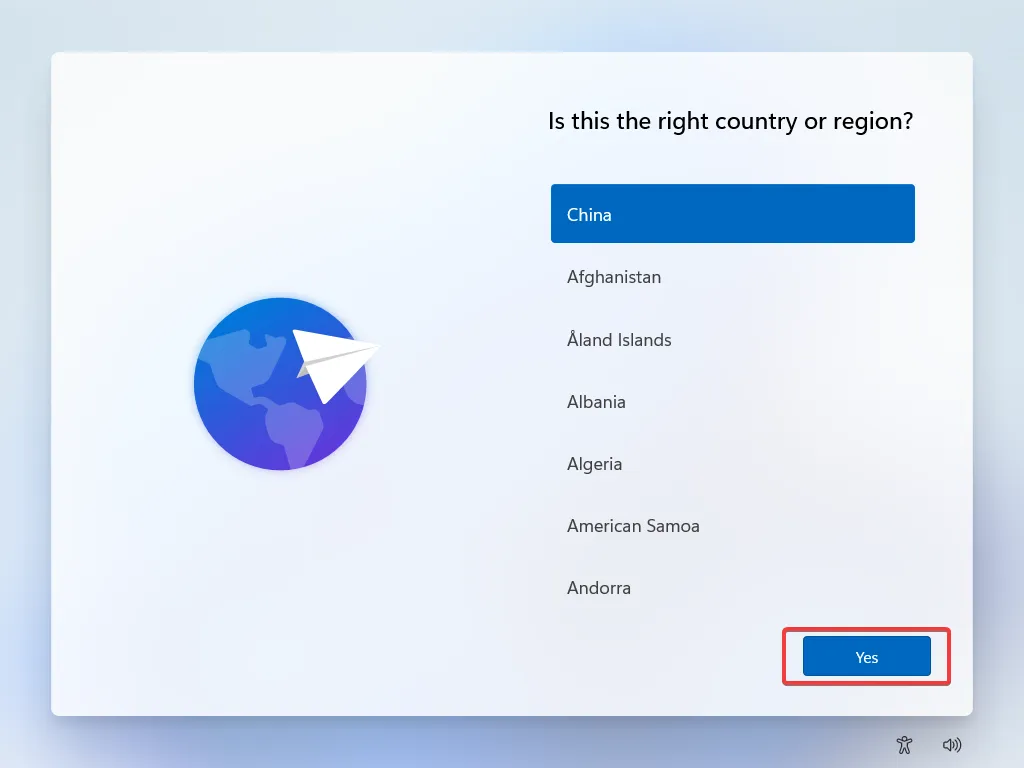
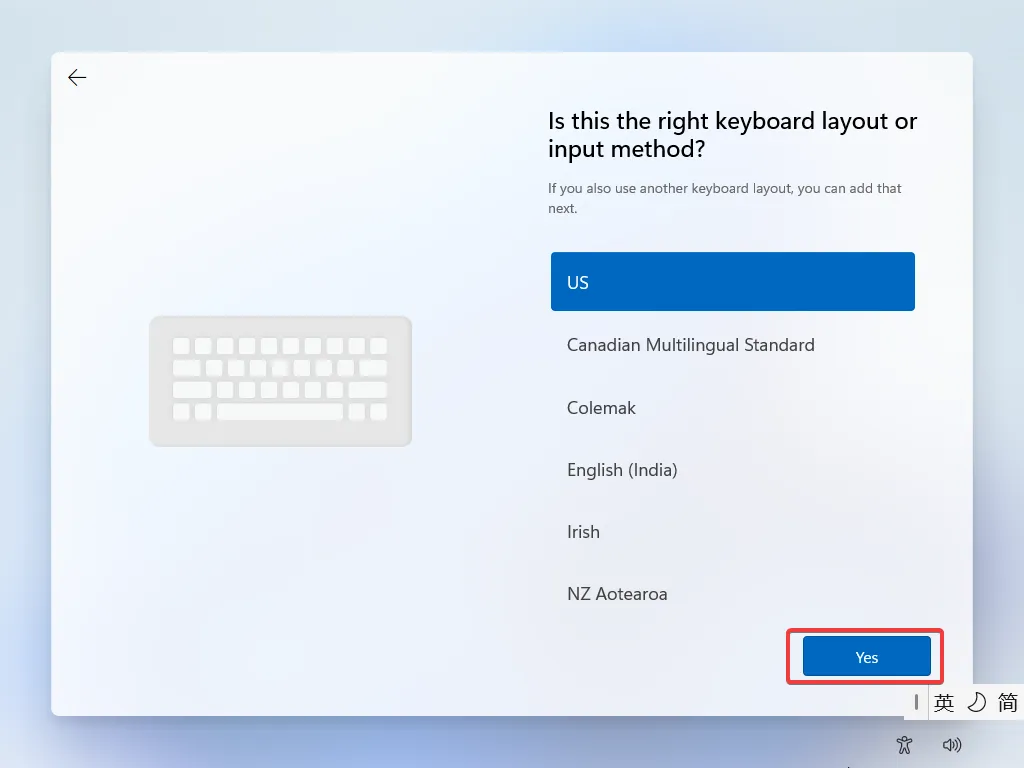
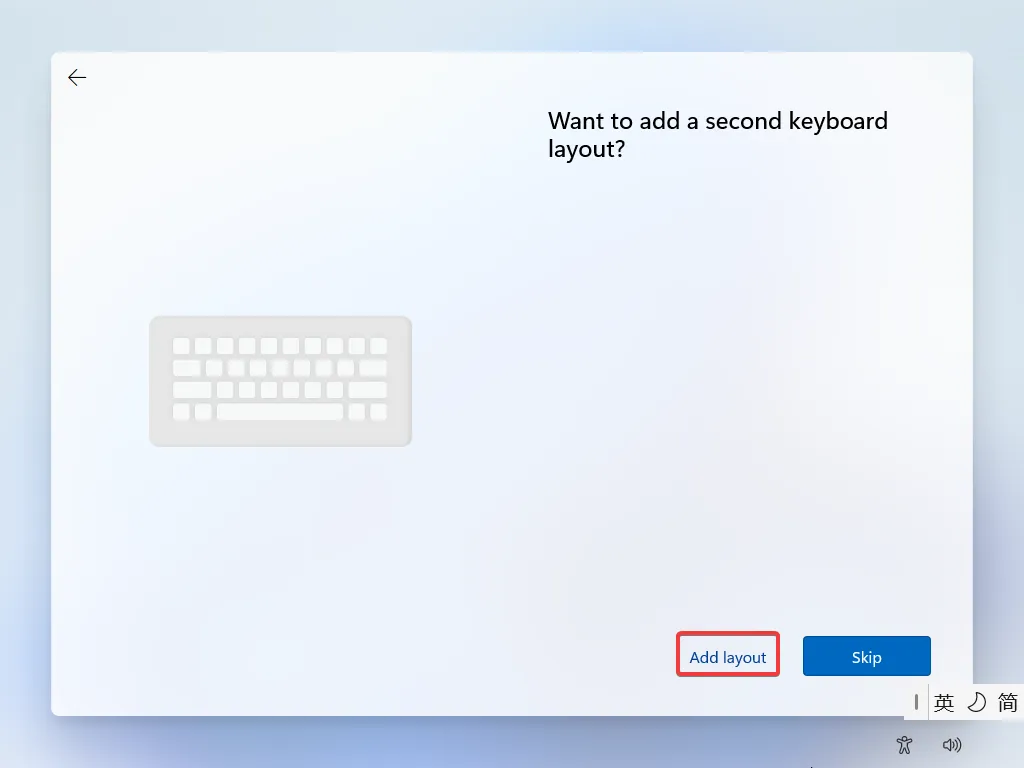
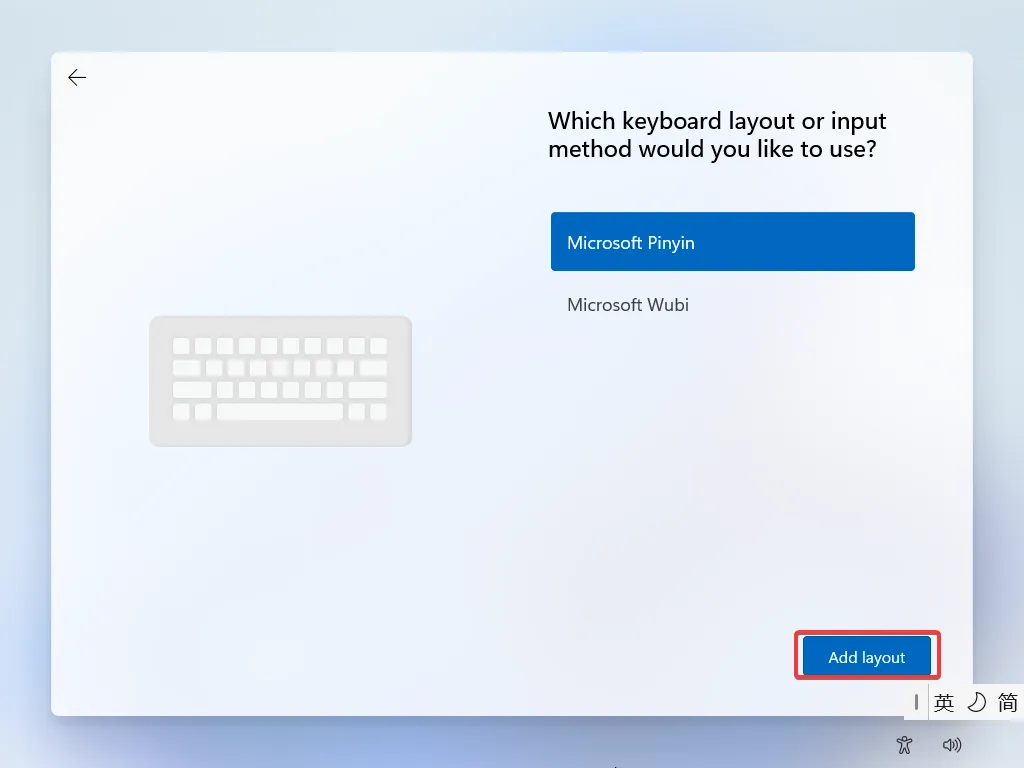
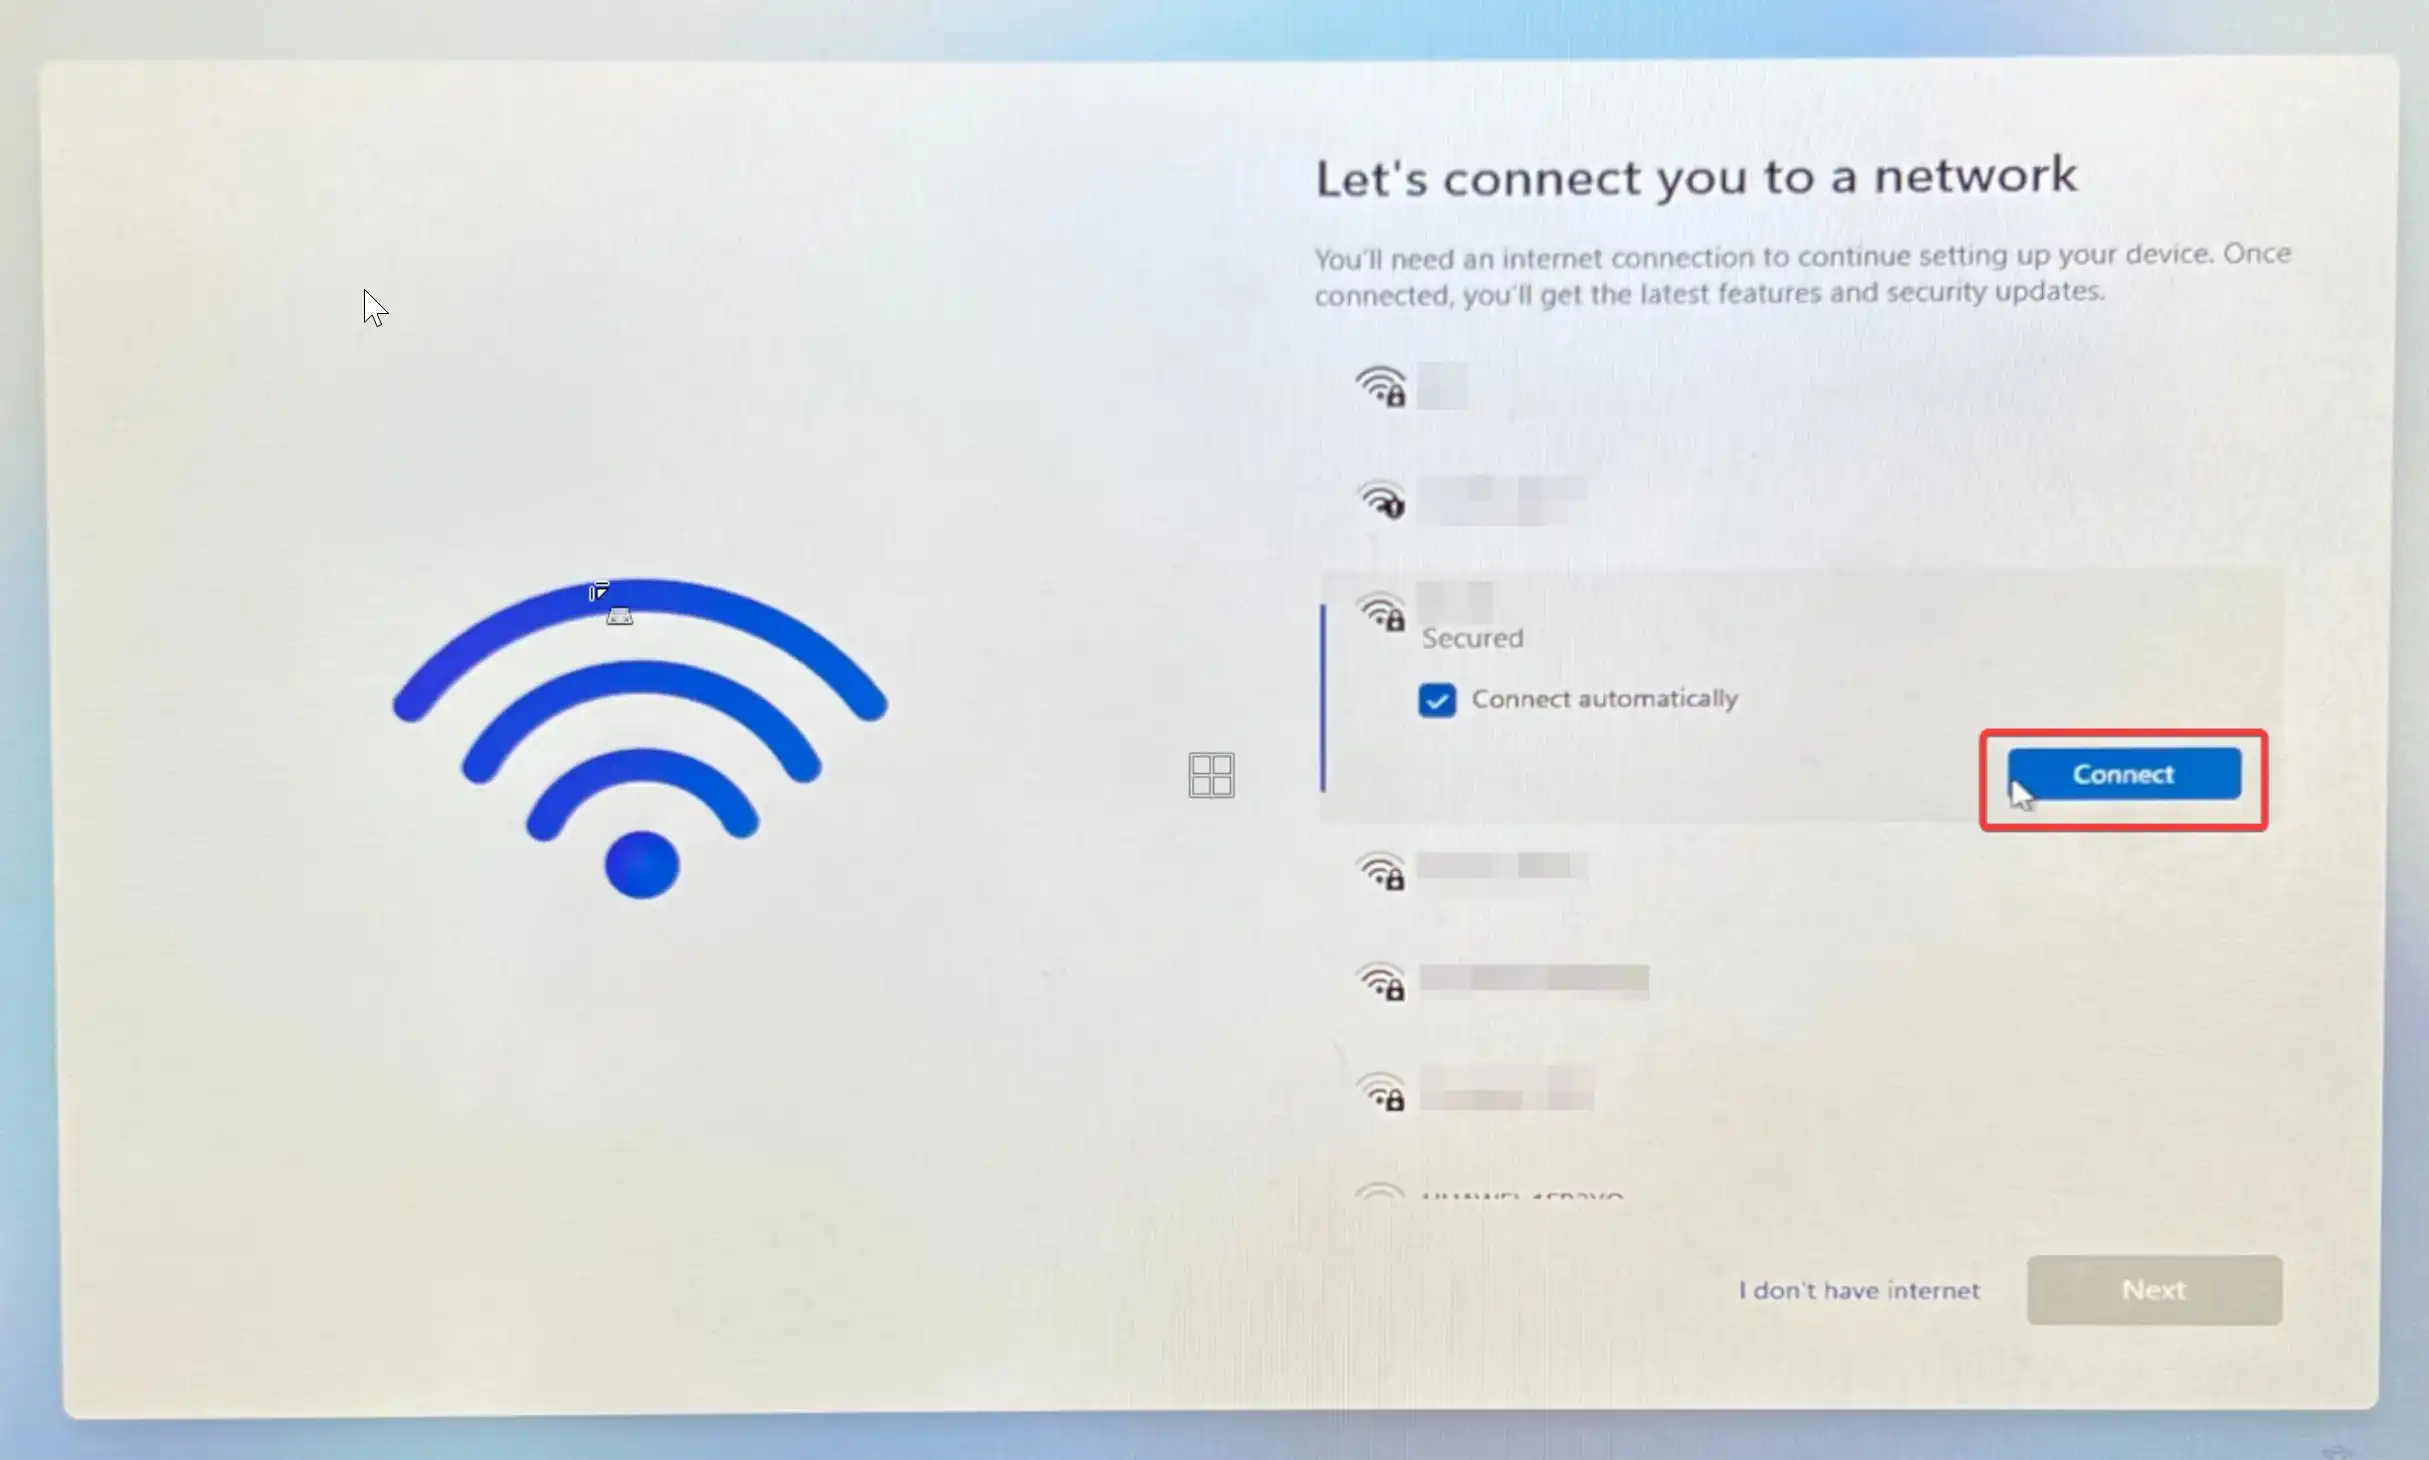
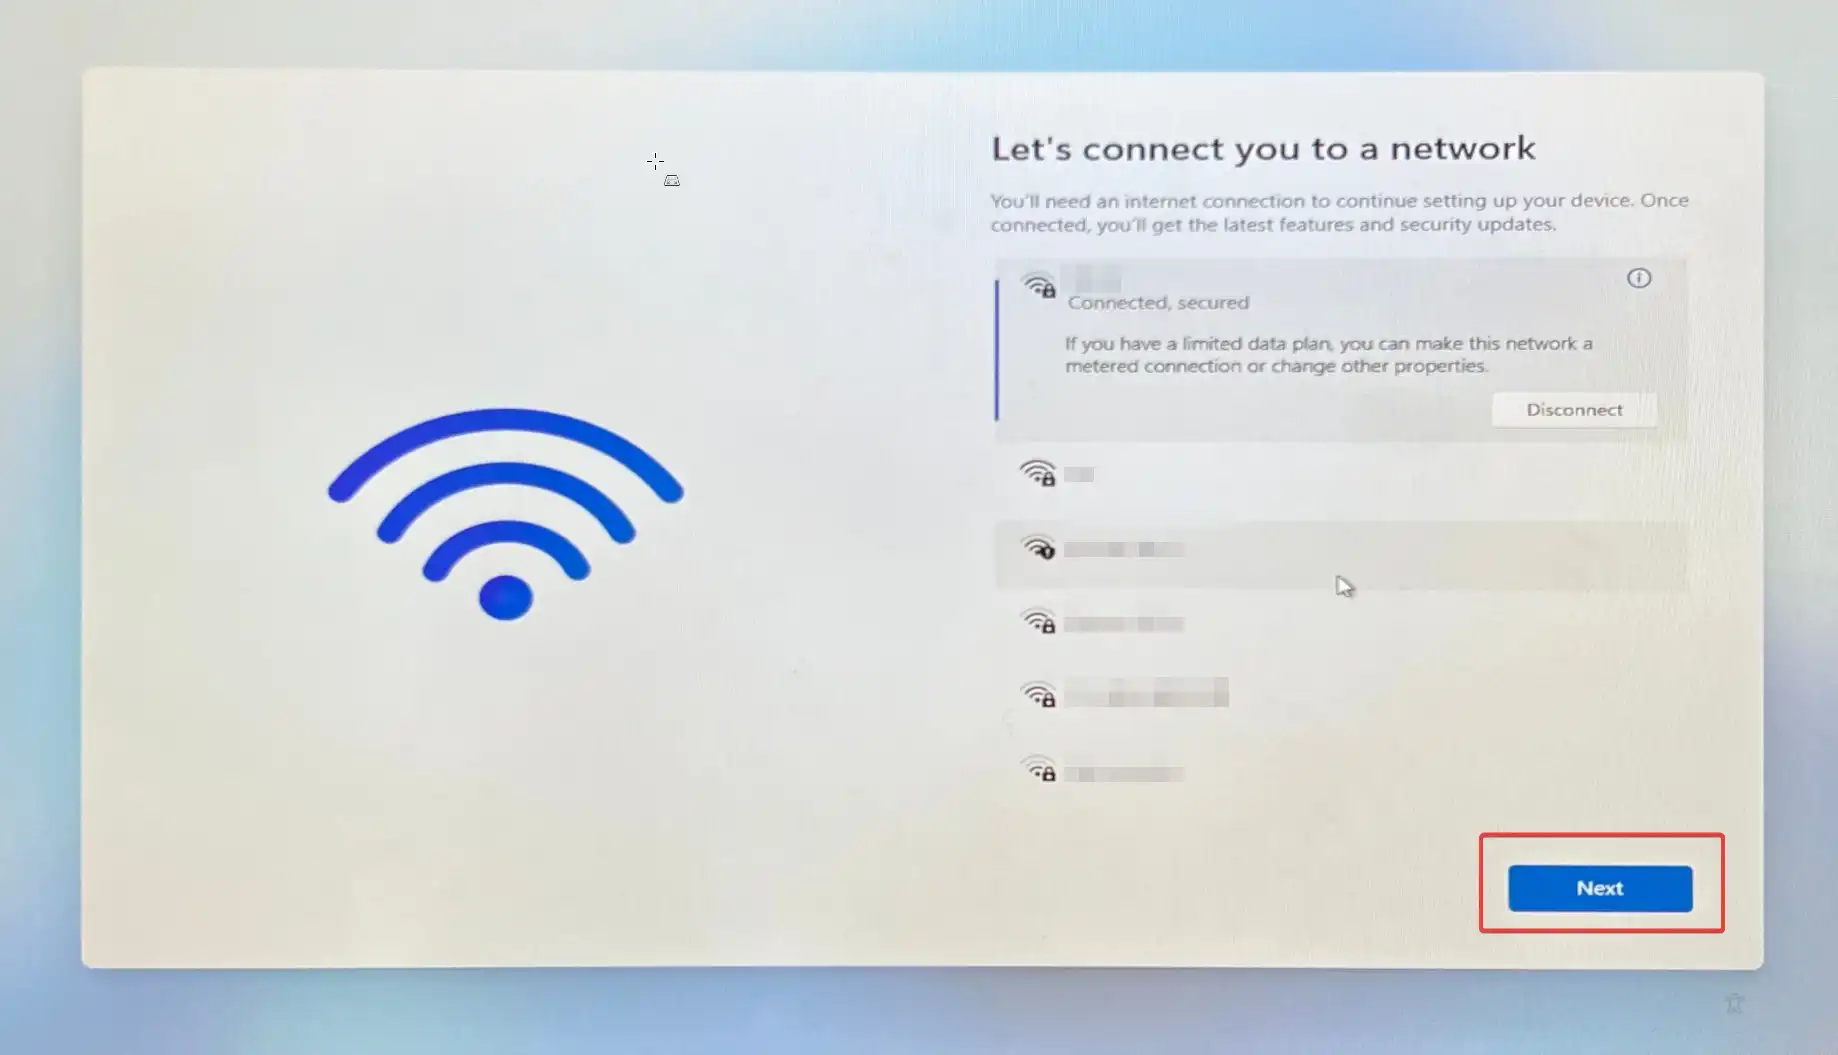
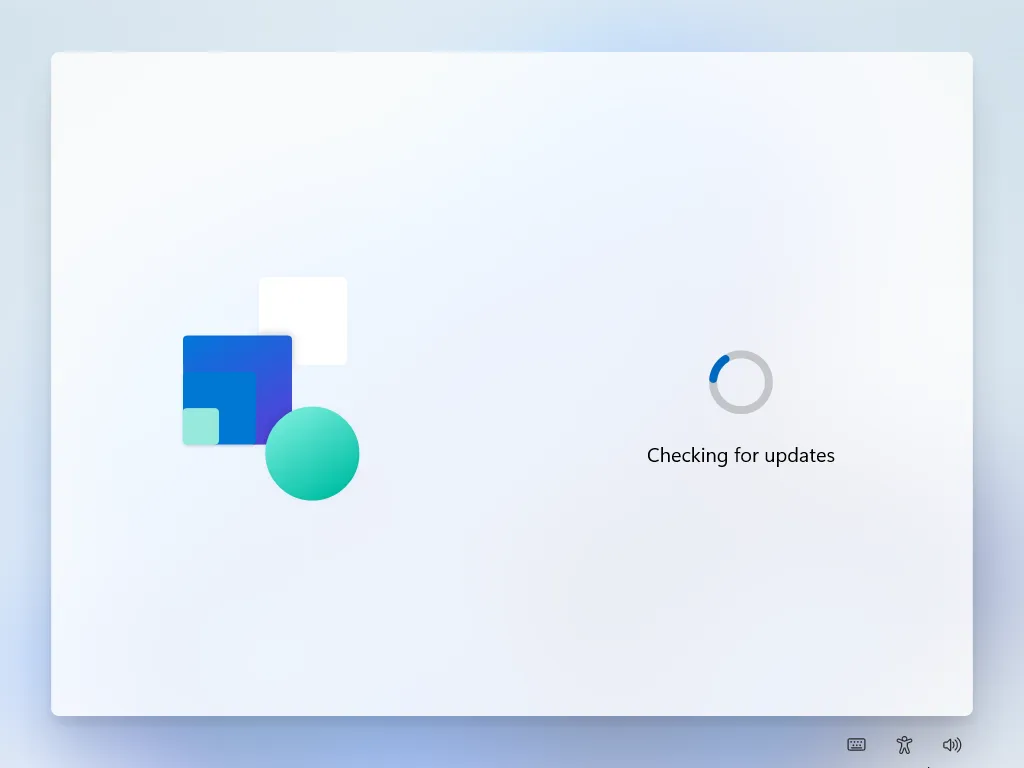
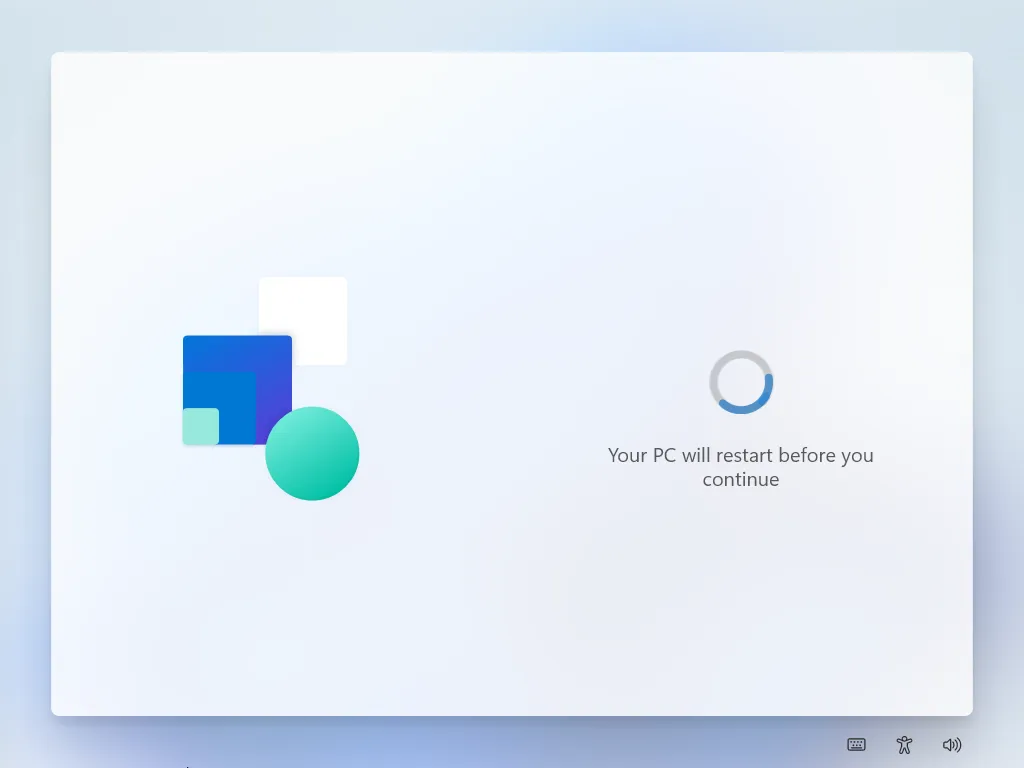
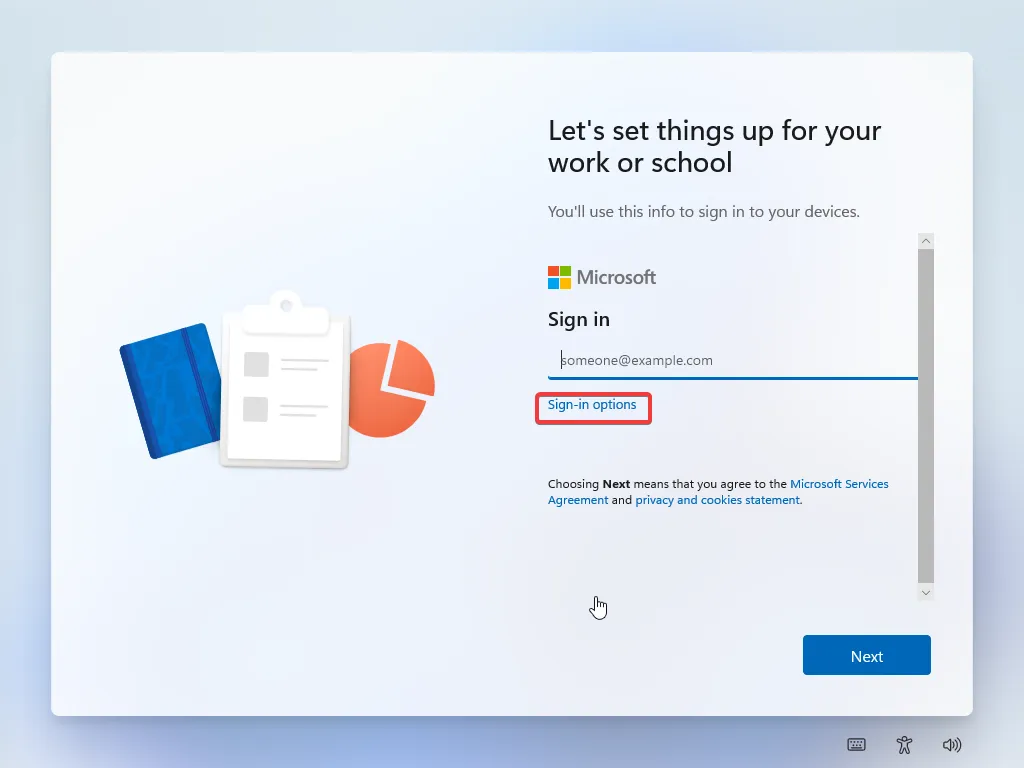
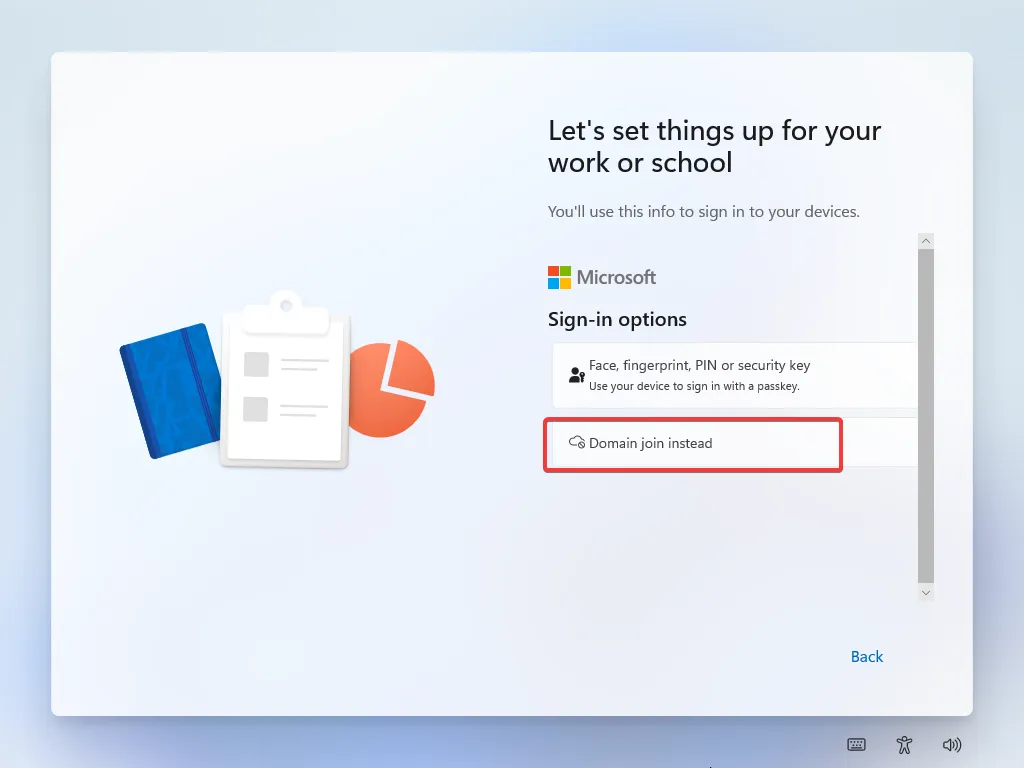
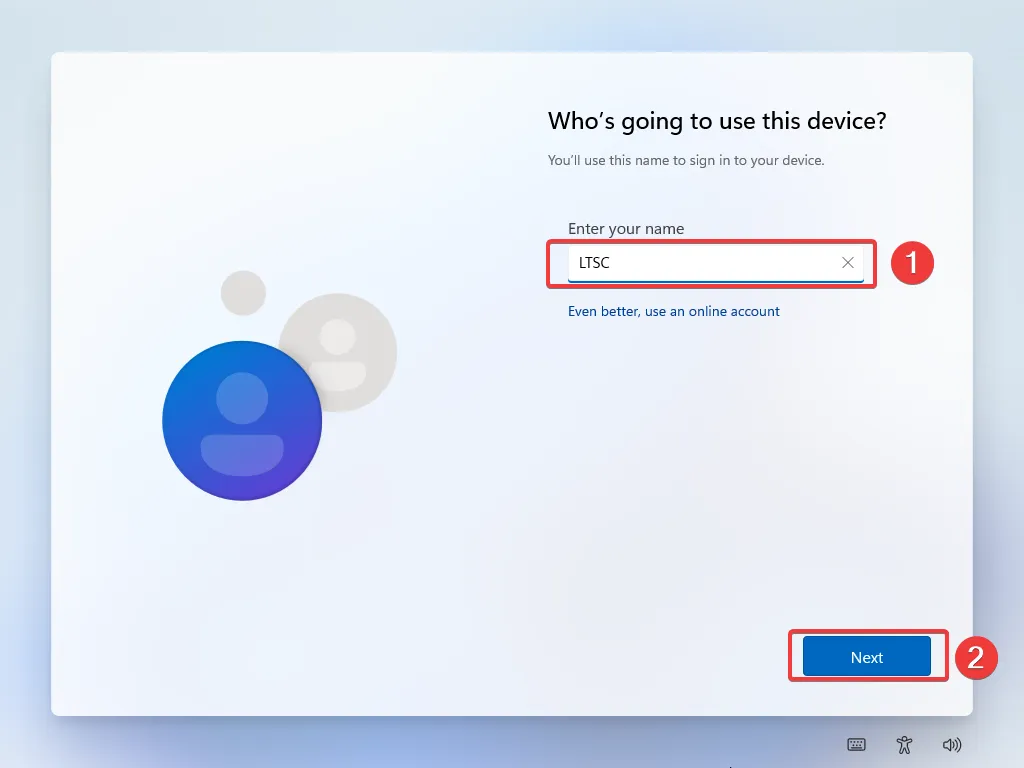
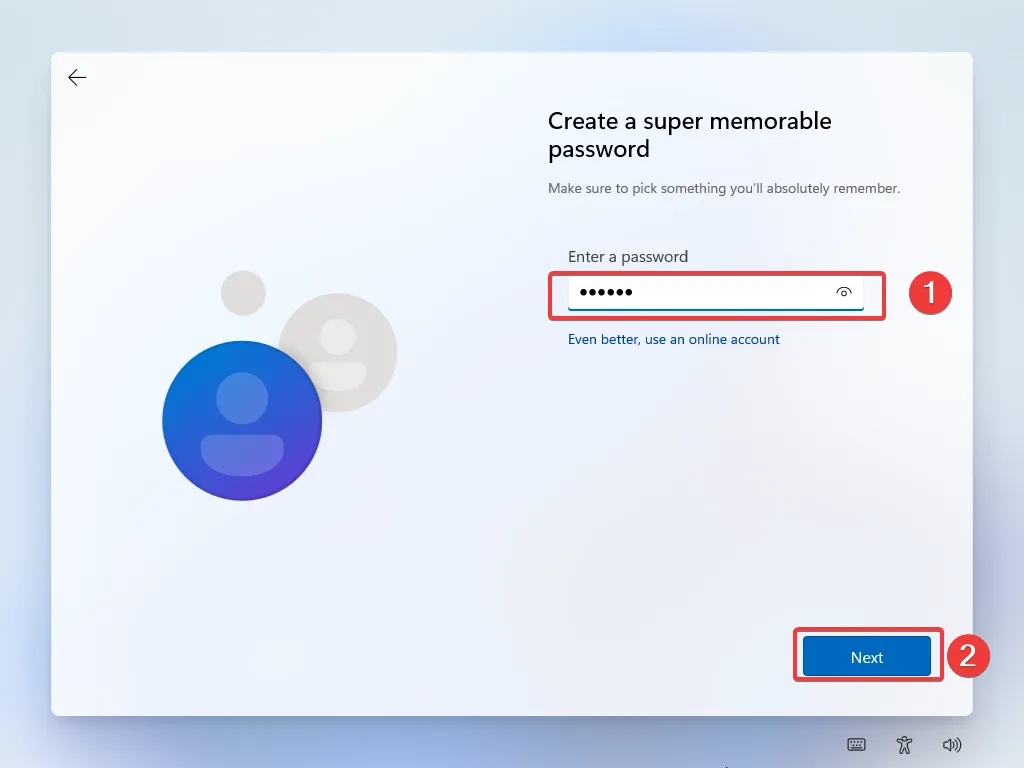
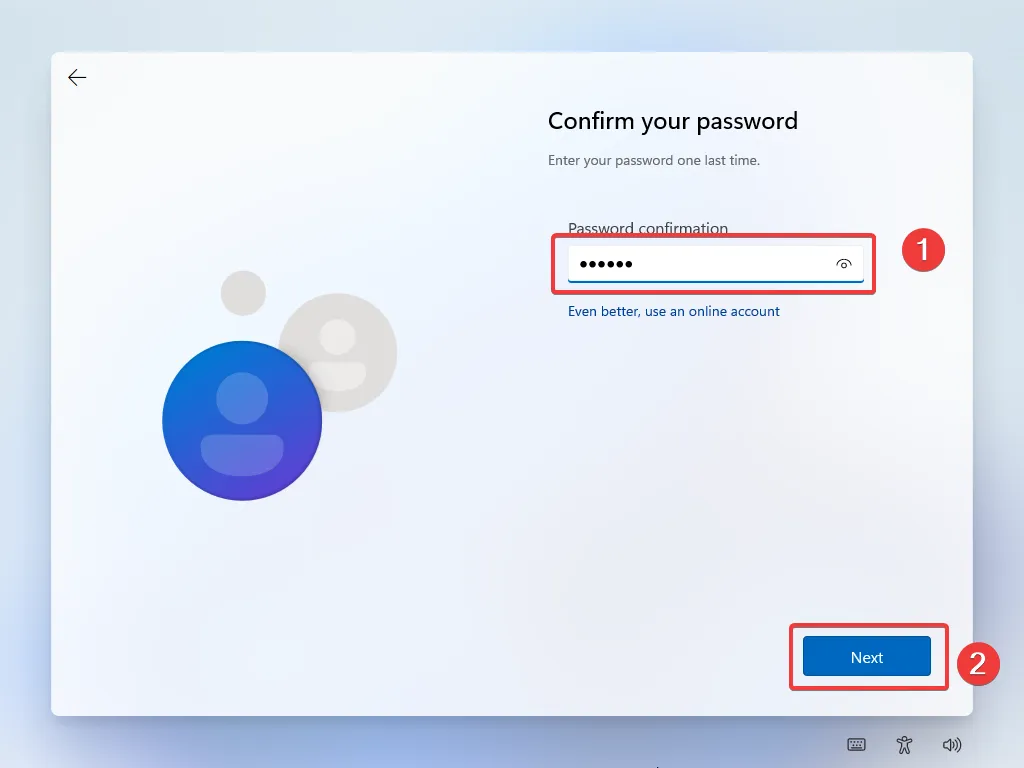
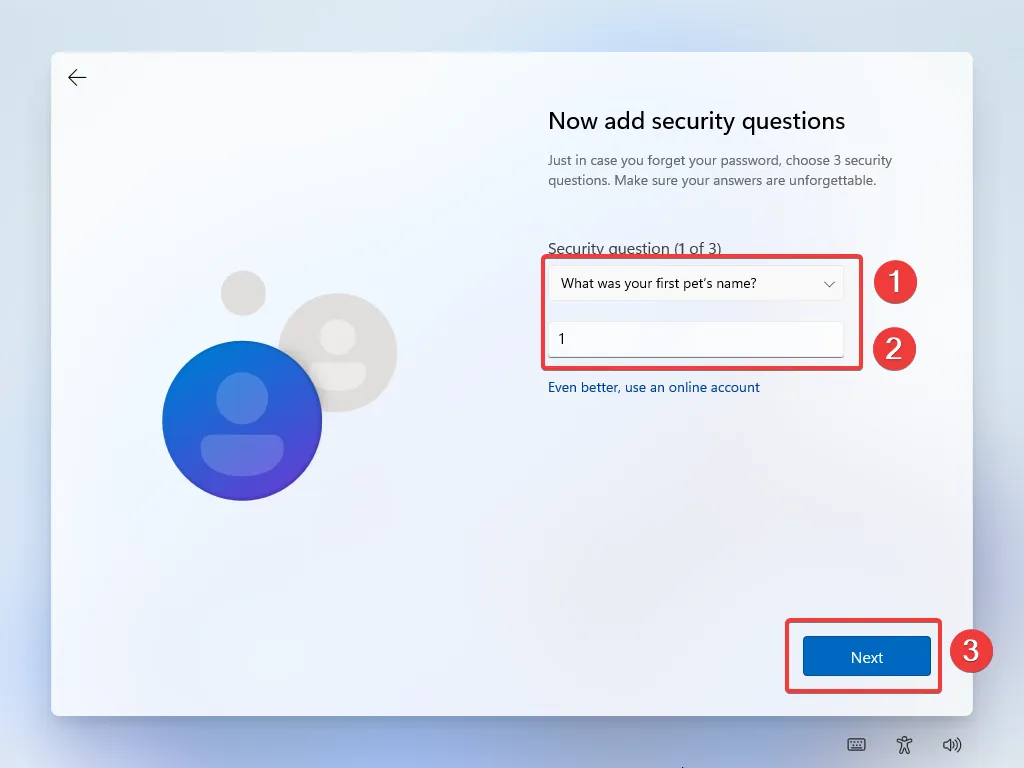
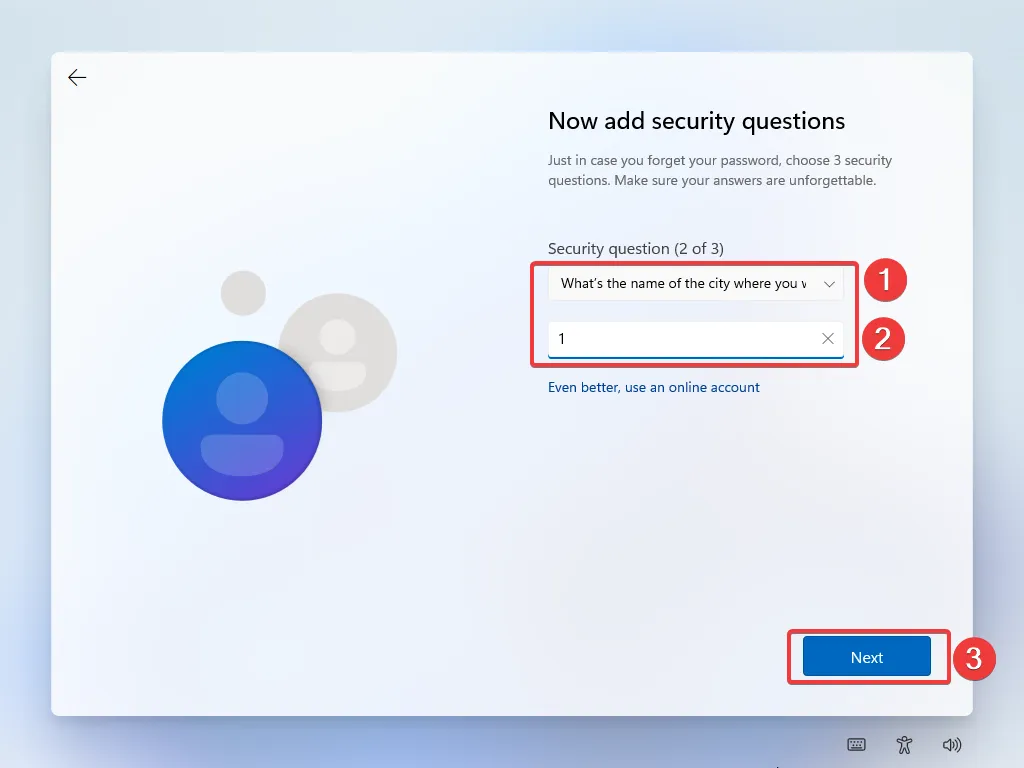
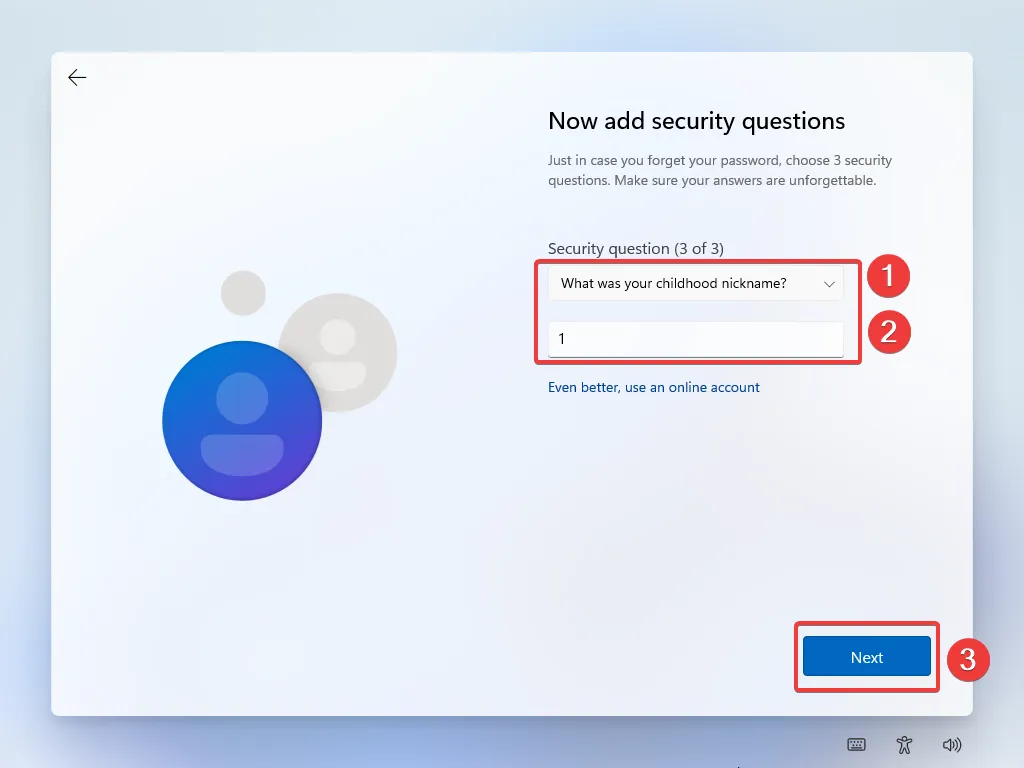
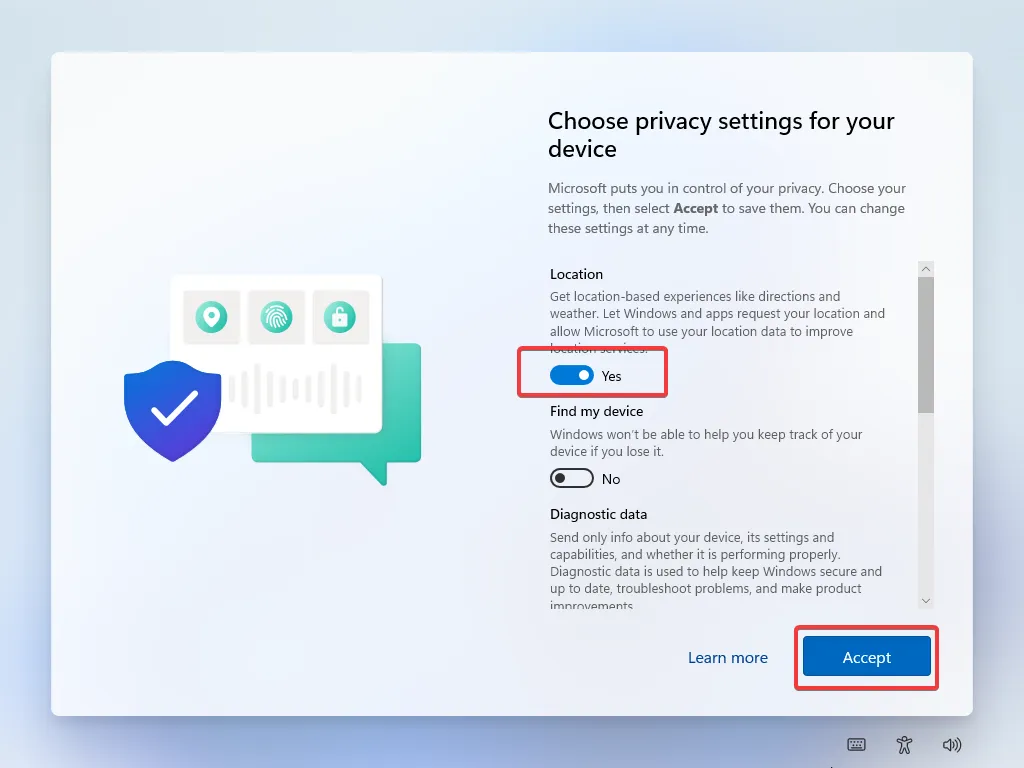
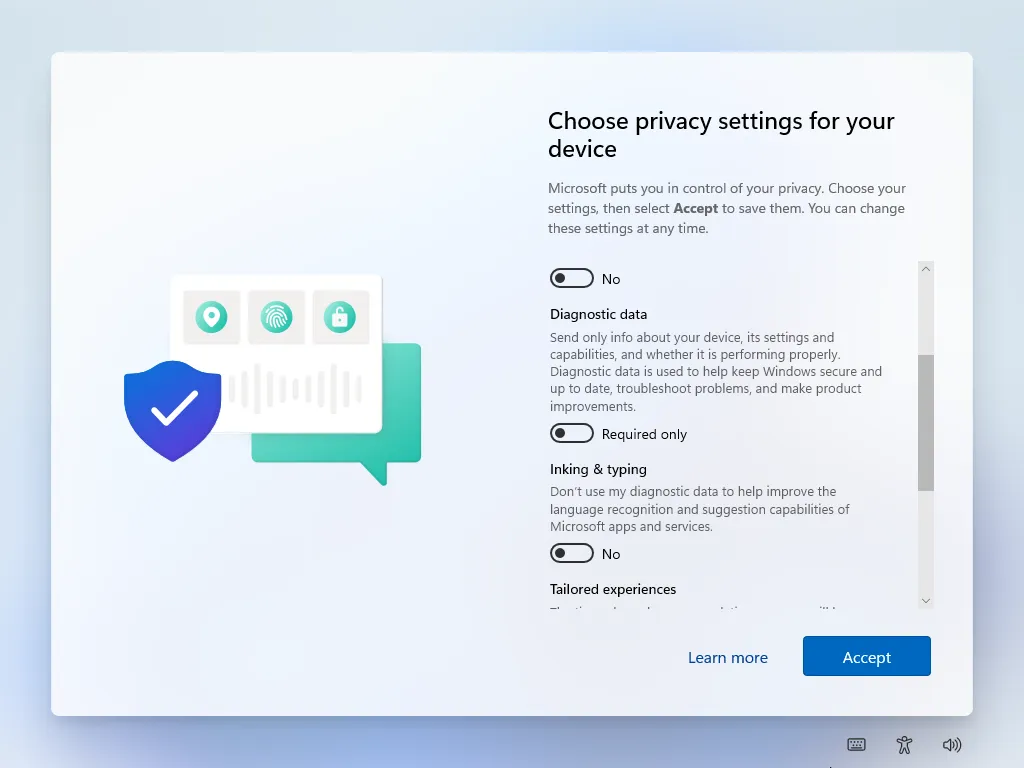
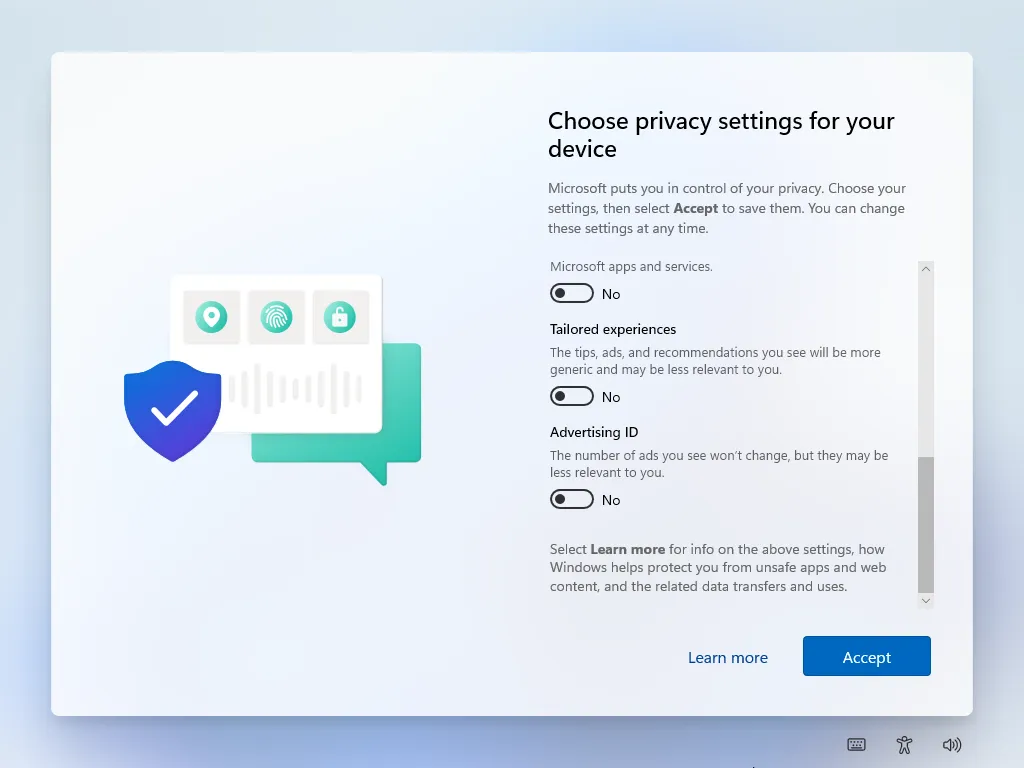
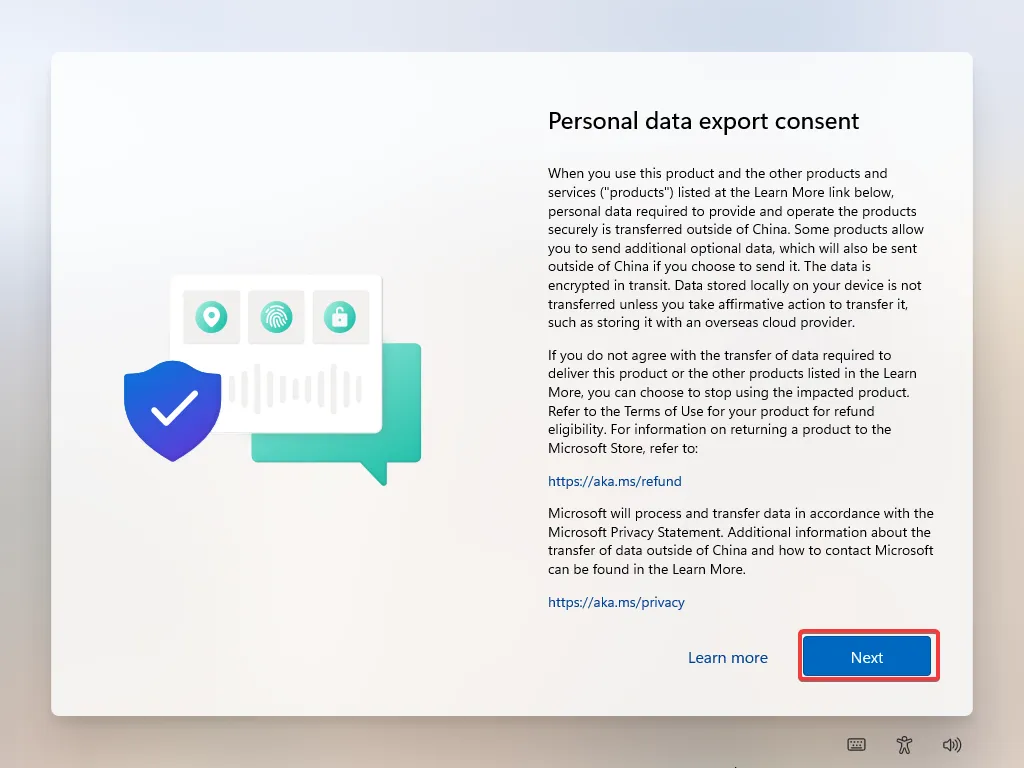
If all goes well, after rebooting, your computer will enter the Windows installation program. The steps from here are straightforward — just follow the prompts step-by-step, though there are quite a few of them. I’ve captured each key screen during the installation process, so I’ll just provide the images here instead of detailing every step, as writing it all out would be a bit much. Additional explanations for certain sections will be included in yellow text boxes below.
Command Line Disk Wipe Instructions
This method is ideal for those who want a completely clean install by wiping all content on the disk, as I do for every reinstallation.
Important: If your computer has multiple physical disks or one physical disk with multiple partitions and you only want to format the C: drive, do not use this method!
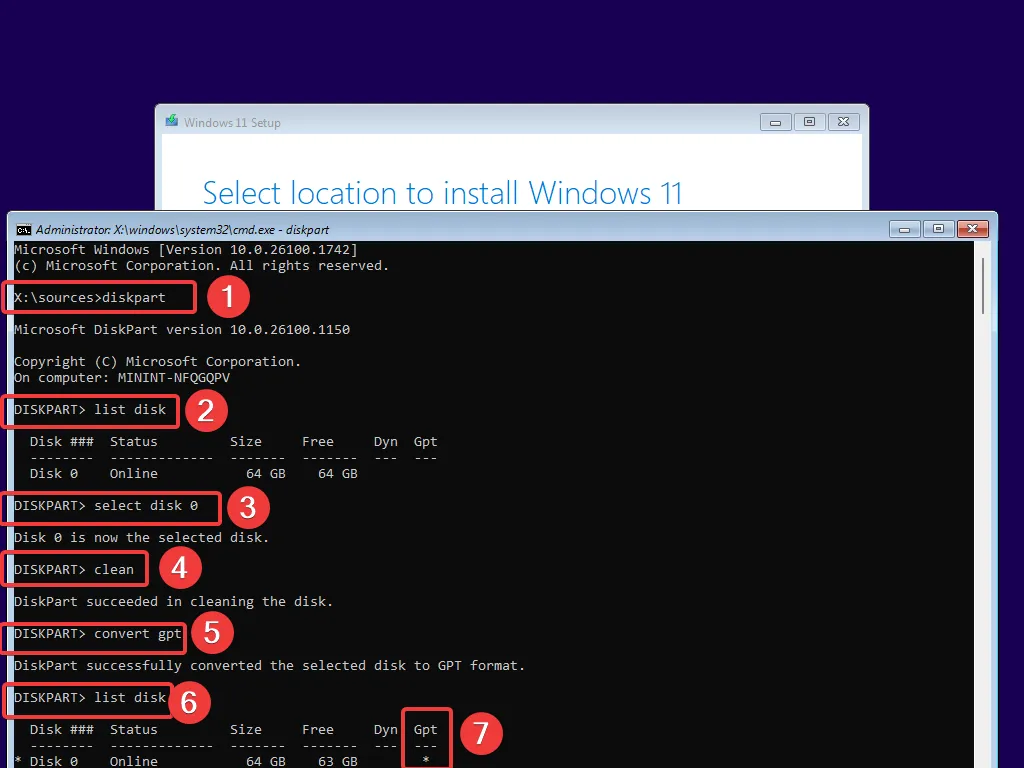
- On the “Select location to install Windows 11” screen, press
Shift+F10to open thecmdwindow (some devices may requireFnto be pressed along withShiftandF10). - Type
diskpartand press Enter. - Use the
list diskcommand to list all mounted disks. - Use the command
select disk [number]to choose the disk based on your setup.- Here, I’m installing on a virtual machine with a single disk, so the command is
select disk 0. - Typically, you will see at least two disks listed (your USB drive and the main disk). If you have multiple physical drives, they will all appear here, so take care not to accidentally select the USB drive. You can differentiate them by checking the disk sizes.
- Note: Here you’re selecting a physical disk, so even if one physical disk has multiple partitions, it’s still viewed as a single disk.
- Here, I’m installing on a virtual machine with a single disk, so the command is
- Enter
cleanand press Enter to erase all contents on the selected disk. - Type
convert gptand press Enter to format the disk as GPT. - Finally, use the
list diskcommand again to verify the disk status.
Partitioning Guide
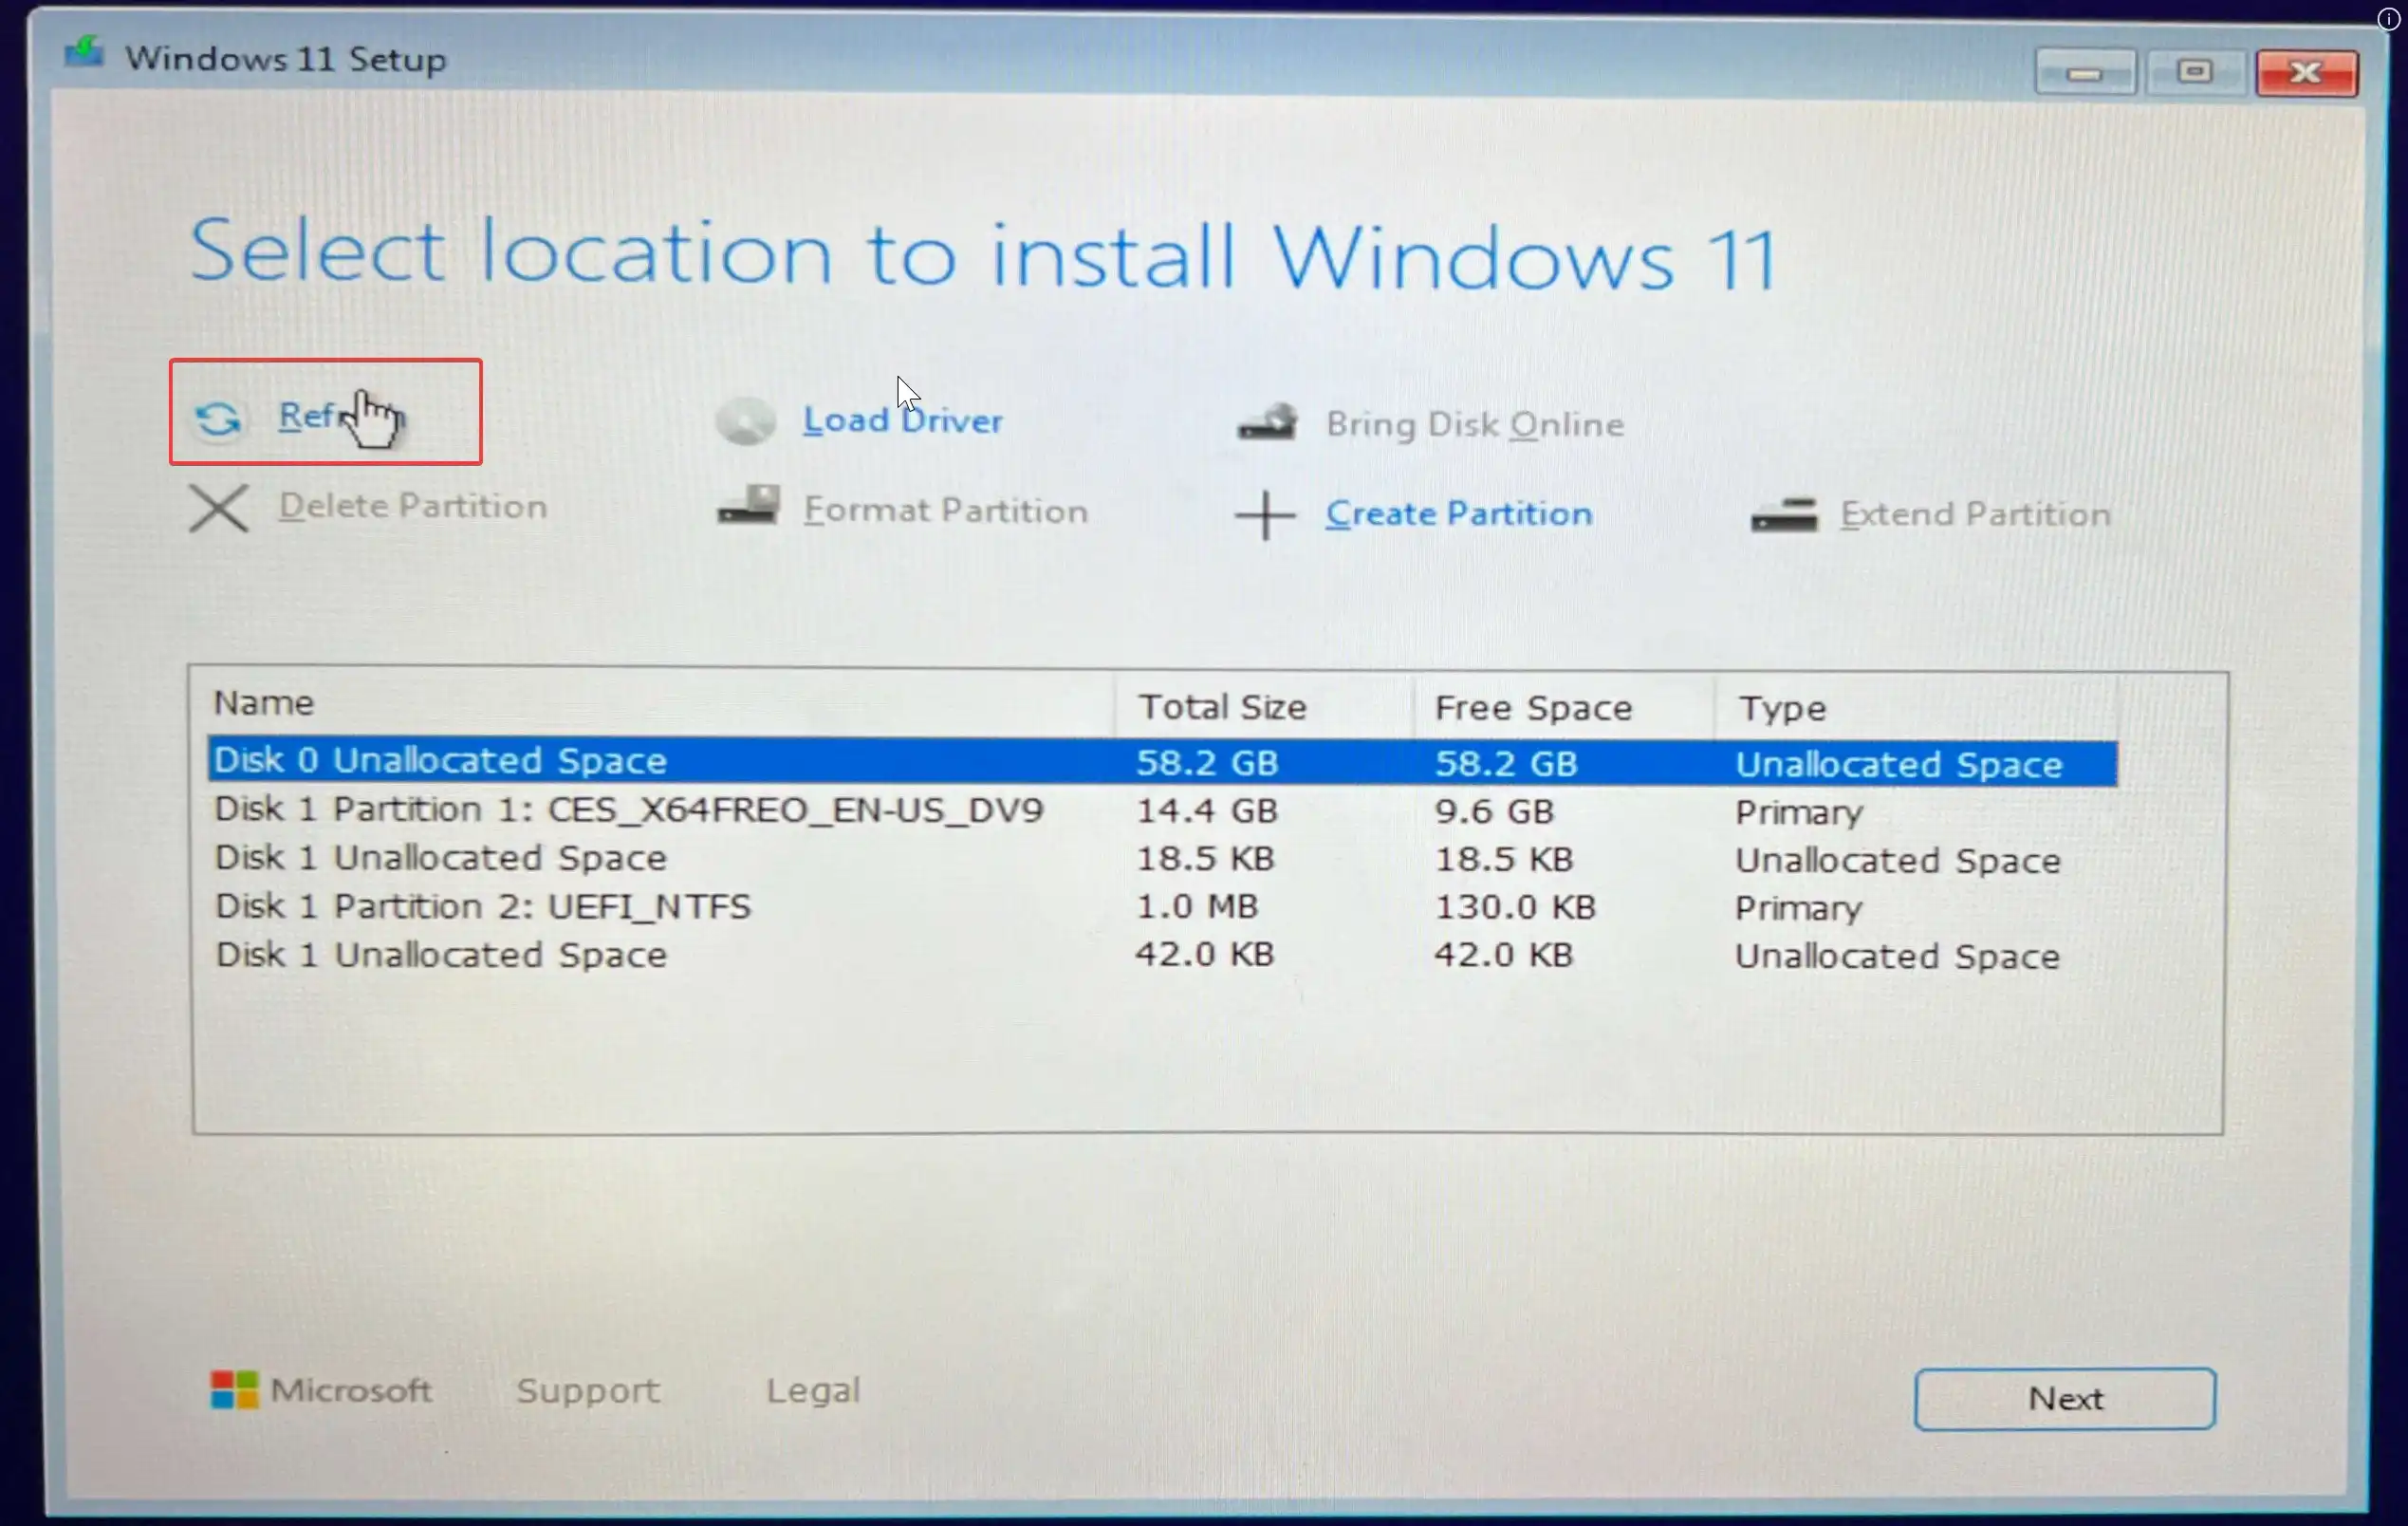
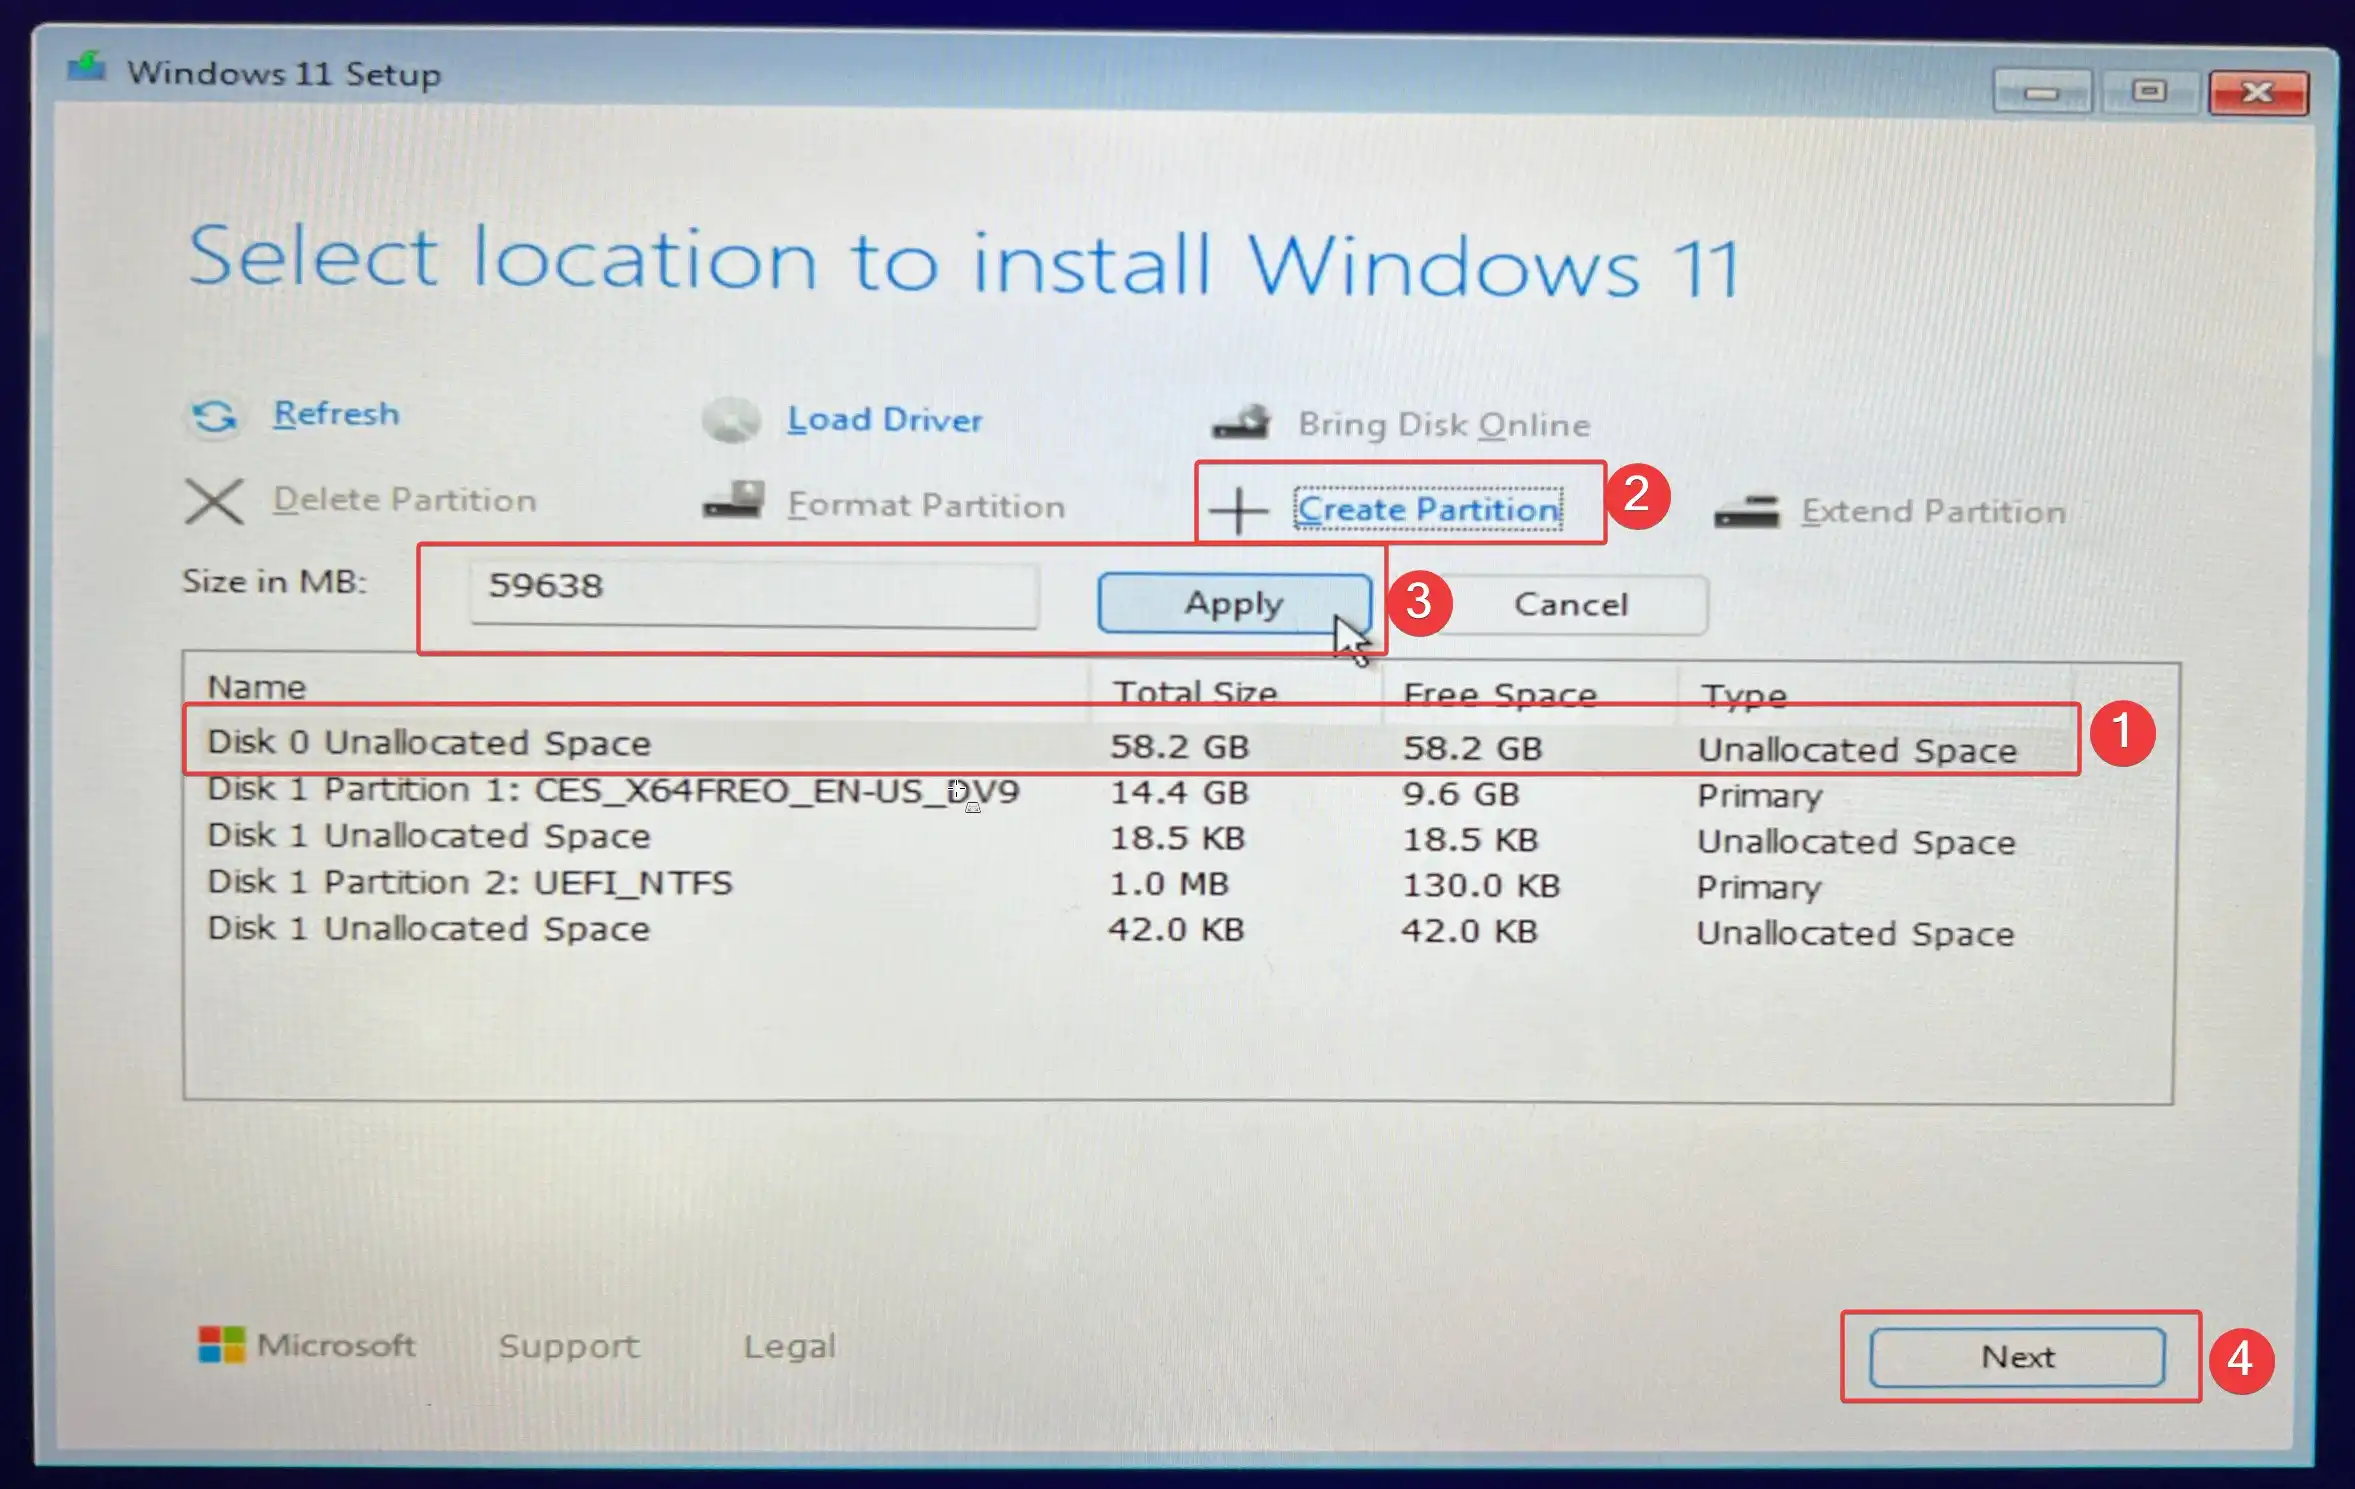
If you’ve used the command line to clear your disk, you can proceed directly with partition creation by selecting the main disk and creating a new partition.
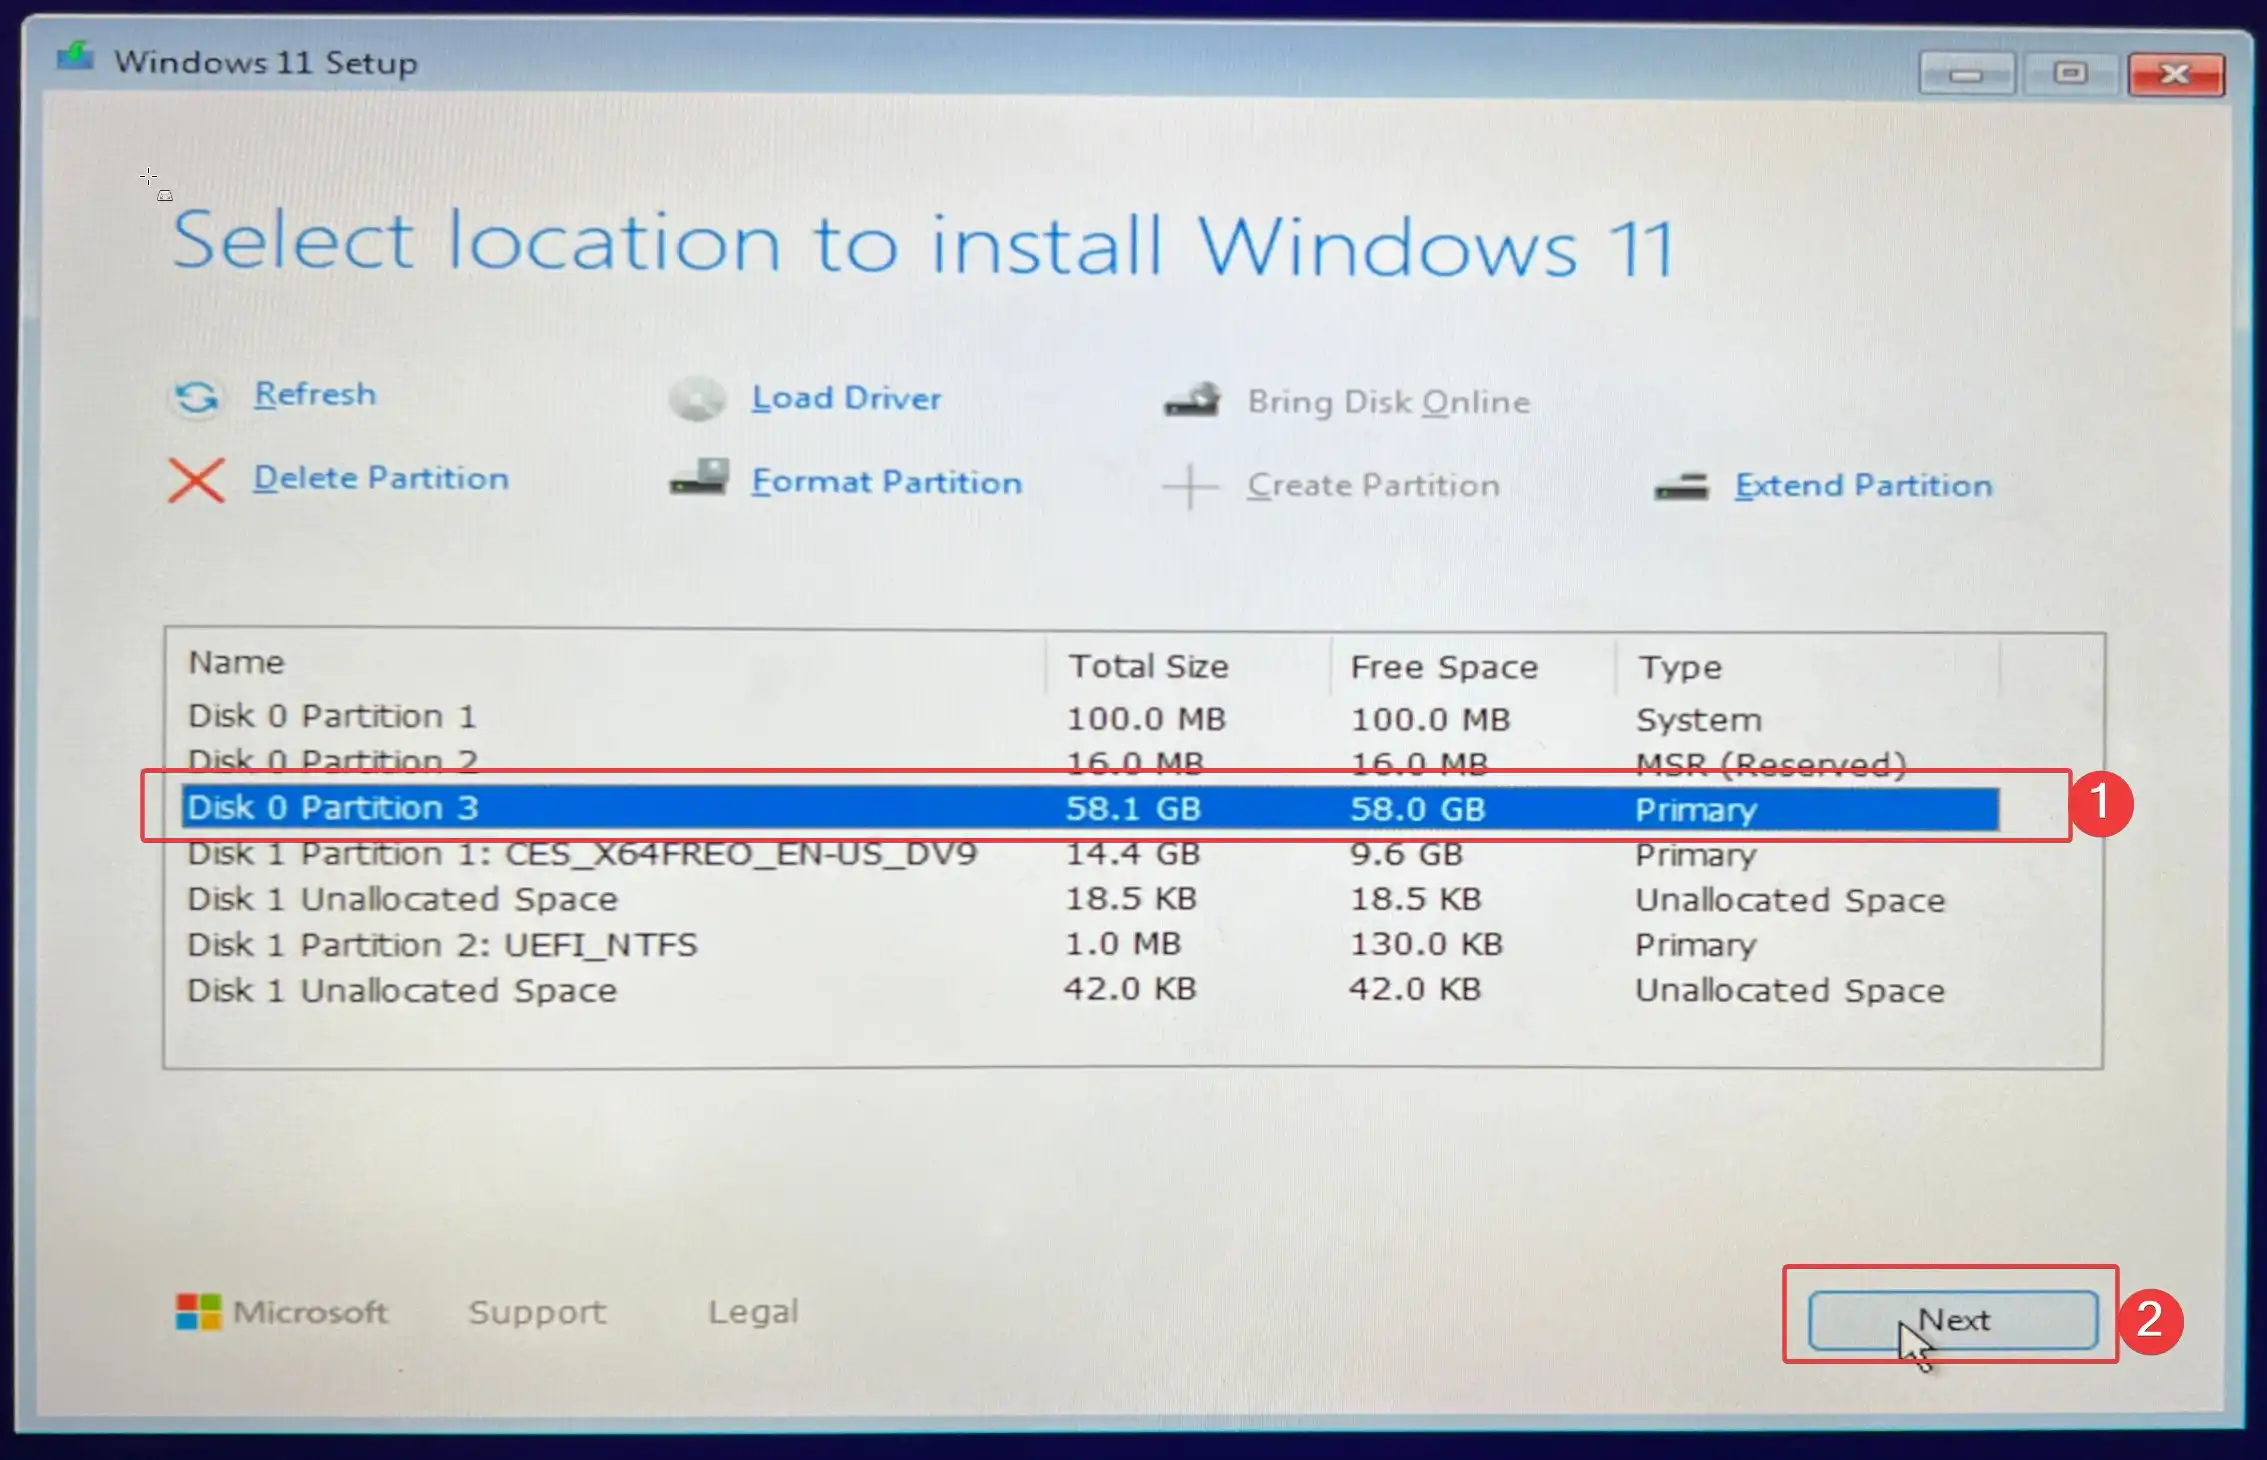
When creating a new partition on an unpartitioned disk, the system will automatically divide the disk into three parts:
- A 100MB System Partition (for EFI boot).
- A Recovery Partition (MSR (Reserved)) of a few hundred MBs.
- The largest Primary Partition (C: drive) where the system will be installed. Select this primary partition and click
Nextto begin the installation.
You can also partition other disks at this stage or wait until after the installation to use Disk Management.
If you skipped the command line disk cleaning, select your previous system’s C: drive partition and format it (Format Partition) before proceeding with the installation.
Activation
Below are two activation methods. It’s important to note that systems activated using these methods are not legally considered genuine. Only a key purchased directly from Microsoft is legally legitimate. Microsoft, however, turns a blind eye to this practice. The following methods are for testing purposes only.
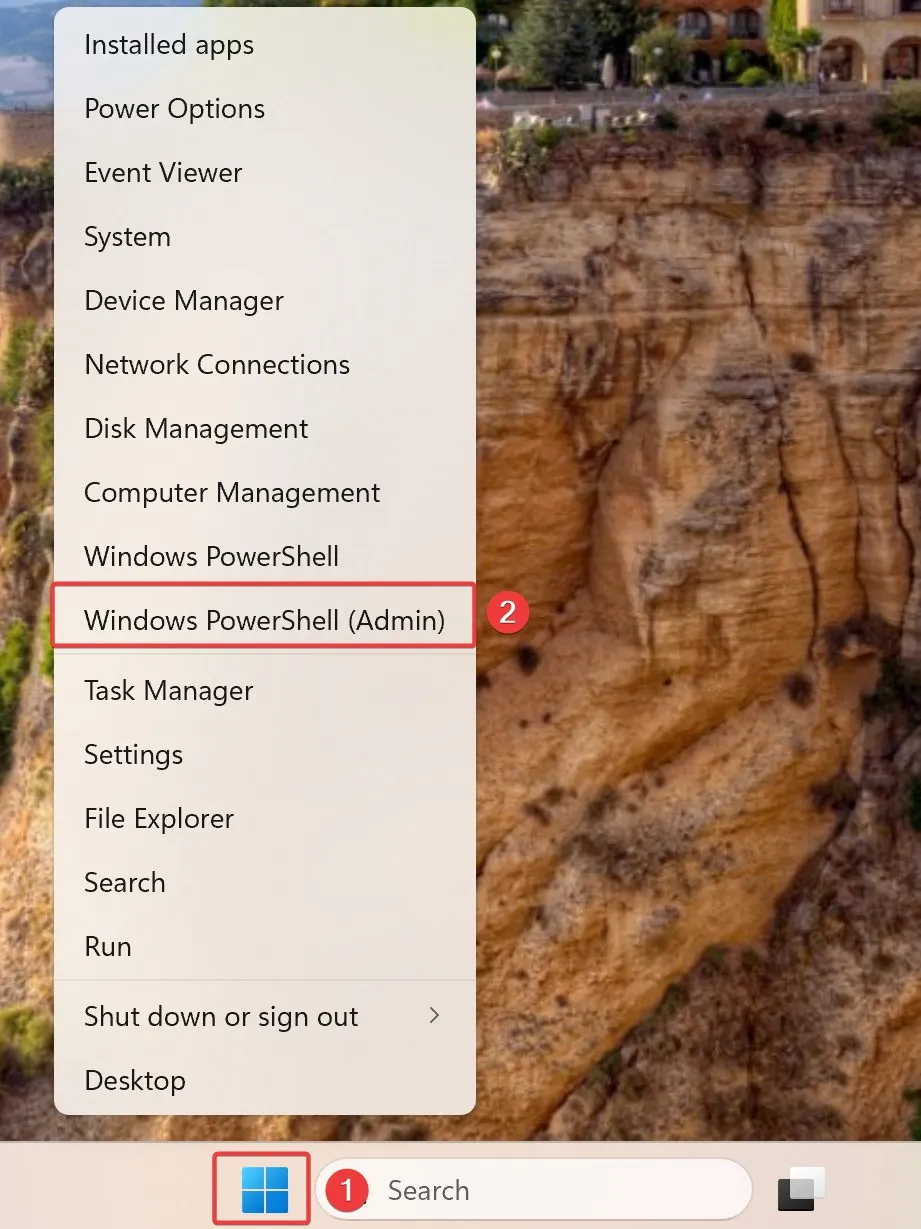
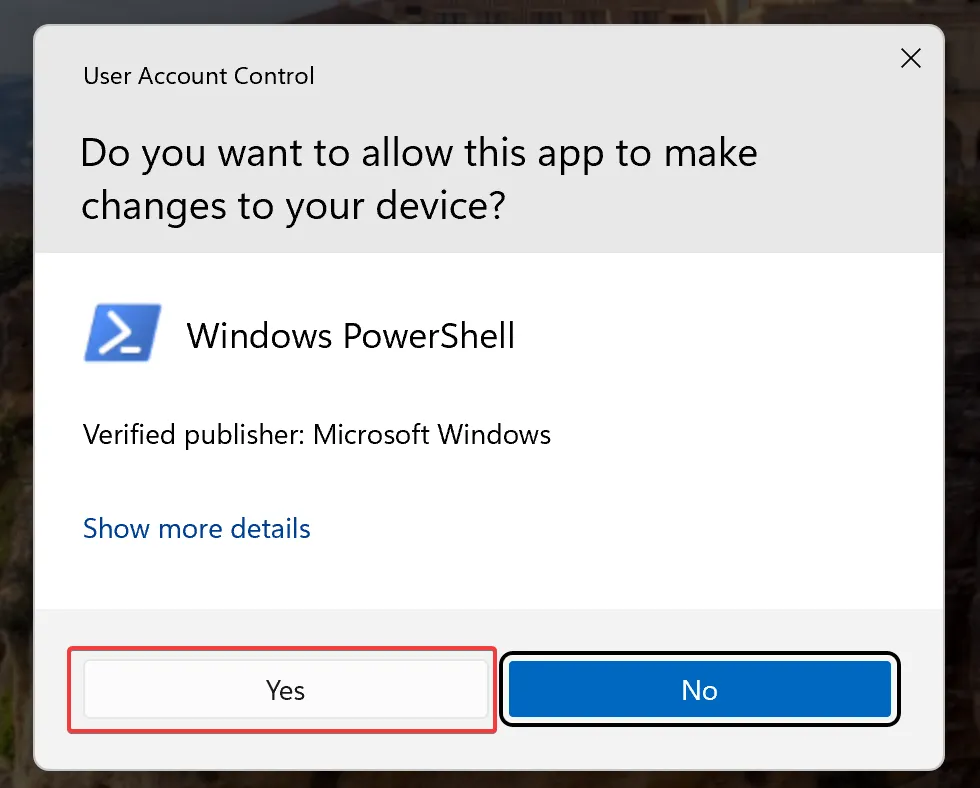
First, right-click the Start menu button (Windows icon) on the taskbar and select Windows PowerShell (Admin).
Before activating, check PowerShell’s execution policy by typing the following command:
1 | get-executionpolicy |
If the return value is Restricted, you’ll need to change the execution policy, or else the script won’t execute.
1 | Set-ExecutionPolicy RemoteSigned |
Then press a and hit enter to confirm the change.
About PowerShell’s execution policy
Content generated by ChatGPT:
The PowerShell Execution Policy is a security feature used to control the permissions and behavior of running scripts on Windows. It restricts the execution of scripts and configuration files to help prevent malicious scripts or unauthorized code from running on the system. The execution policy itself is not a true security measure; it is merely a mechanism to control script execution, not to prevent malicious scripts from running. It is primarily used to help users avoid accidentally running untrusted scripts.
PowerShell has several execution policy levels, each with different permissions and restrictions. Common execution policies include:
- Restricted (default setting):
- Description: This is the default execution policy in PowerShell. In this mode, no scripts are allowed to run; only PowerShell commands and functions (command-line inputs) can be executed. Users can run commands interactively, but cannot directly execute
.ps1script files. - Use case: The most secure setting to prevent any scripts or automation from running.
- Description: This is the default execution policy in PowerShell. In this mode, no scripts are allowed to run; only PowerShell commands and functions (command-line inputs) can be executed. Users can run commands interactively, but cannot directly execute
- AllSigned:
- Description: Requires that all scripts and configuration files (including your own scripts) be digitally signed by a trusted publisher before they can be executed. Even local scripts must be signed, or they will be blocked.
- Use case: Strong control over the scripts that are executed, ensuring that all scripts are signed by trusted developers.
- RemoteSigned:
- Description: Requires scripts downloaded from the Internet to be signed by a trusted publisher before they can be executed. Locally created scripts (not downloaded from the web) do not need to be signed.
- Use case: A commonly used setting that allows local scripts to run freely, but requires signature verification for scripts downloaded from the Internet.
- Unrestricted:
- Description: Allows any script to be executed, regardless of whether it is signed. For scripts downloaded from the Internet, users will see a warning prompt, but can still run the script. This setting has no signature verification, making it less secure.
- Use case: Suitable for environments where security is not a concern or all script sources are trusted.
- Bypass:
- Description: No restrictions; all scripts are allowed to execute, completely bypassing any execution policy checks. This policy is suitable for certain automation tasks or when running scripts without any security warnings or prompts.
- Use case: Typically used in specific automation or testing environments, but due to its low security, it is generally not recommended for use in production environments.
- Undefined:
- Description: Indicates that no execution policy has been set for the scope (such as user, computer, session, etc.). If the execution policy for a scope is “Undefined,” it will inherit the settings of the parent scope.
- Use case: This state means no execution policy is configured. If all scopes on the system are “Undefined,” PowerShell will use the default policy (usually Restricted).
MAS PowerShell Script Activation
Microsoft Activation Scripts (MAS) is a set of open-source automation scripts developed by a third party, used for activating Windows and Office. They are commonly used to bypass genuine verification or activate Windows or Office products without a proper official key.
To run the activation in PowerShell, execute the following command:
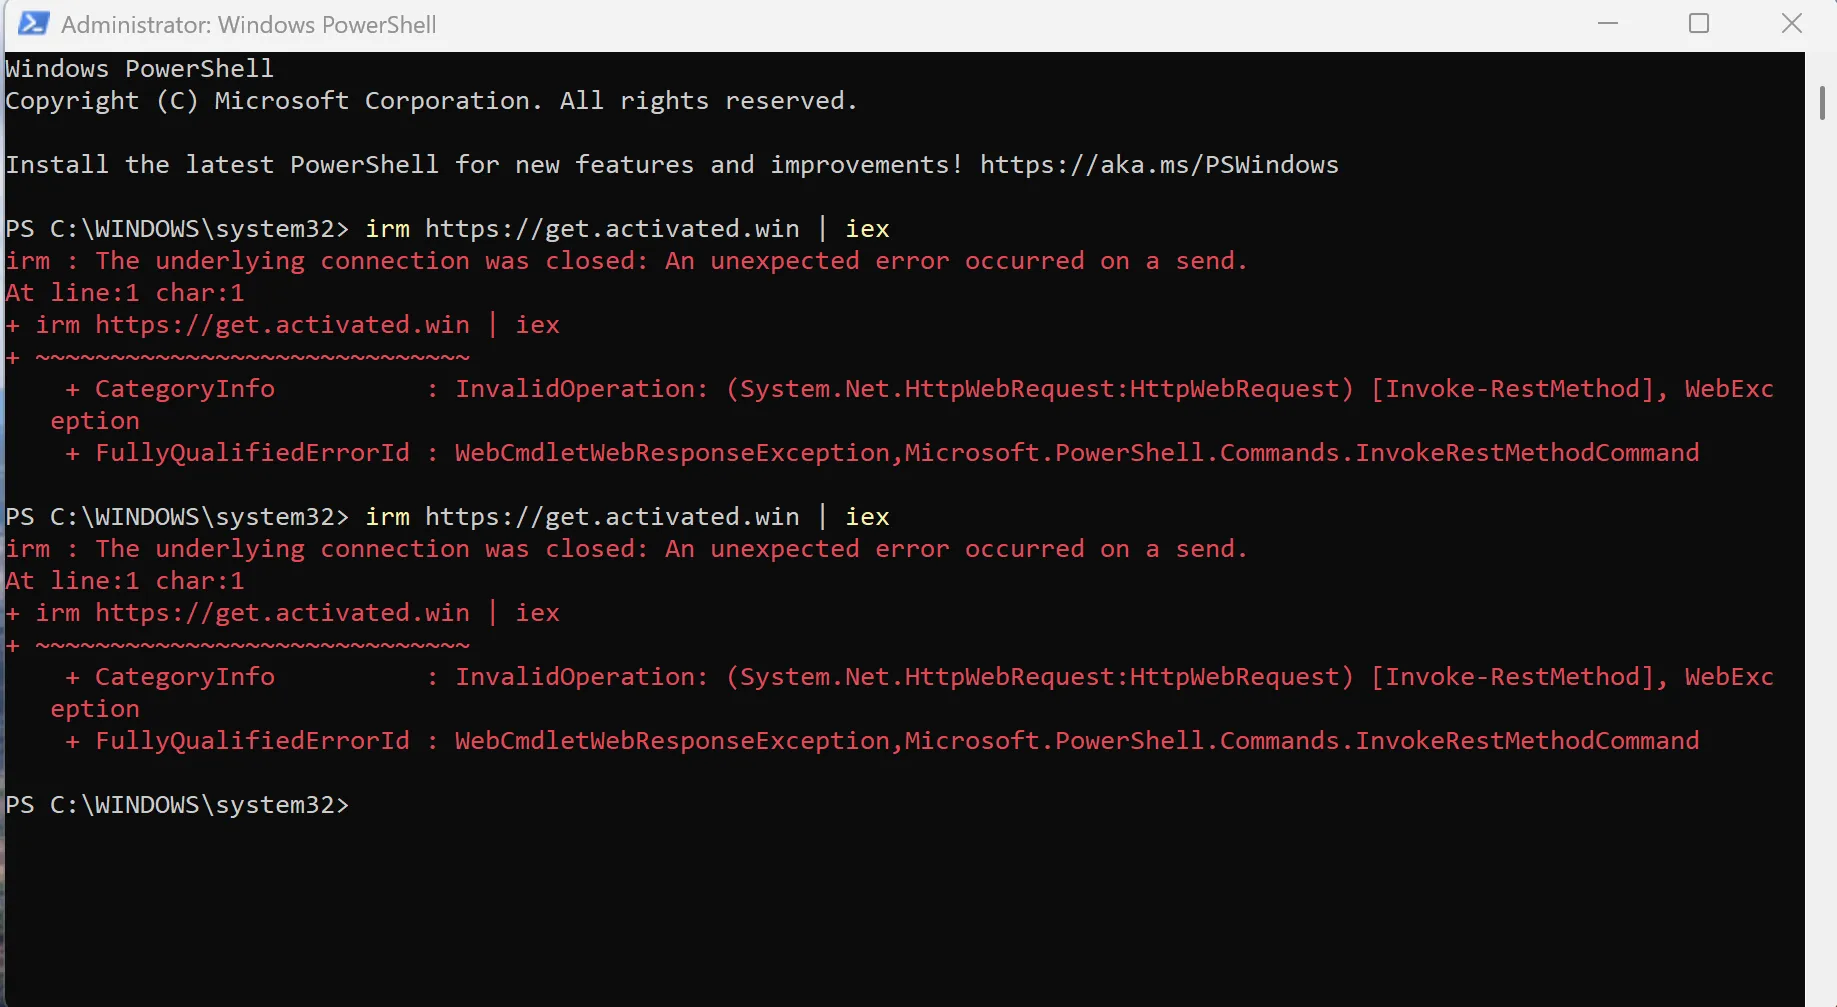
1 | irm https://get.activated.win | iex |
Since get.activated.win is a new domain, it might be blocked by your ISP or DNS. If PowerShell throws an error and cannot connect, use the following command as an alternative. Note that this command might be deprecated at any time:
1 | irm https://massgrave.dev/get | iex |
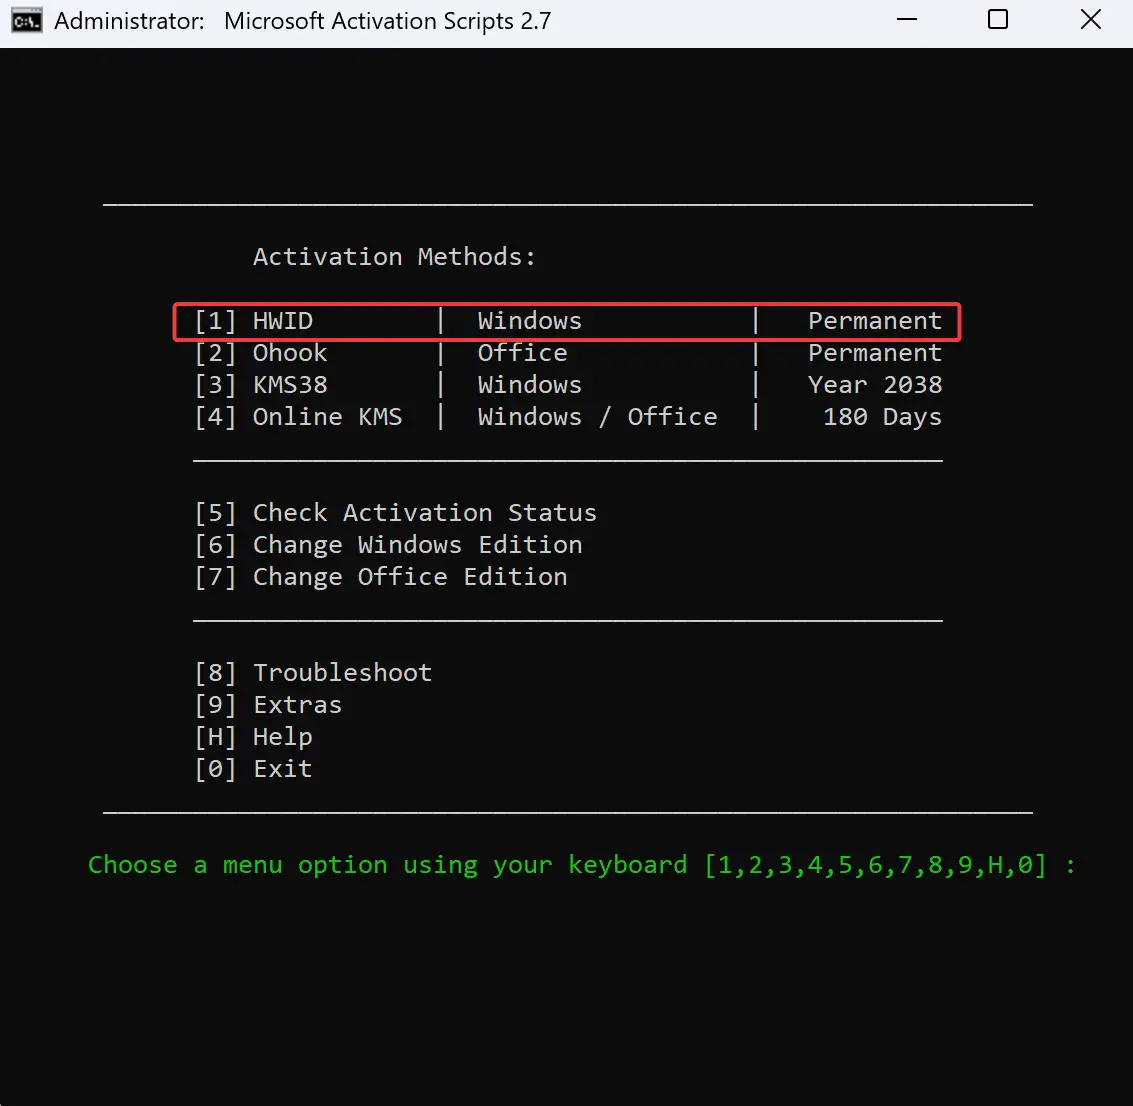
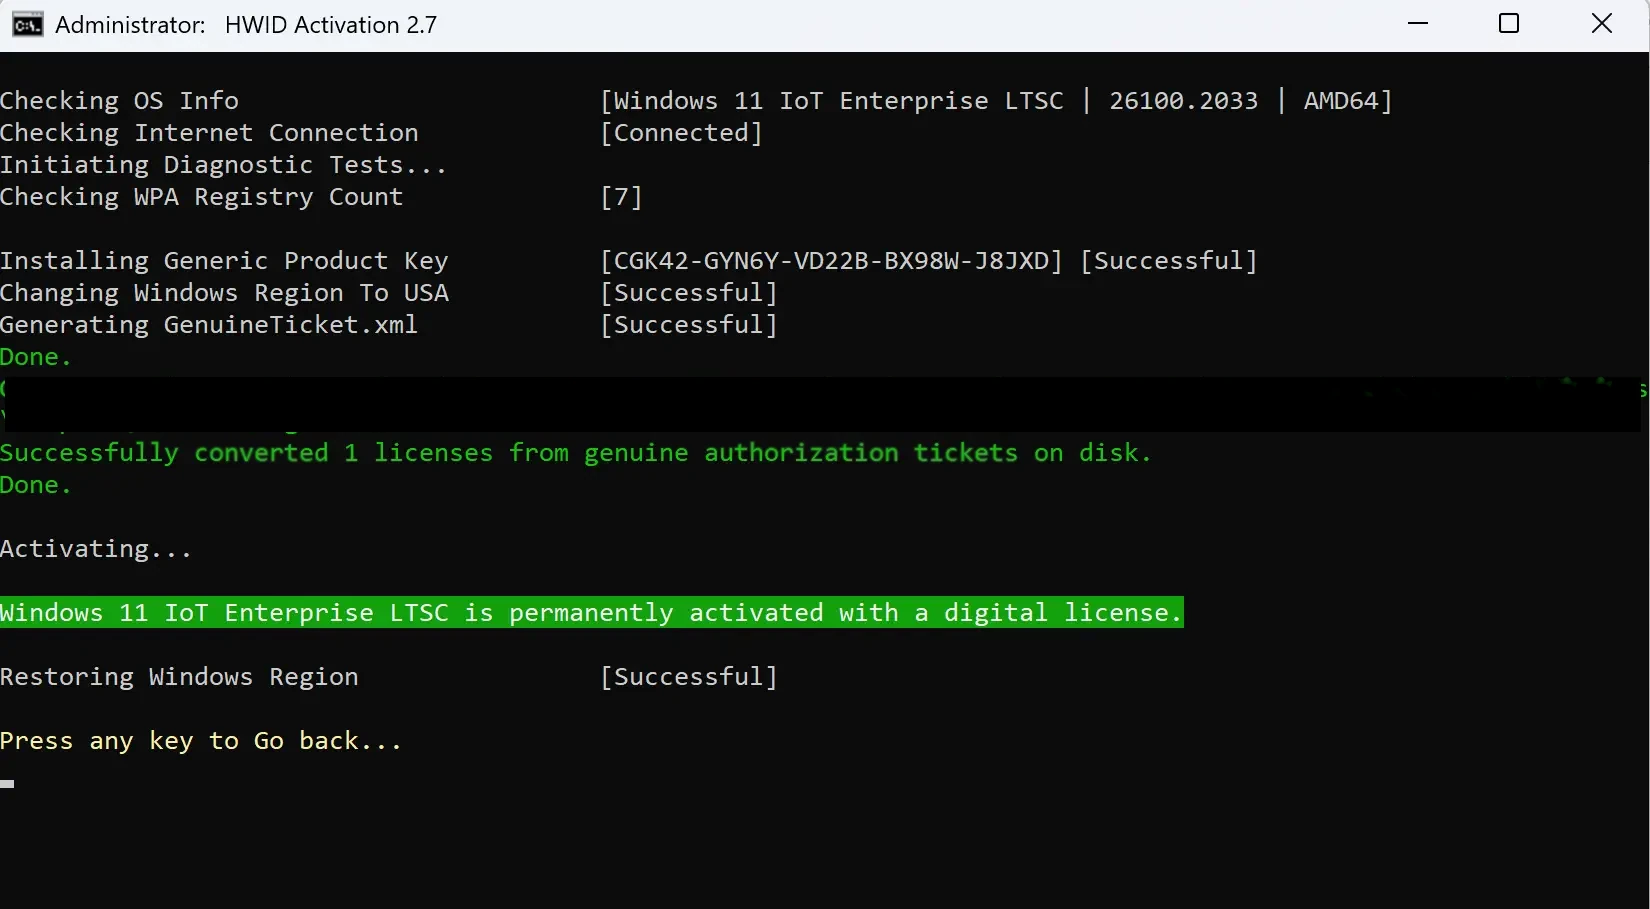
Then, in the new window that appears, enter 1 to activate using the HWID digital license. Once the script completes execution, press any key to exit the script.
PowerShell command explanation
Content generated by ChatGPT:
The PowerShell command mentioned above contains two parts linked by the pipe |. The whole command is designed to download a script from a remote URL and execute it directly. Here’s a breakdown of each part:
irm https://get.activated.win:irmstands forInvoke-RestMethod, a command in PowerShell that downloads data from a specified URL (usually in formats like JSON, XML, or plain text). It’s similar to tools likecurlorwget, but designed for PowerShell environments.- The URL
https://get.activated.winis a remote website address. The command attempts to access this site and download data. Typically, this data will be a PowerShell script or some other content that PowerShell can process.
|(Pipe symbol):- The pipe symbol
|passes the output of theirmcommand to theiexcommand as input. In this case, it sends the data downloaded from the URL to theiexcommand.
- The pipe symbol
iex:iexstands forInvoke-Expression, a command in PowerShell used to execute a string of text as PowerShell commands. In other words,iexwill treat the content it receives (in this case, the script downloaded viairm) as PowerShell code and execute it.
In summary, this command will download content from the URL https://get.activated.win and pass the downloaded content (which should be a PowerShell script) to iex for execution. Typically, such scripts are used to perform background tasks like activating software, installing programs, or modifying system settings.
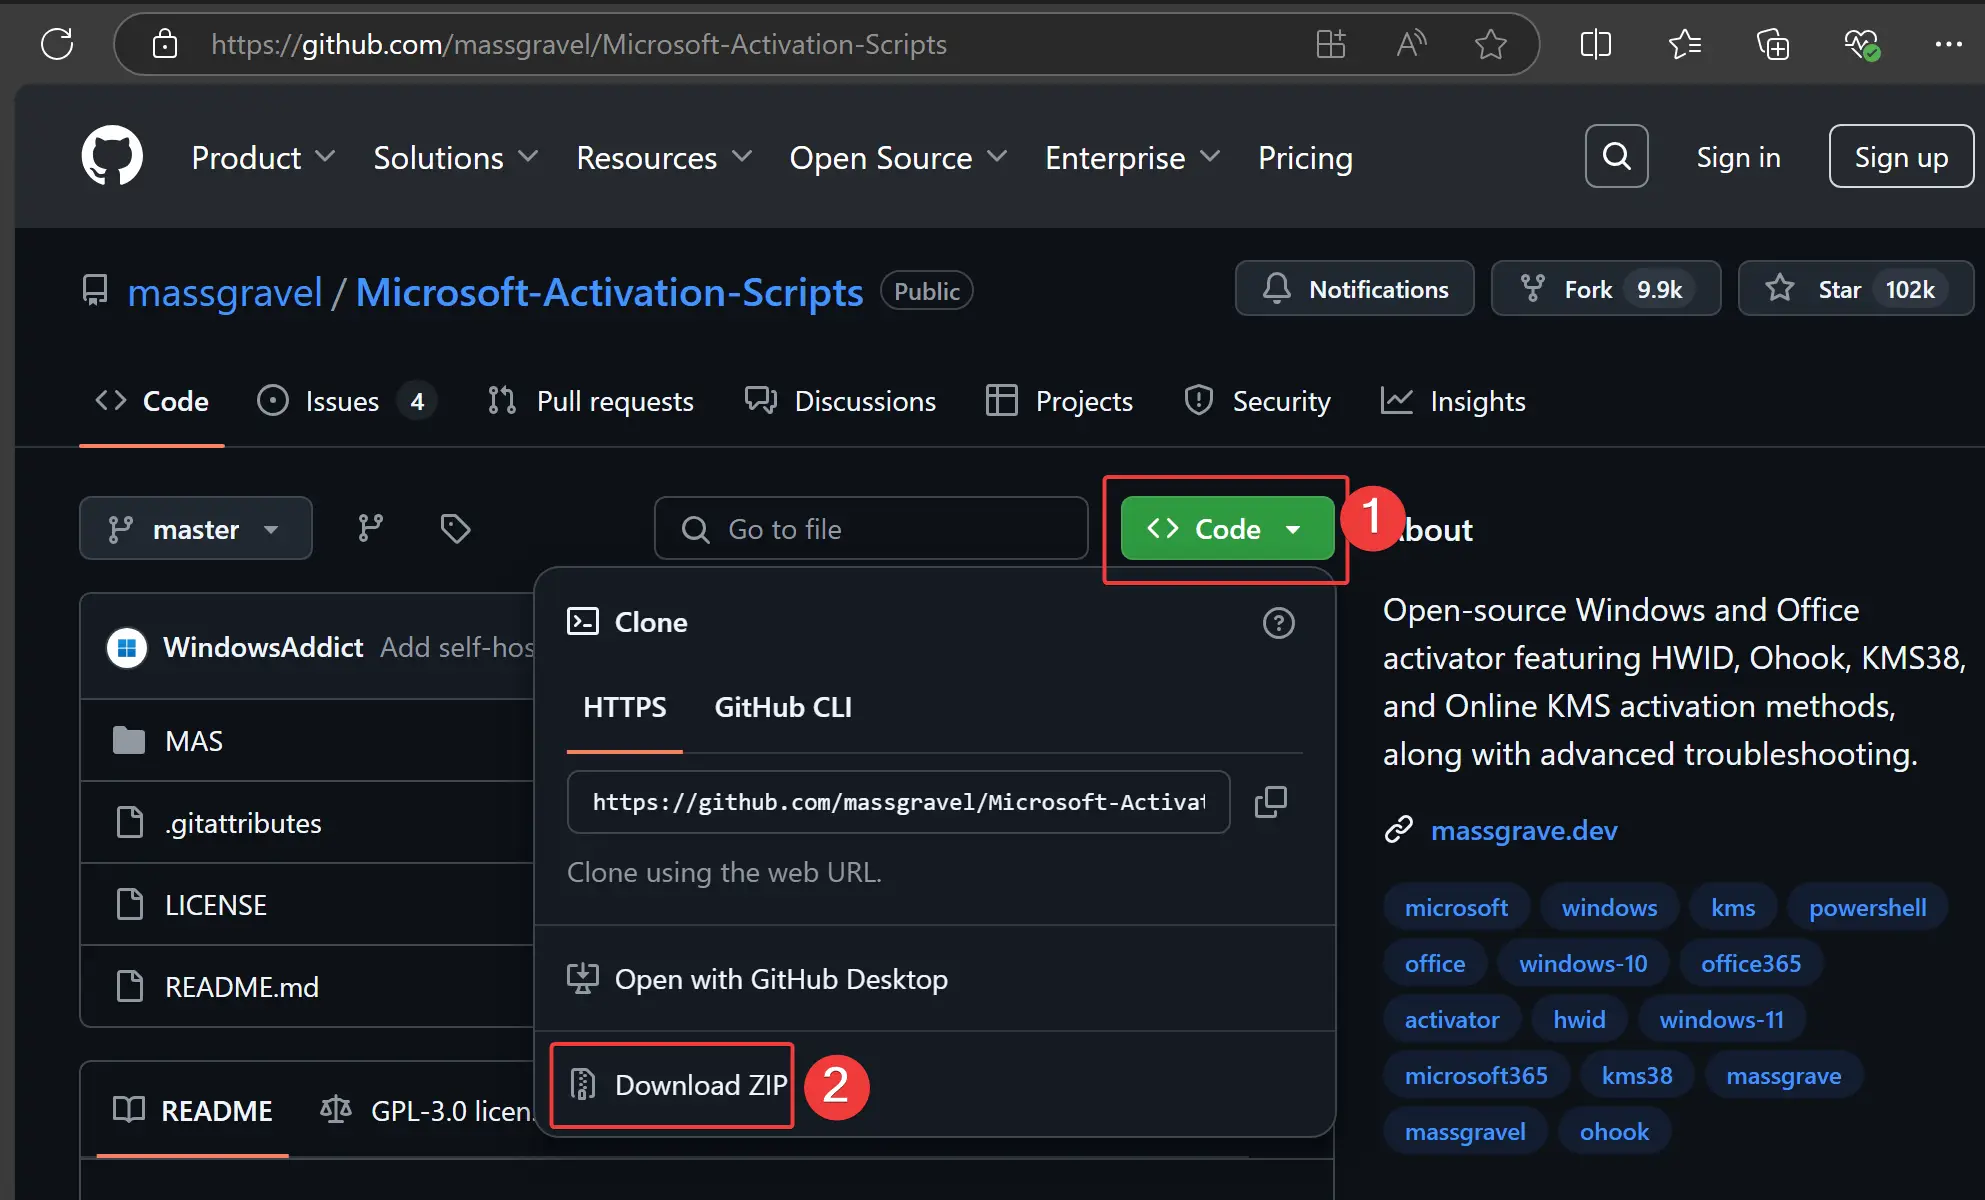
If you are unable to execute the command successfully, you can download the script source files directly from GitHub and run them locally. Here are the steps:
- First, visit the MAS script GitHub repository and click the
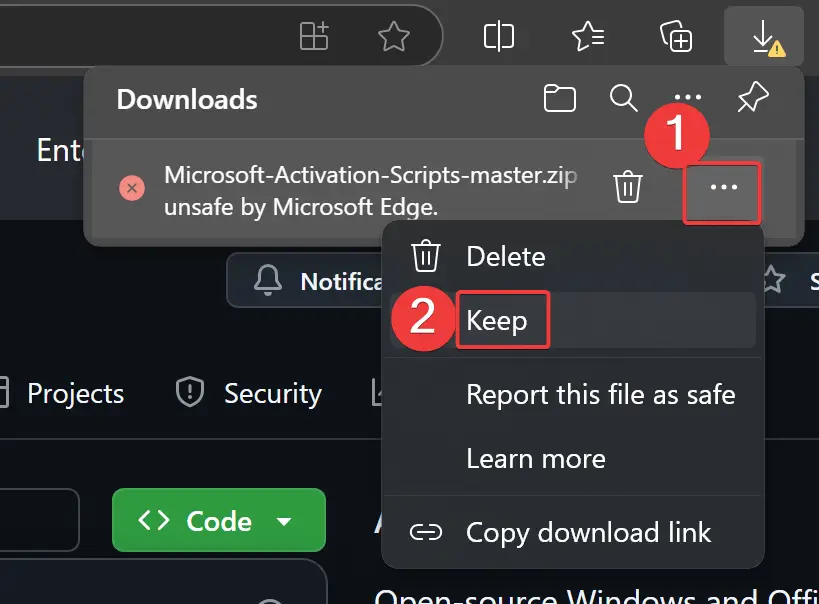
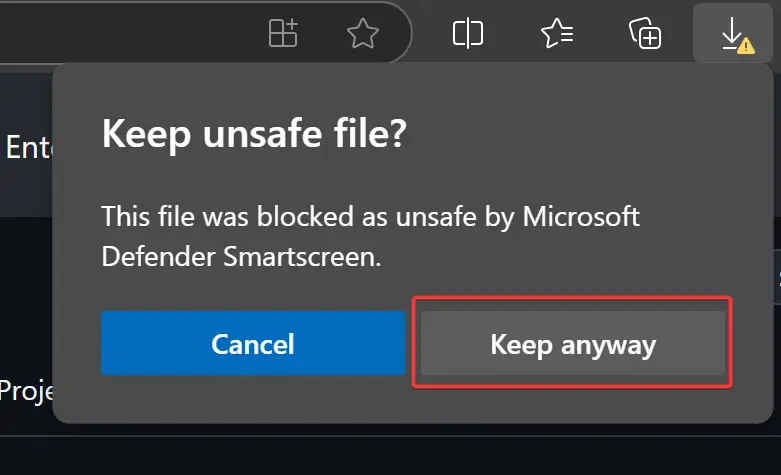
Codebutton in the upper-right corner. SelectDownload ZIPto download the compressed file. - Edge browser may prompt you to confirm if you want to download and keep the file, so make sure to confirm the download.
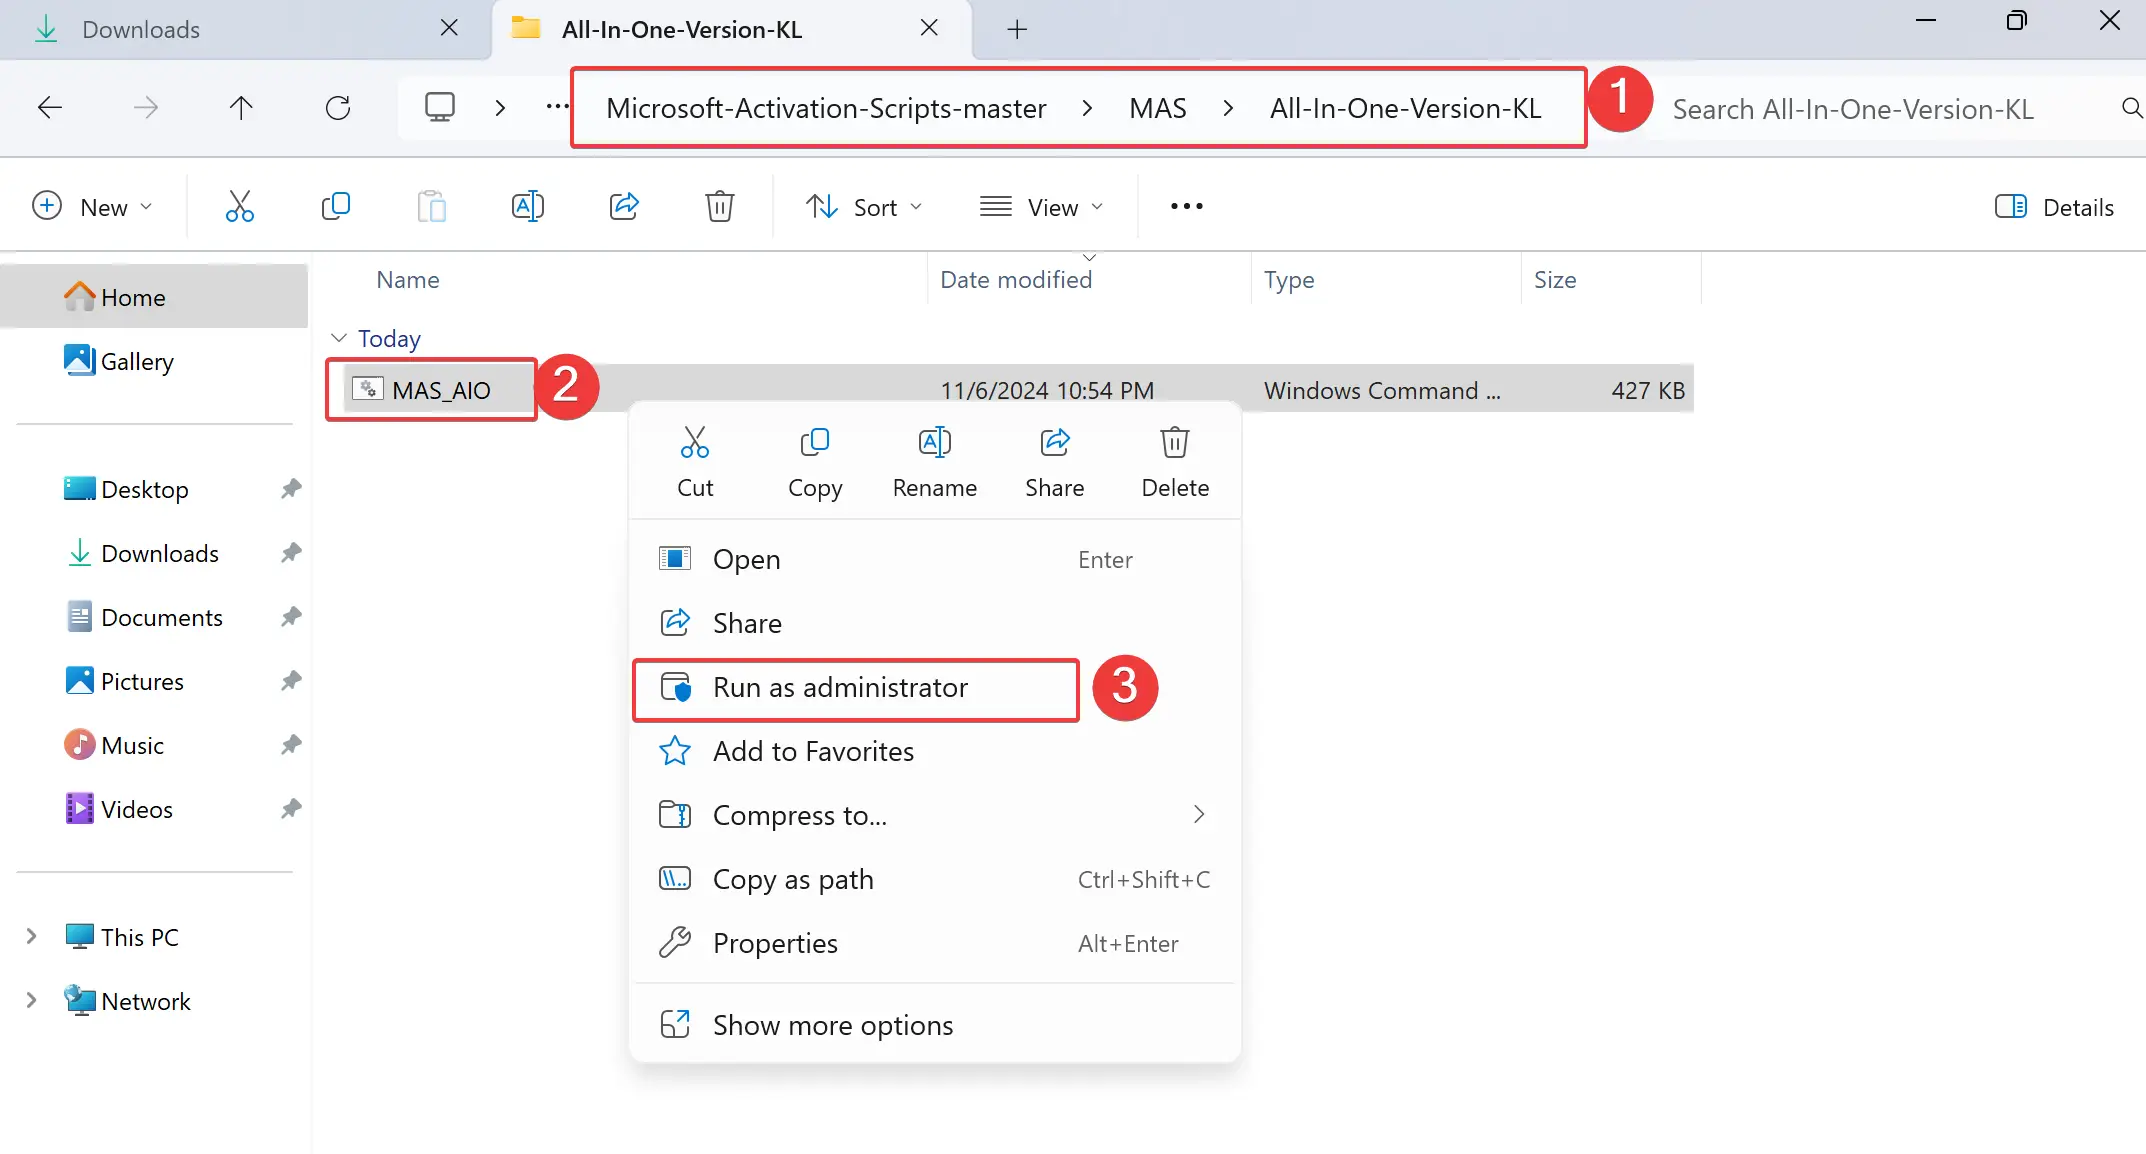
- Once downloaded, unzip the file and navigate to the directory
./Microsoft-Activation-Scripts-master/MAS/All-In-One-Version-KL. - Right-click on
MAS_AIO.cmdand chooseRun as administrator. - In the popup window, input
1to proceed with the HWID digital license activation. - Wait for the script to finish executing, then press any key to exit the script.
KMS Activation
If the MAS script fails to activate your system, you can try the more traditional KMS activation. KMS, or Key Management Service, is primarily used for bulk activation of computers within enterprises. The activation is valid for 180 days but can be set for automatic renewal.
Here’s how to activate using KMS:
- Right-click the Start menu button (Windows icon) on the taskbar and open
Windows Powershell (Administrator). Then, sequentially enter the following commands and press Enter. Note that activation requires a network connection, and after executing the last two commands, you will see some activation popups—click OK to complete. - Set the KMS server:
1
slmgr -skms kms.03k.org
- Set the product key. If you’re installing a different version, replace the key accordingly:
1
slmgr -ipk KBN8V-HFGQ4-MGXVD-347P6-PDQGT
- Start Windows activation:
1
slmgr -ato
- (Optional) Display detailed license and activation information:
1
slmgr -dlv
KMS Keys
The corresponding product keys for different versions of Windows are as follows. Note that the keys for Windows 11 and Windows 10 are the same and have not changed. For more KMS keys, please refer to the Microsoft official documentation. In this documentation, the versions with an “N” suffix are for the European edition, and those with a “G” suffix are for the Government edition. However, these are generally not relevant for regular users.
| Operating system edition | KMS Client Product Key |
|---|---|
| Pro | W269N-WFGWX-YVC9B-4J6C9-T83GX |
| Pro N | MH37W-N47XK-V7XM9-C7227-GCQG9 |
| Pro for Workstations | NRG8B-VKK3Q-CXVCJ-9G2XF-6Q84J |
| Pro for Workstations N | 9FNHH-K3HBT-3W4TD-6383H-6XYWF |
| Pro Education | 6TP4R-GNPTD-KYYHQ-7B7DP-J447Y |
| Pro Education N | YVWGF-BXNMC-HTQYQ-CPQ99-66QFC |
| Education | NW6C2-QMPVW-D7KKK-3GKT6-VCFB2 |
| Education N | 2WH4N-8QGBV-H22JP-CT43Q-MDWWJ |
| Enterprise | NPPR9-FWDCX-D2C8J-H872K-2YT43 |
| Enterprise N | DPH2V-TTNVB-4X9Q3-TJR4H-KHJW4 |
| Enterprise G | YYVX9-NTFWV-6MDM3-9PT4T-4M68B |
| Enterprise G N | 44RPN-FTY23-9VTTB-MP9BX-T84FV |
| Enterprise LTSC 2024/2021/2019 | M7XTQ-FN8P6-TTKYV-9D4CC-J462D |
| Enterprise N LTSC 2024/2021/2019 | 92NFX-8DJQP-P6BBQ-THF9C-7CG2H |
| IoT Enterprise LTSC 2024/21 | KBN8V-HFGQ4-MGXVD-347P6-PDQGT |
| Server 2025 Standard | TVRH6-WHNXV-R9WG3-9XRFY-MY832 |
| Server 2025 Datacenter | D764K-2NDRG-47T6Q-P8T8W-YP6DF |
slmgr command
Content generated by ChatGPT:
In Windows, the slmgr (Software Licensing Management Tool) is a command-line utility used to manage and configure Windows activation and license information. The four commands mentioned above are related to KMS (Key Management Service) activation. Here is a detailed explanation of each command:
slmgr -skms kms.03k.org- Purpose: This command sets the activation server address for Windows to
kms.03k.org, which is the specified KMS server address. - Explanation:
-skmsis the parameter used to specify the KMS server address.kms.03k.orgis the domain name of the KMS server. The Windows system will communicate with this server to complete the activation process.
- This command instructs the operating system to use the specified KMS server for activation.
- Purpose: This command sets the activation server address for Windows to
slmgr -ipk [corresponding version key]- Purpose: This command installs a Windows product key for activation.
- Explanation:
-ipkis the parameter used to install a product key.[corresponding version key]should be replaced with the actual product key for the version of Windows you wish to activate (e.g., the key for Windows 10 Professional).
- This command installs the specified key into the system to be used during activation. For KMS activation, it typically installs the KMS client key corresponding to the specific version of Windows.
slmgr -ato- Purpose: This command initiates the activation process for Windows.
- Explanation:
-atostands for “Activate Online,” which instructs Windows to attempt activation immediately using the KMS server that has been set up.
- When this command is executed, Windows will try to connect to the specified KMS server and activate the operating system. If everything is correctly set up (server and key), activation will succeed.
slmgr -dlv- Purpose: This command displays detailed license and activation information.
- Explanation:
-dlvstands for “Display License Information and Verification,” which shows detailed information about the current system’s license.
- When executed, this command provides detailed information about the activation status, license type, KMS server information, expiration date, etc. It’s useful for verifying whether the activation was successful or for obtaining more details about the system’s activation state.
Settings
Use the Windows + I shortcut to open the Settings menu.
(Optional) Change Language
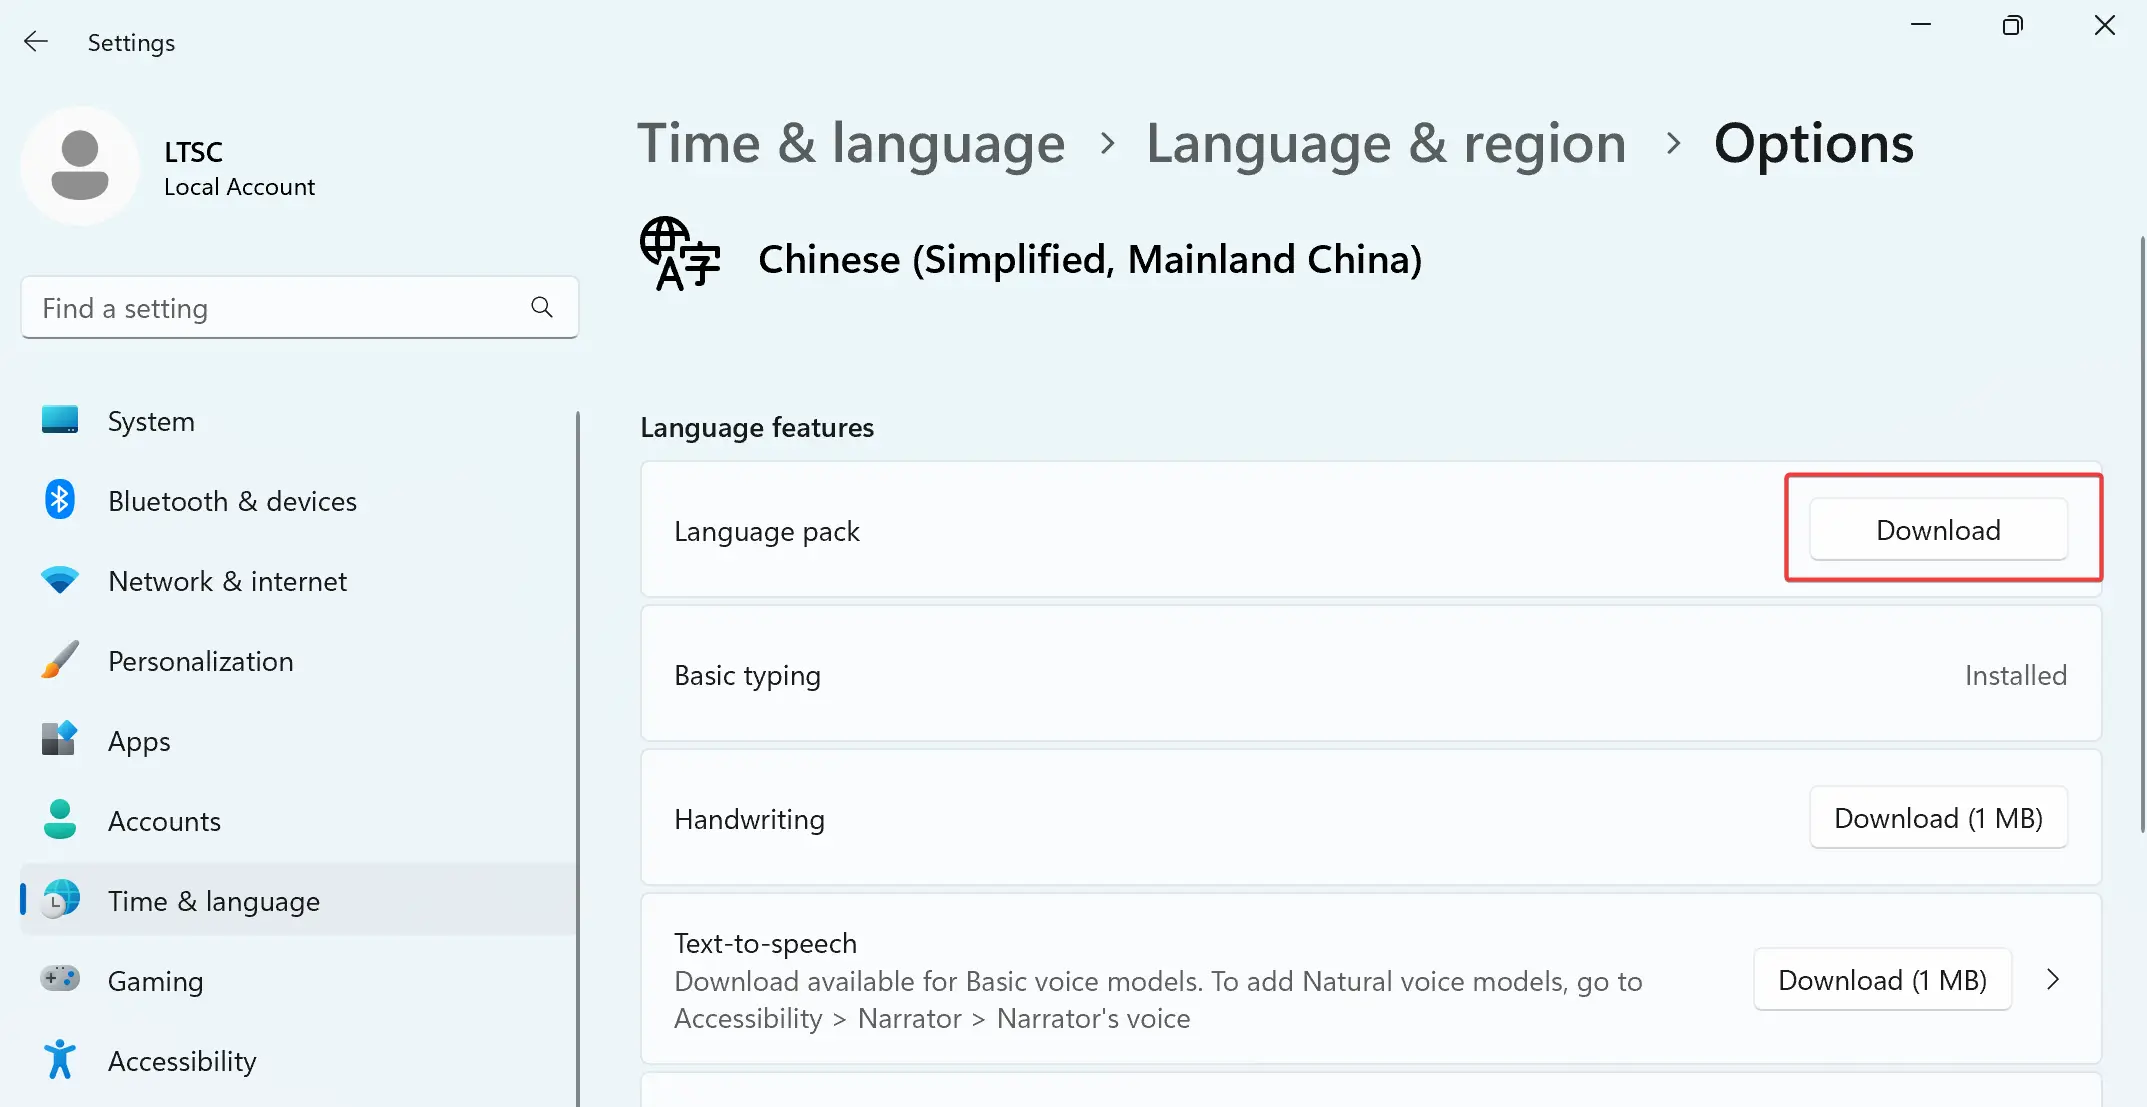
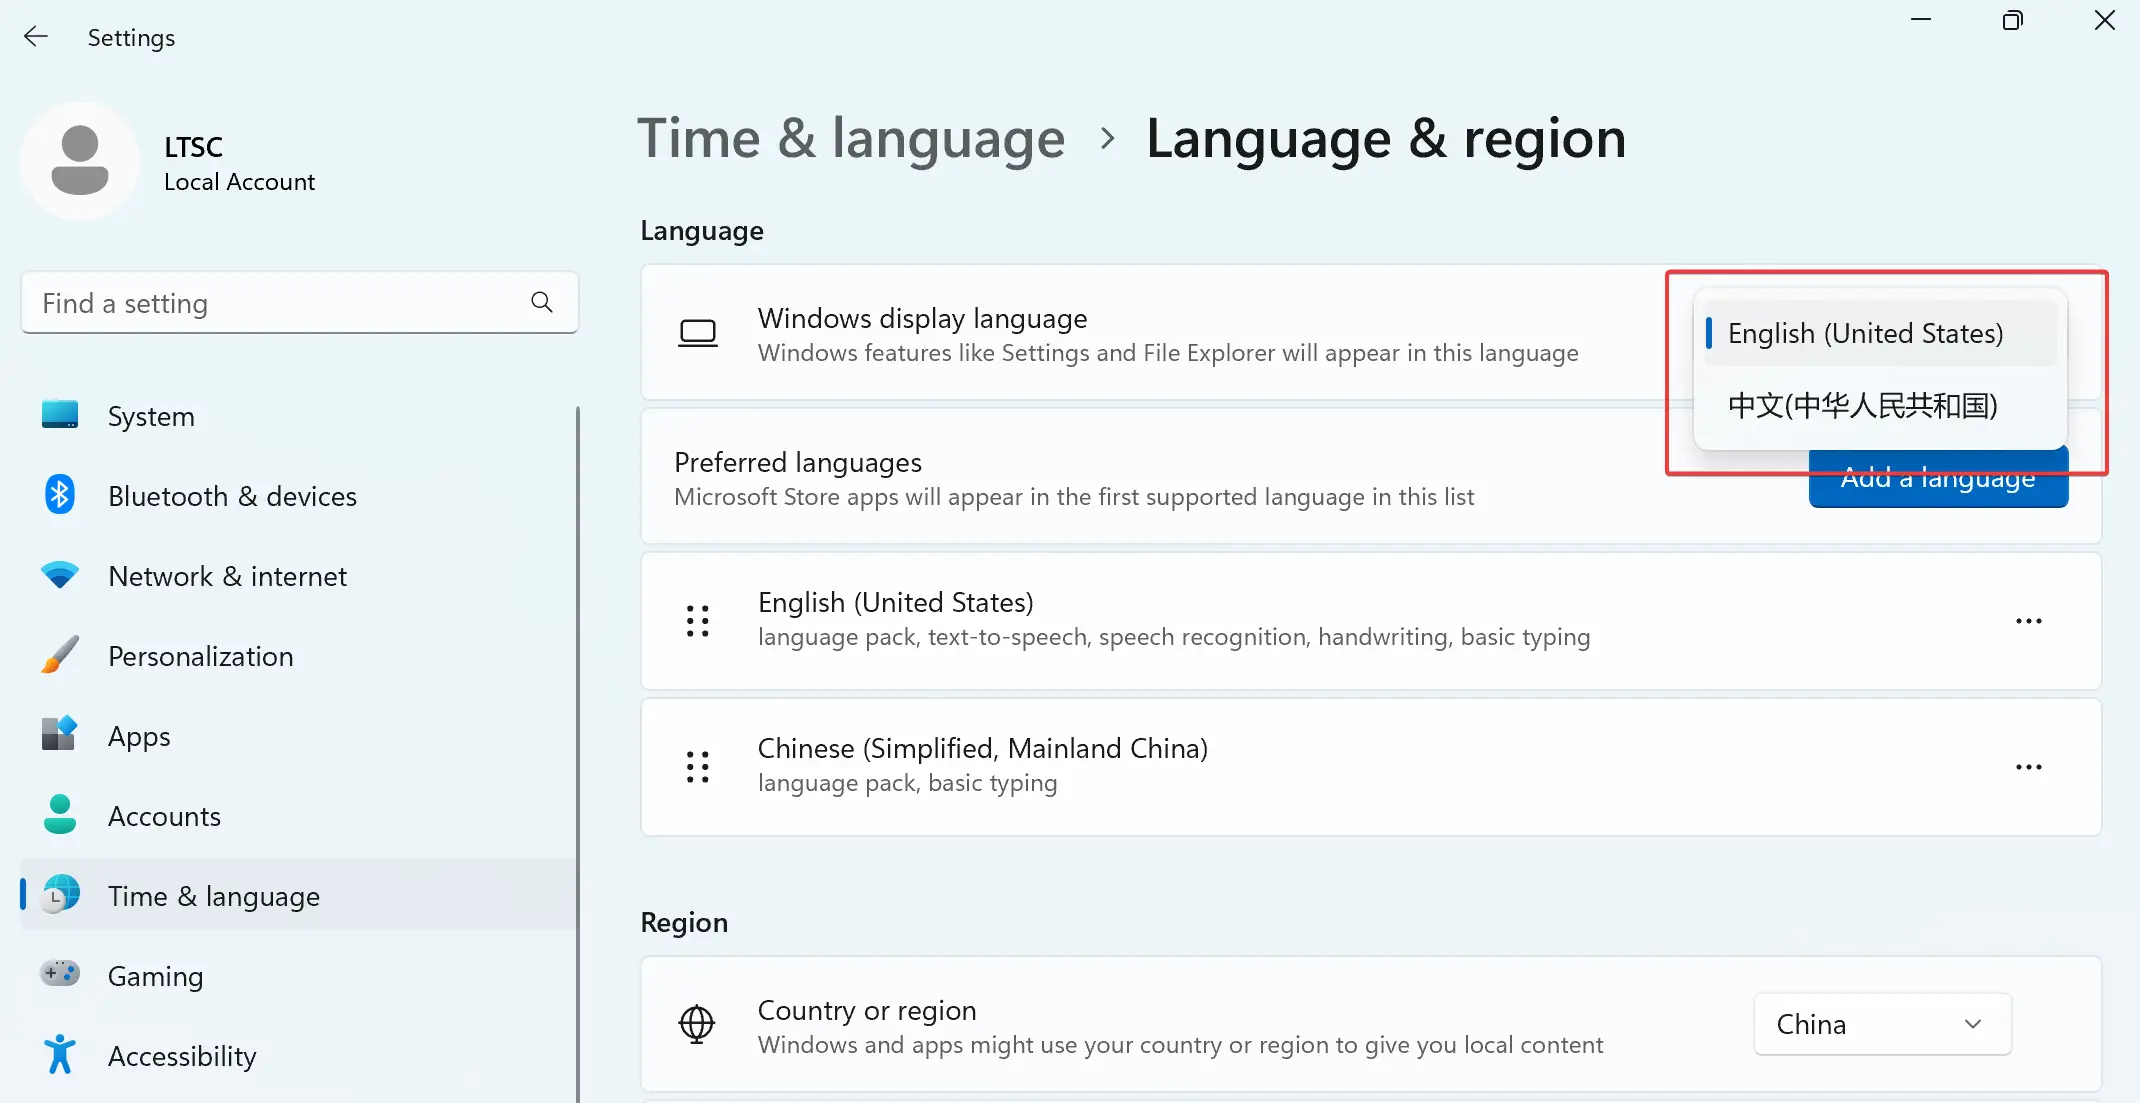
Before making further adjustments, you may want to change the language to your native language. Here’s how to switch to Simplified Chinese as an example:
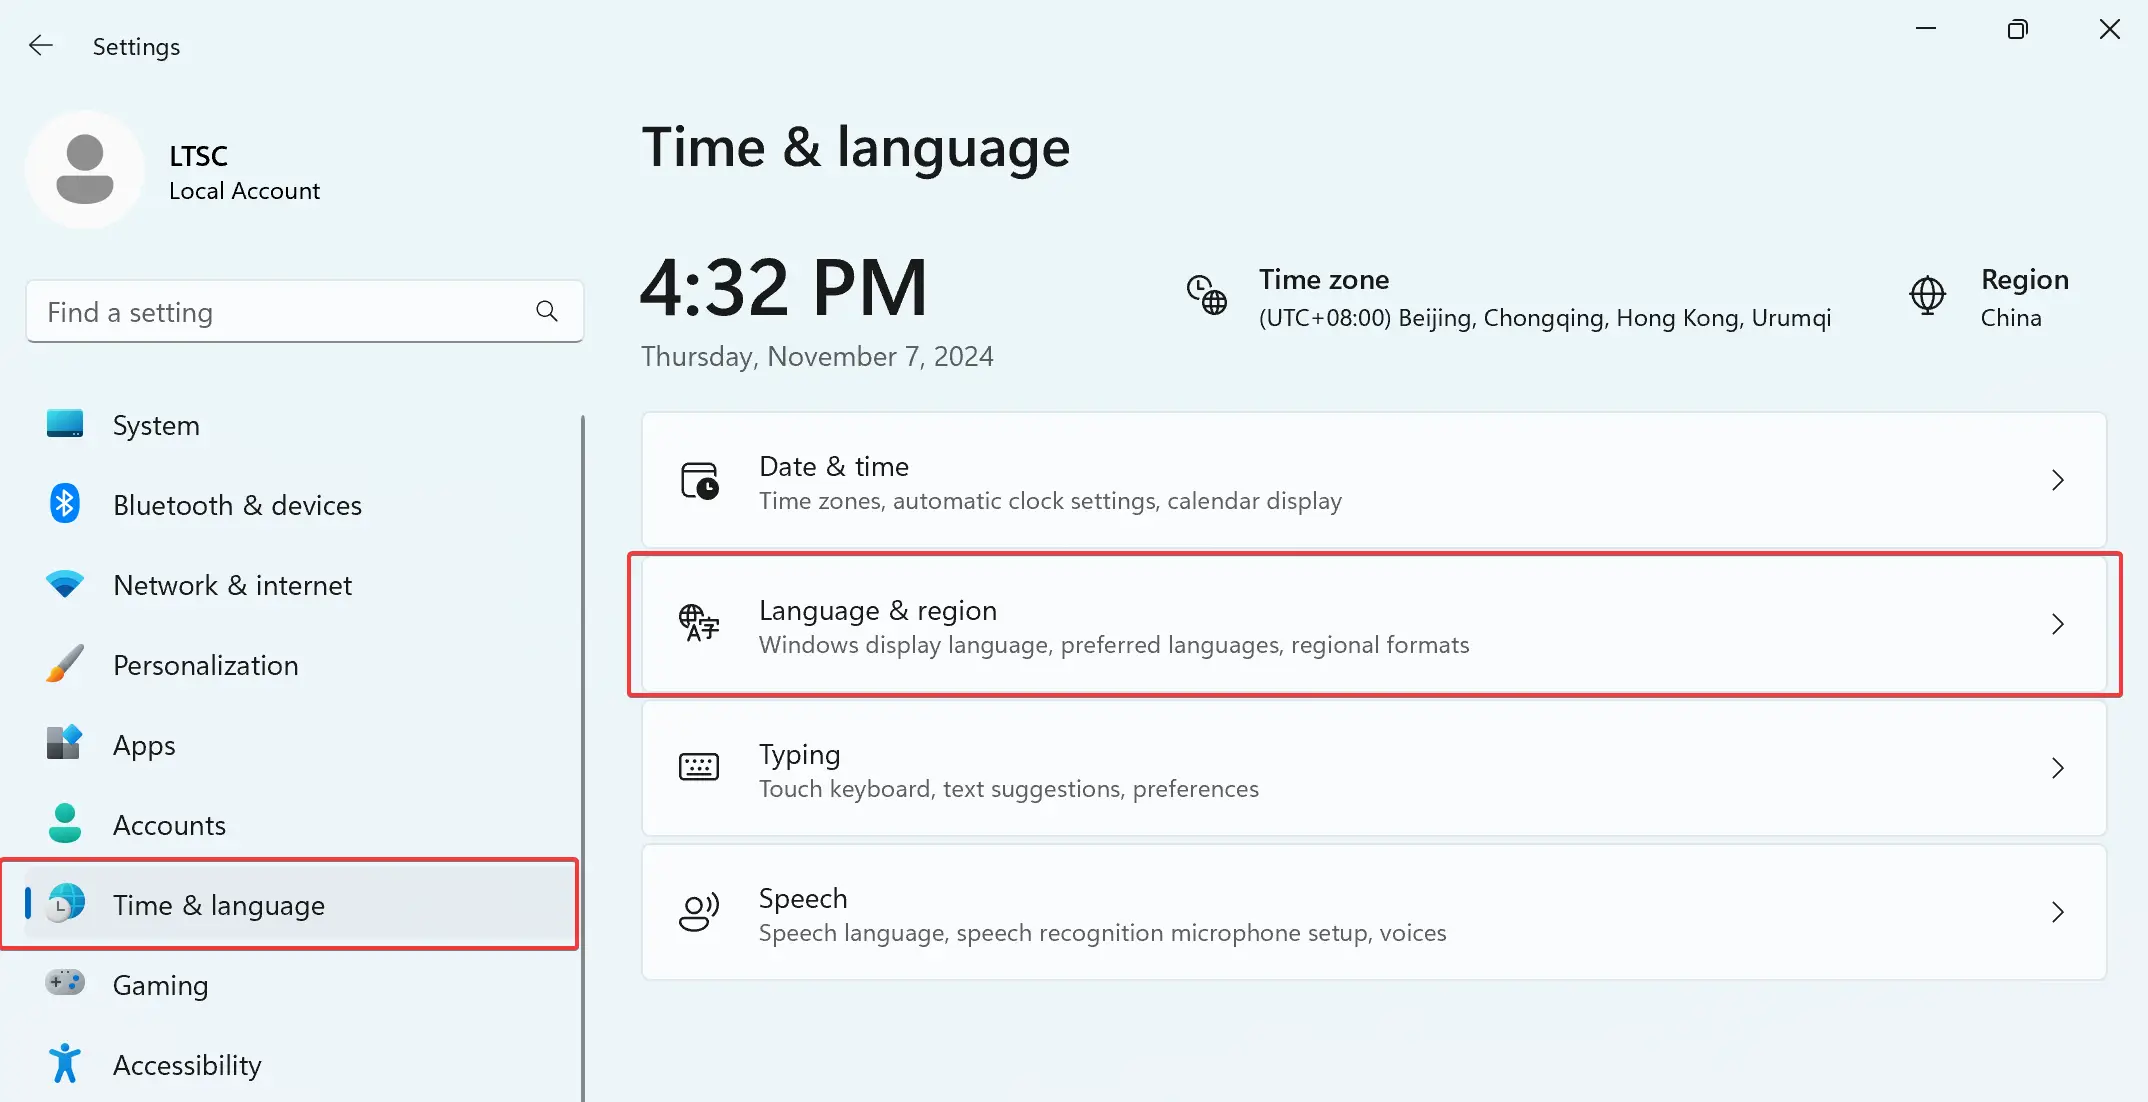
- Click on the
Time & languageoption in the left sidebar, then selectLanguage & regionon the right. - Click the three dots next to the
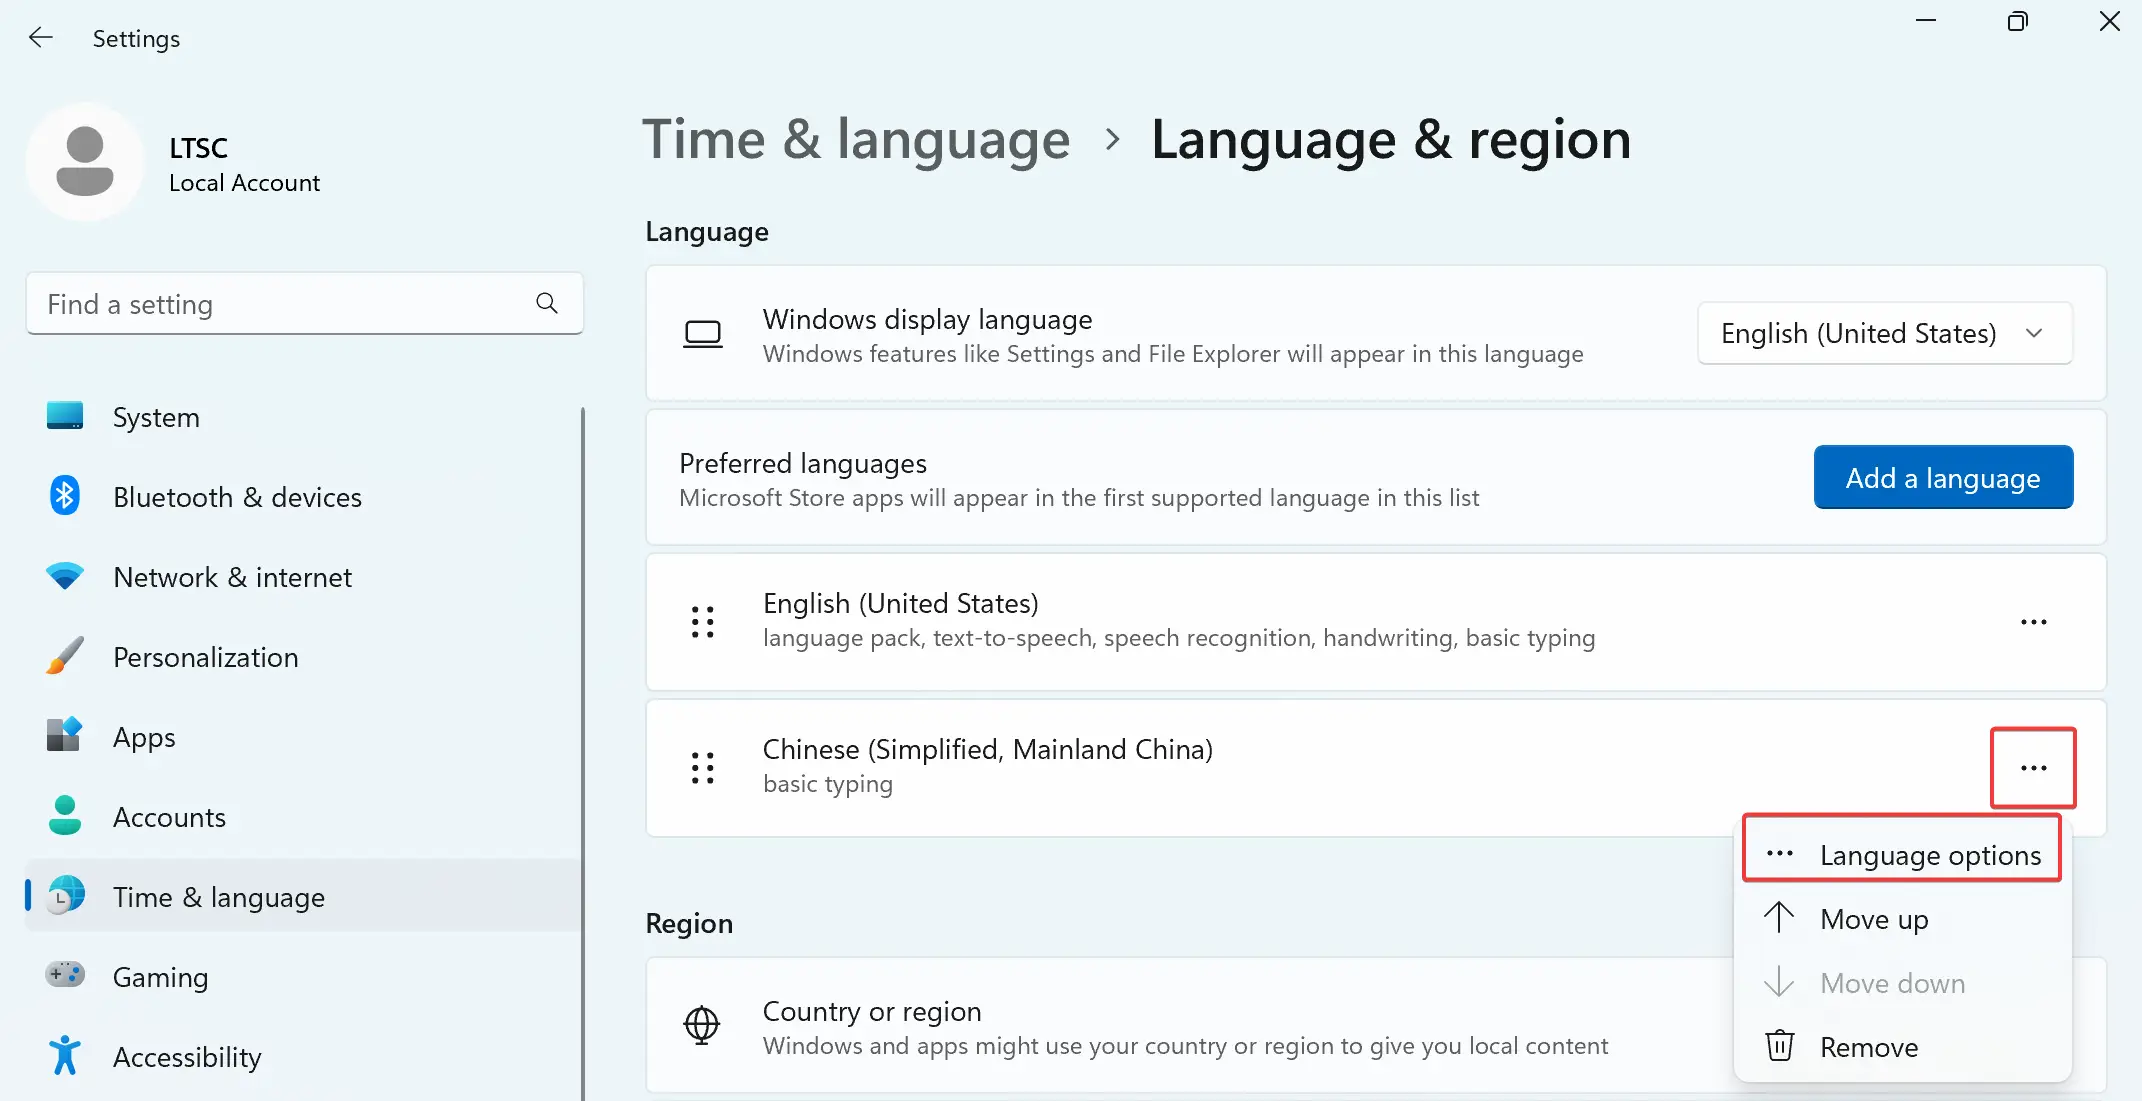
Chineseentry and selectLanguage optionsfrom the menu. - Click the
Downloadbutton next toLanguage pack. - Return to the
Language & regionpage and switch theWindows display languageto中文(中华人民共和国). - Restart the computer. Although the system suggests logging out, I encountered a mixed language bug after logging out, so a full restart is recommended.
Personalization Settings
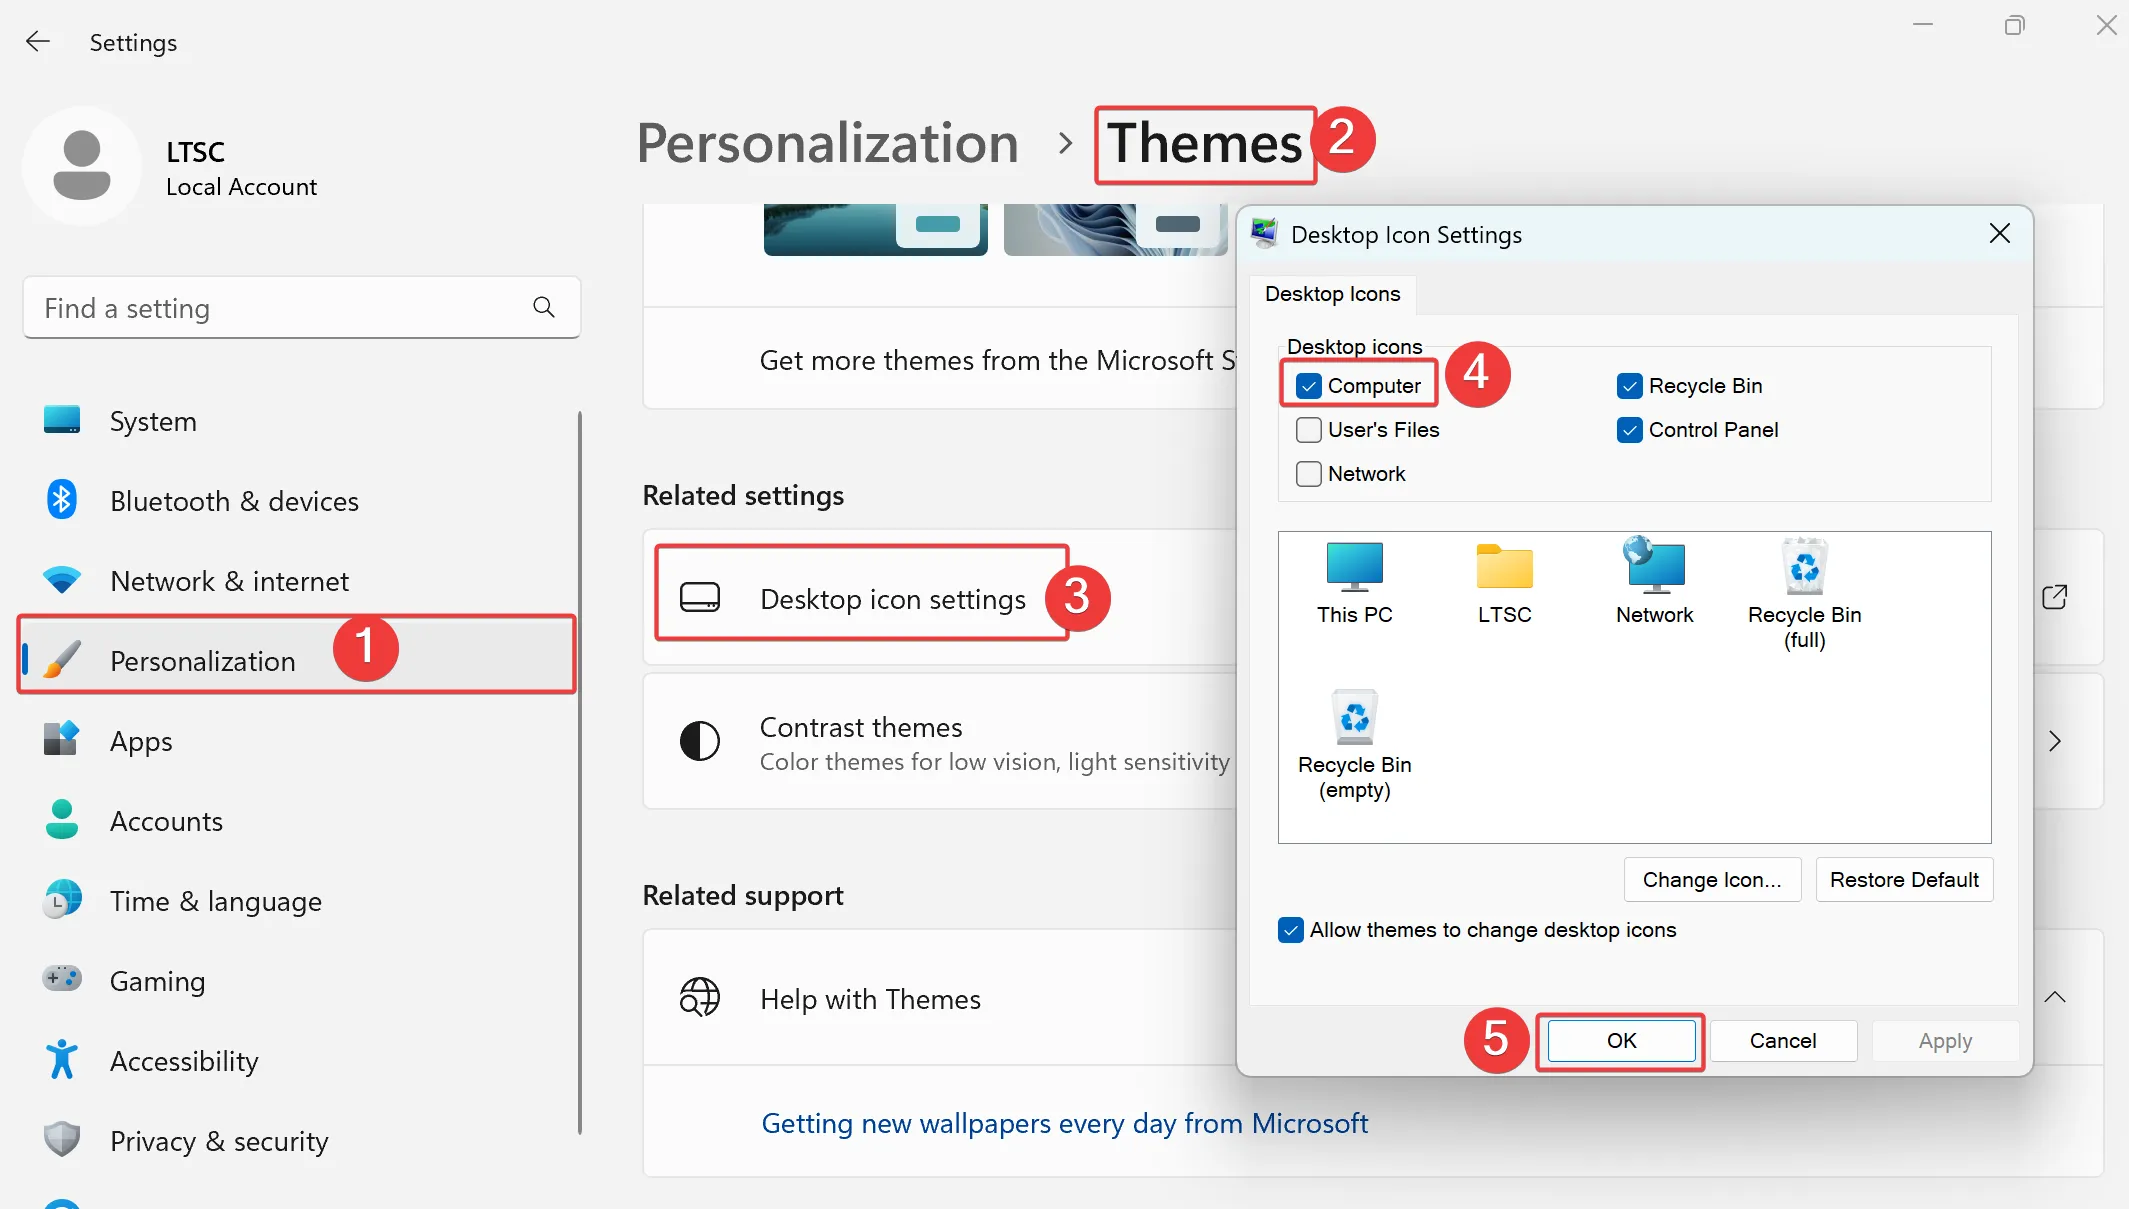
By default, only the Recycle Bin icon appears on the desktop. Here’s how to add the “This PC” icon to the desktop:
- Click on the
Personalizationoption in the left sidebar. - Open
Themessettings. - Click on
Desktop icon settings. - Check the box for
Computer. - Click
OKto save the changes.
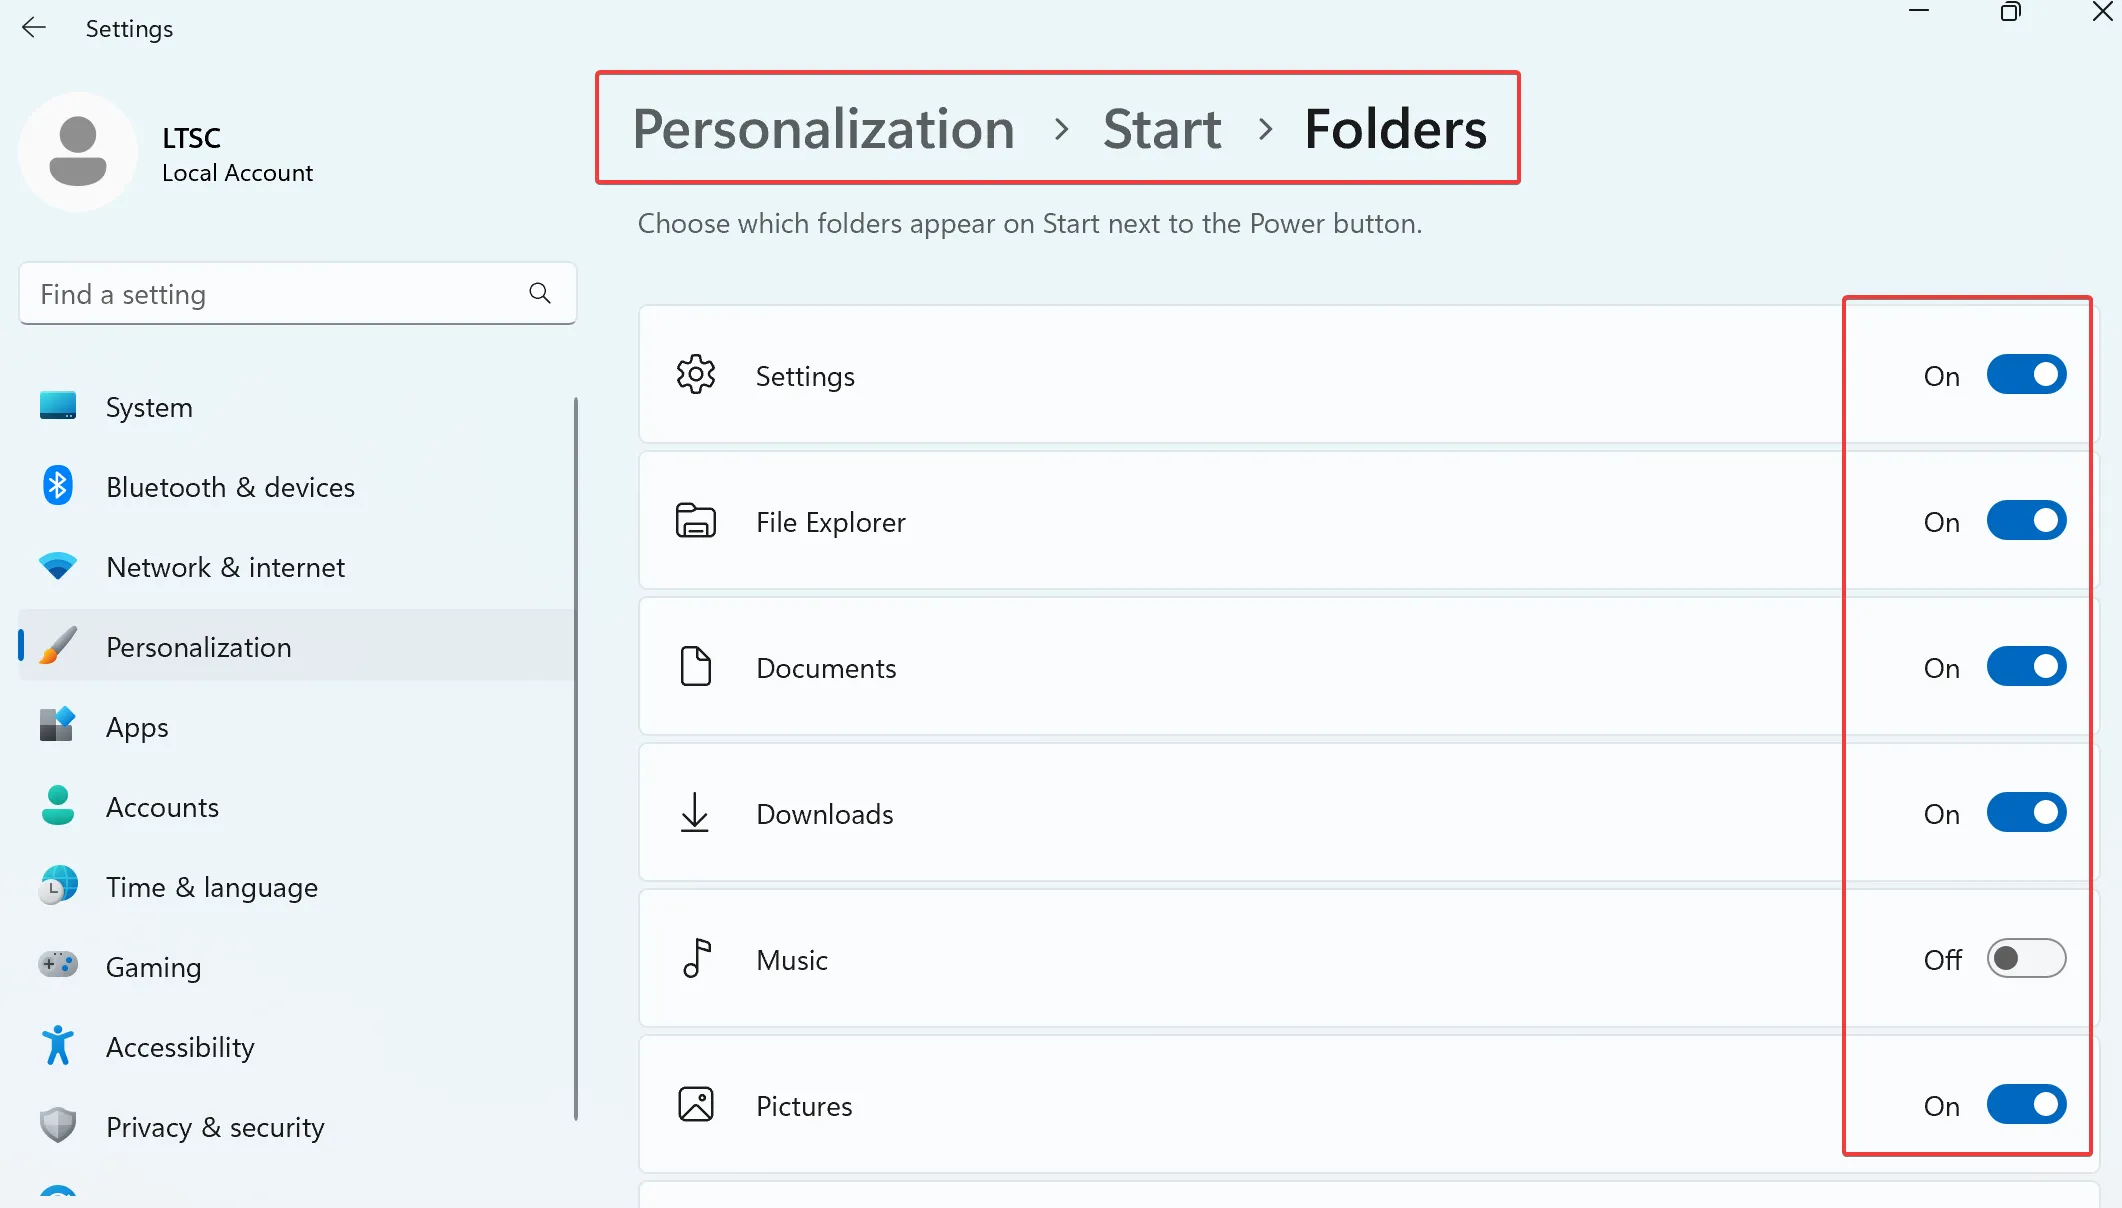
Next, add icons such as Settings and File Explorer to the Start Menu:
- Switch to the
Startsettings. - Click on
Foldersat the bottom. - Toggle on the switches for the desired options to add them to the Start Menu.
Updates
Finally, go to Settings - Windows Update - Check for updates to manually check for updates. After all updates have been installed, click Restart now if prompted. This process can take some time, depending on your internet speed and computer performance. Additionally, the system will automatically install drivers in the background, so if the screen resolution looks unusual, don’t worry—this should normalize once the graphics driver is installed.
Disk Partition
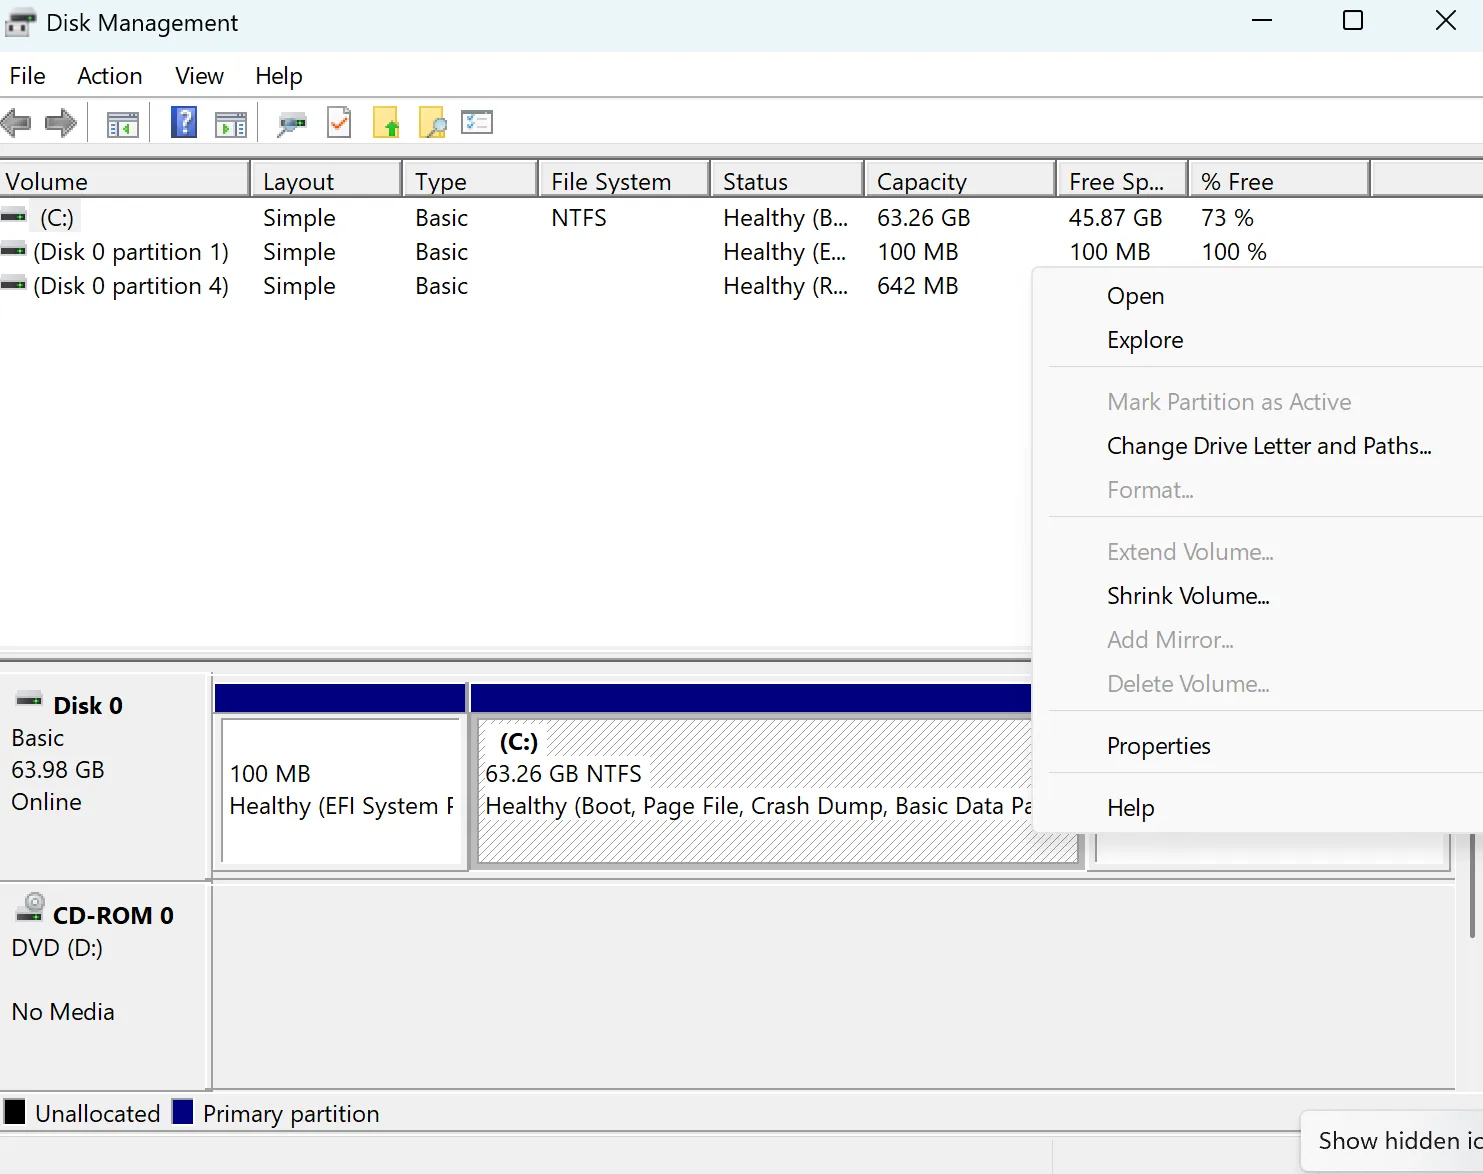
If you have an unpartitioned hard drive remaining from the system installation process, you can use the Disk Management tool to create partitions now.
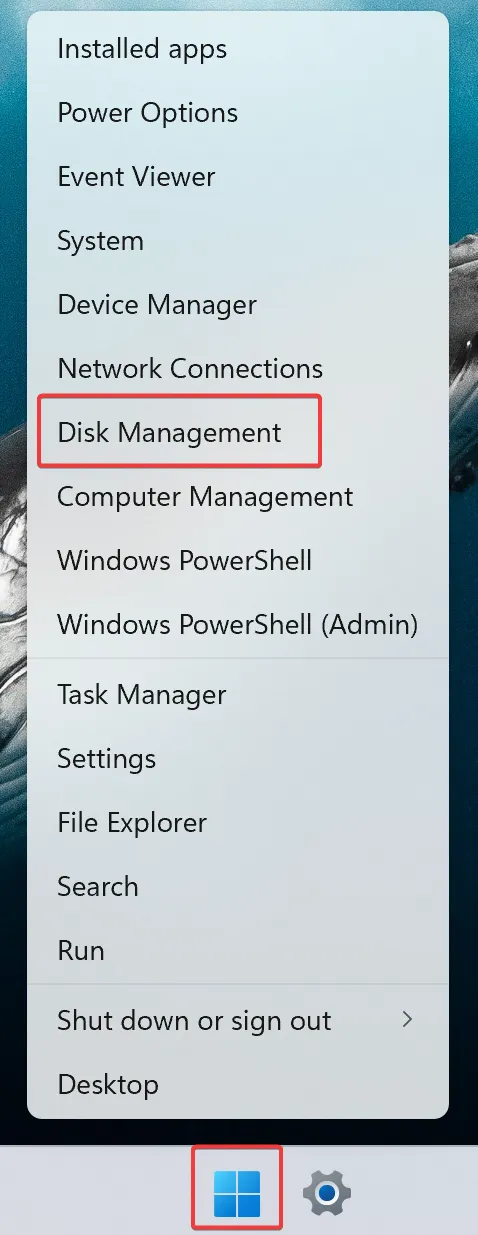
To do this, right-click the Start button (Windows icon) on the taskbar and open Disk Management.
Create New Partition
If there’s unallocated space on the disk (indicated by a black bar), you can create a new partition:
- Right-click on the black
Unallocatedspace. - Select
New Simple Volumeand follow the wizard instructions. - Choose the partition size (either the maximum capacity or a custom size in MB, where 1GB = 1024MB), then click
Next. - Select a drive letter (e.g., D: or E:) and click
Next. - Choose the partition format, keeping the default as NTFS with a quick format. Click
Next. - Click
Finishto create the new partition.
If your SSD is smaller than 512GB, it’s usually unnecessary to have multiple partitions. When creating new partitions on a basic disk, the first three will be formatted as primary partitions, while starting from the fourth, each partition will be configured as a logical drive within an extended partition.
Delete Partition
To delete an existing partition and free up space (note that this will erase all data on the partition):
- Right-click on the partition you want to delete.
- Select
Delete Volume. - Confirm by clicking
Yesin the pop-up window. - The deleted space will now be shown as
Unallocated(black), which can be used to create a new partition.
Format Partition
Formatting a partition erases all data and re-establishes the file system:
- Right-click on the partition you want to format.
- Select
Format. - Keep the default options.
- Click
OKto proceed with formatting.
Extend Partition
If a partition is running low on space and there’s unallocated space on the disk, you can extend it:
- Right-click on the partition you want to extend.
- Select
Extend Volume. - In the wizard, choose the amount of space to add (by default, it uses the maximum available).
- Click
Next, thenFinish.
Shrink Partition
If you want to reduce a partition’s size, you can shrink it:
- Right-click on the partition you want to shrink.
- Select
Shrink Volume. - Enter the amount of space to shrink.
- Click
Shrink. The freed space will appear asUnallocated(black).
Change Drive Letter and Paths
You can assign a different drive letter to a partition:
- Right-click on the partition or drive.
- Select
Change Drive Letter and Paths. - In the pop-up window, choose
Change, then select the new letter. - Click
OK.
Microsoft Store Installation
The LTSC version of Windows doesn’t include the Microsoft Store by default, so it needs to be installed manually. Here are the steps:
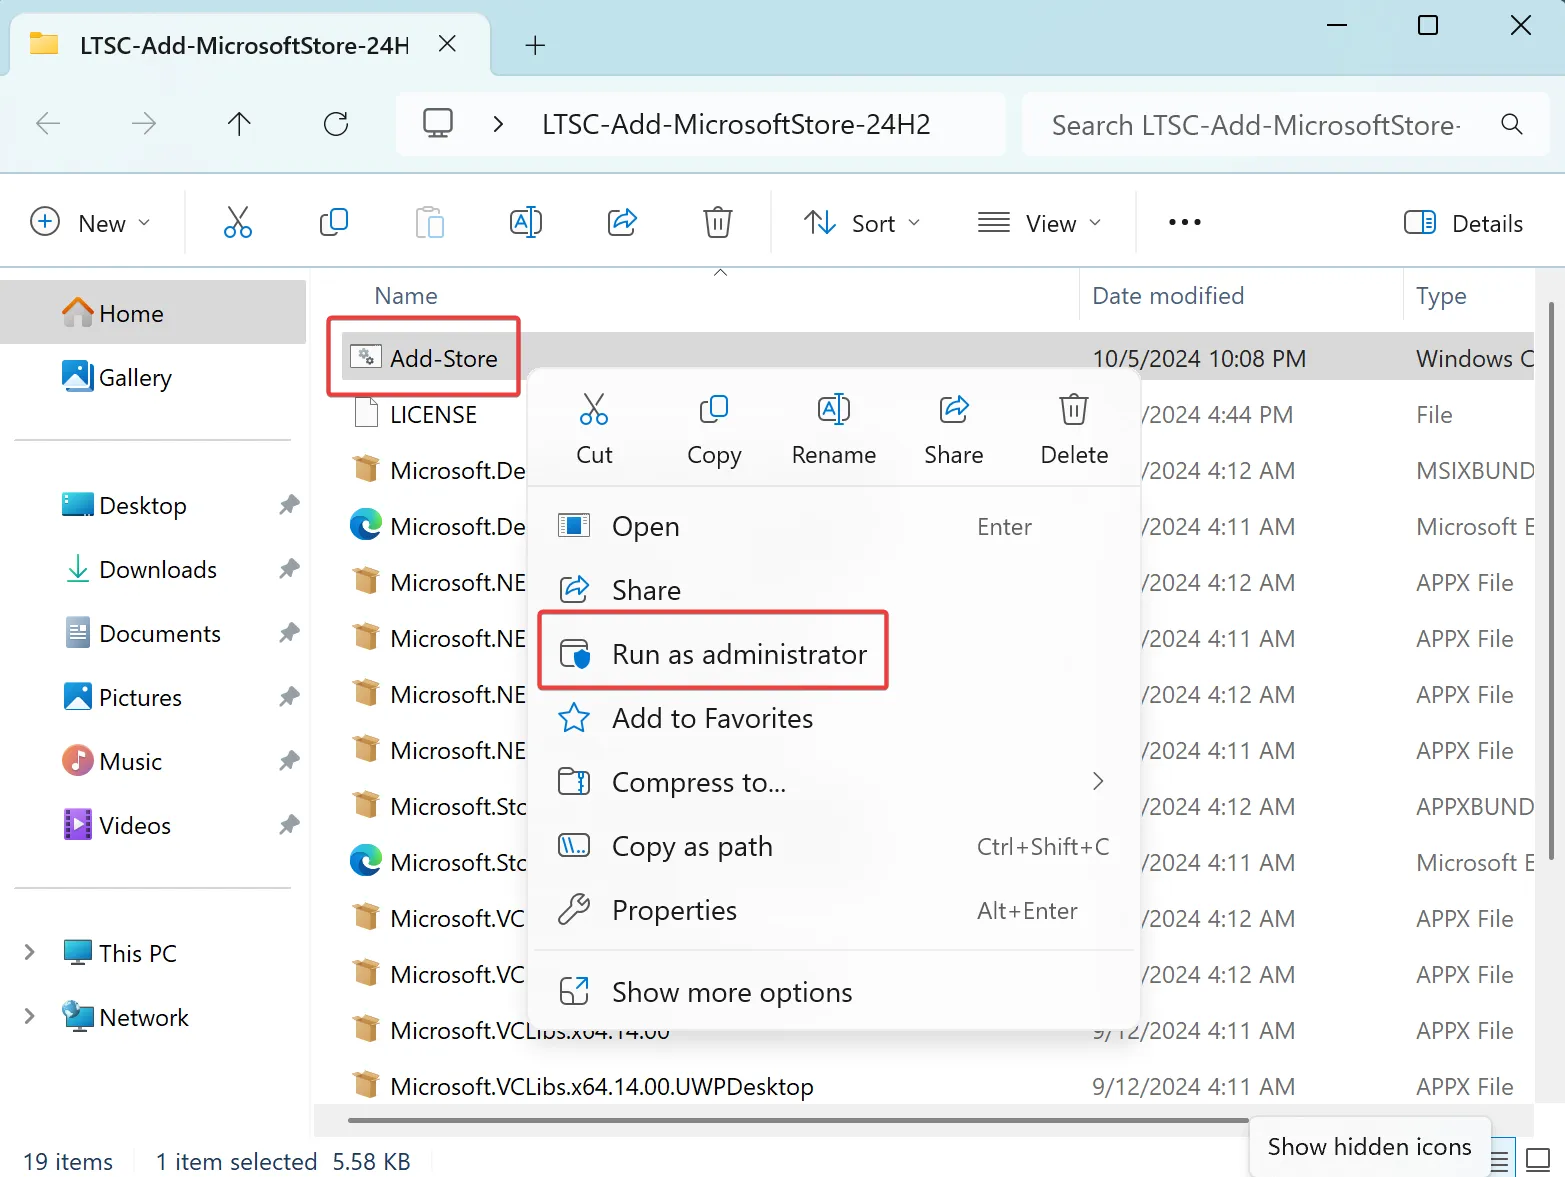
- First, download the installation package provided by the
LTSC-Add-MicrosoftStoreproject. - Extract the downloaded files and open the folder.
- Right-click on the
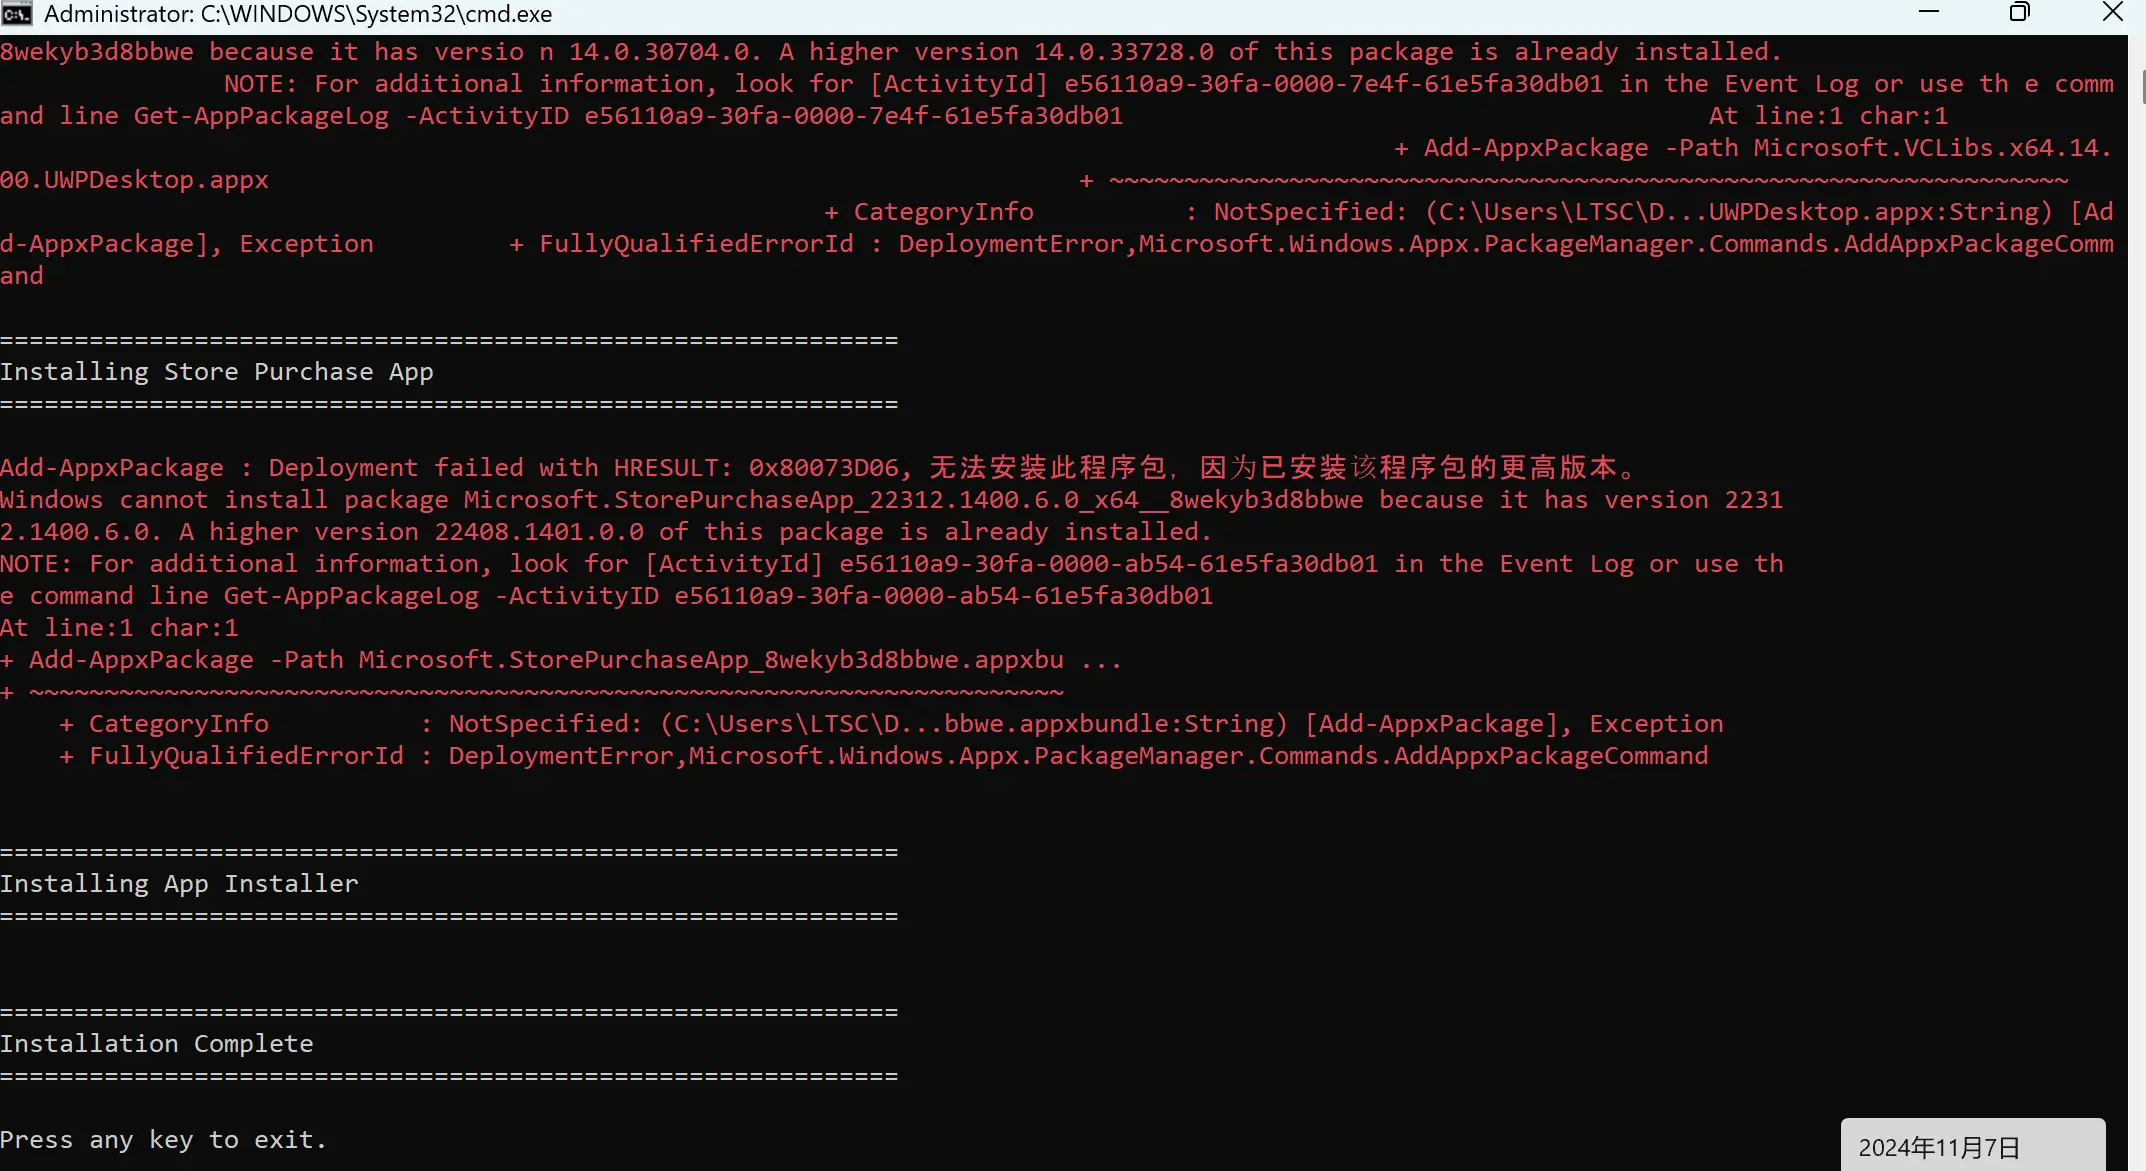
Add-Storescript and selectRun as administrator. - During installation, some errors may appear for components that cannot be installed. This is normal, as certain components are already pre-installed on the system, leading to version conflicts.
- After the installation is complete, press any key to exit the script.
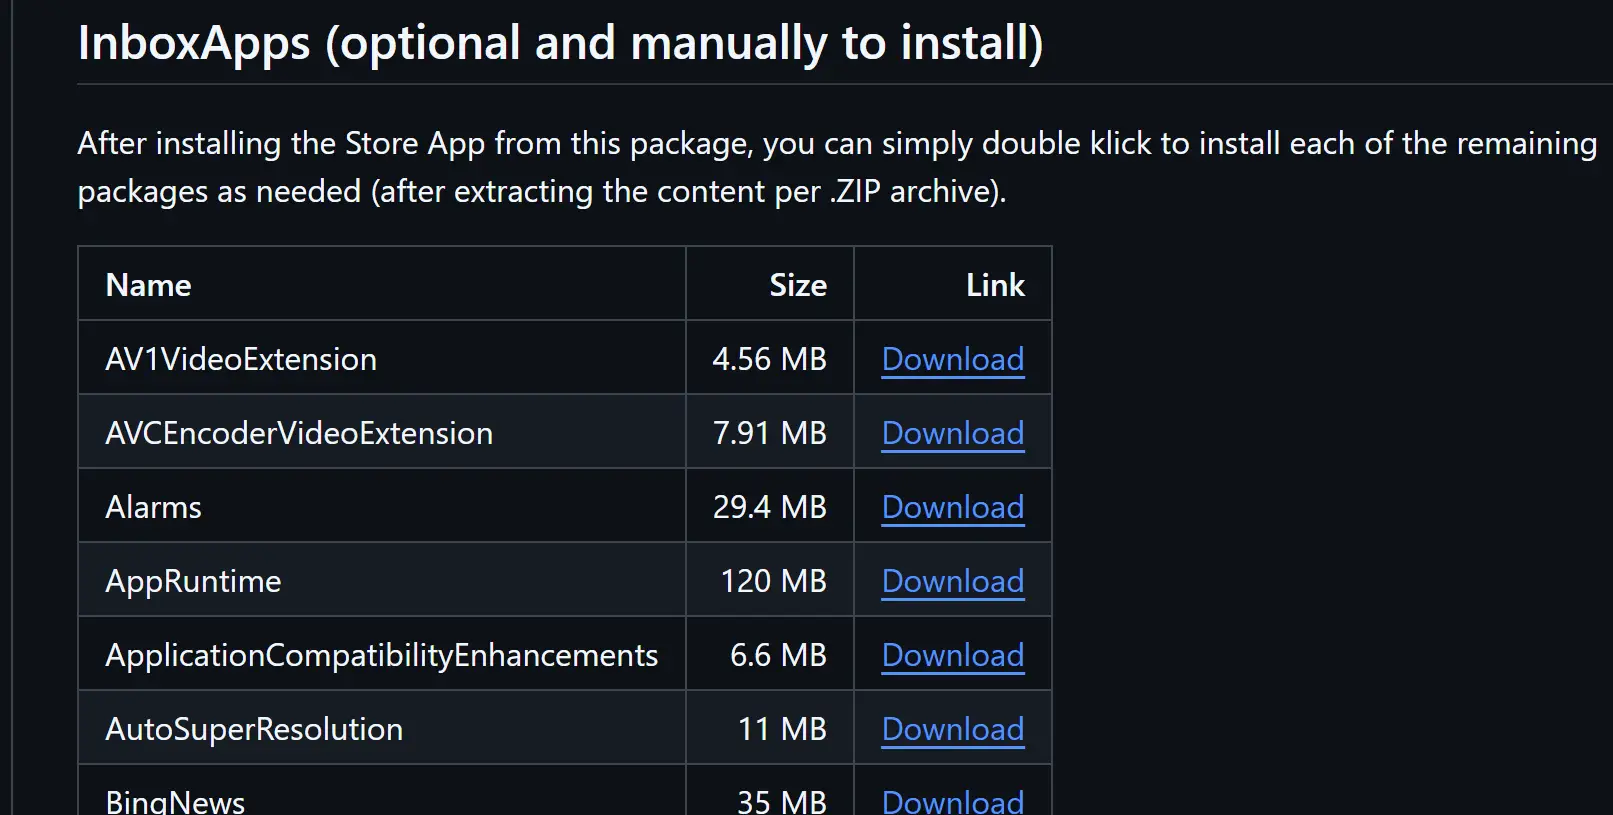
- The project also offers offline installation packages for certain Microsoft Store apps; download and double-click to install as needed.
- LTSC lacks certain media extensions, which can be installed directly from the Store. Search and install the following as needed:
- MPEG-2 Video Extension
- VP9 Video Extension
- Raw Image Extension
- Web Media Extension
- HEIF Image Extension
- AVC Encoder Video Extension
- AV1 Video Extension
- HEVC Video Extension
- WebP Image Extension
- OpenCL™, OpenGL® and Vulkan®
Office LTSC 2024
Installation
I am also installing the LTSC version of Office. Here are the steps:
- First, download the installation tool, Office Tool Plus.
- Extract the downloaded files, open the folder, and right-click to
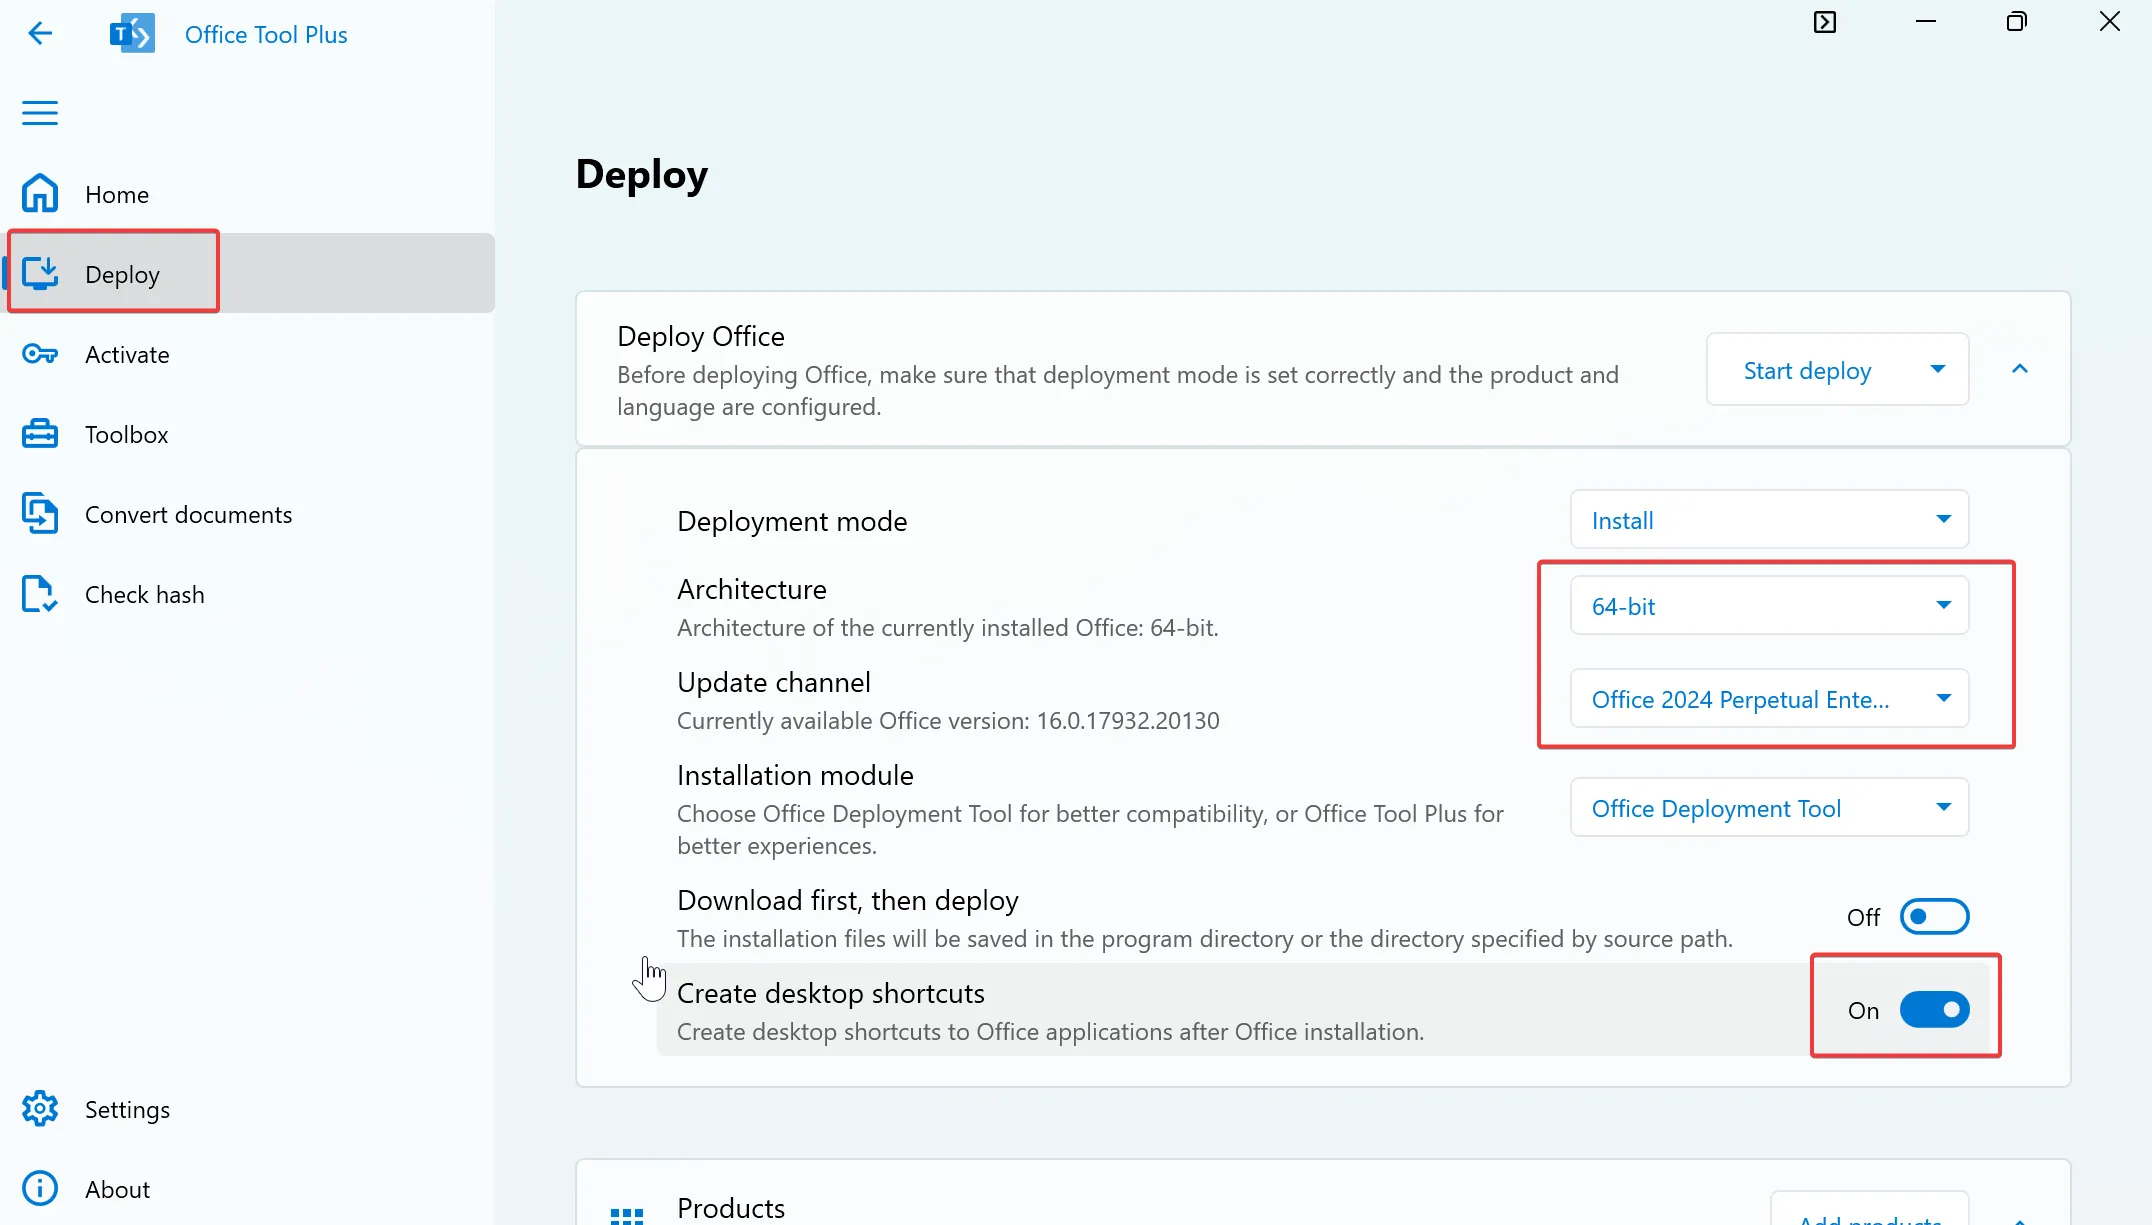
Run as Administratoron theOffice Tool Plusapplication. - Click
Yesto accept the license terms. - In the left sidebar, click on the
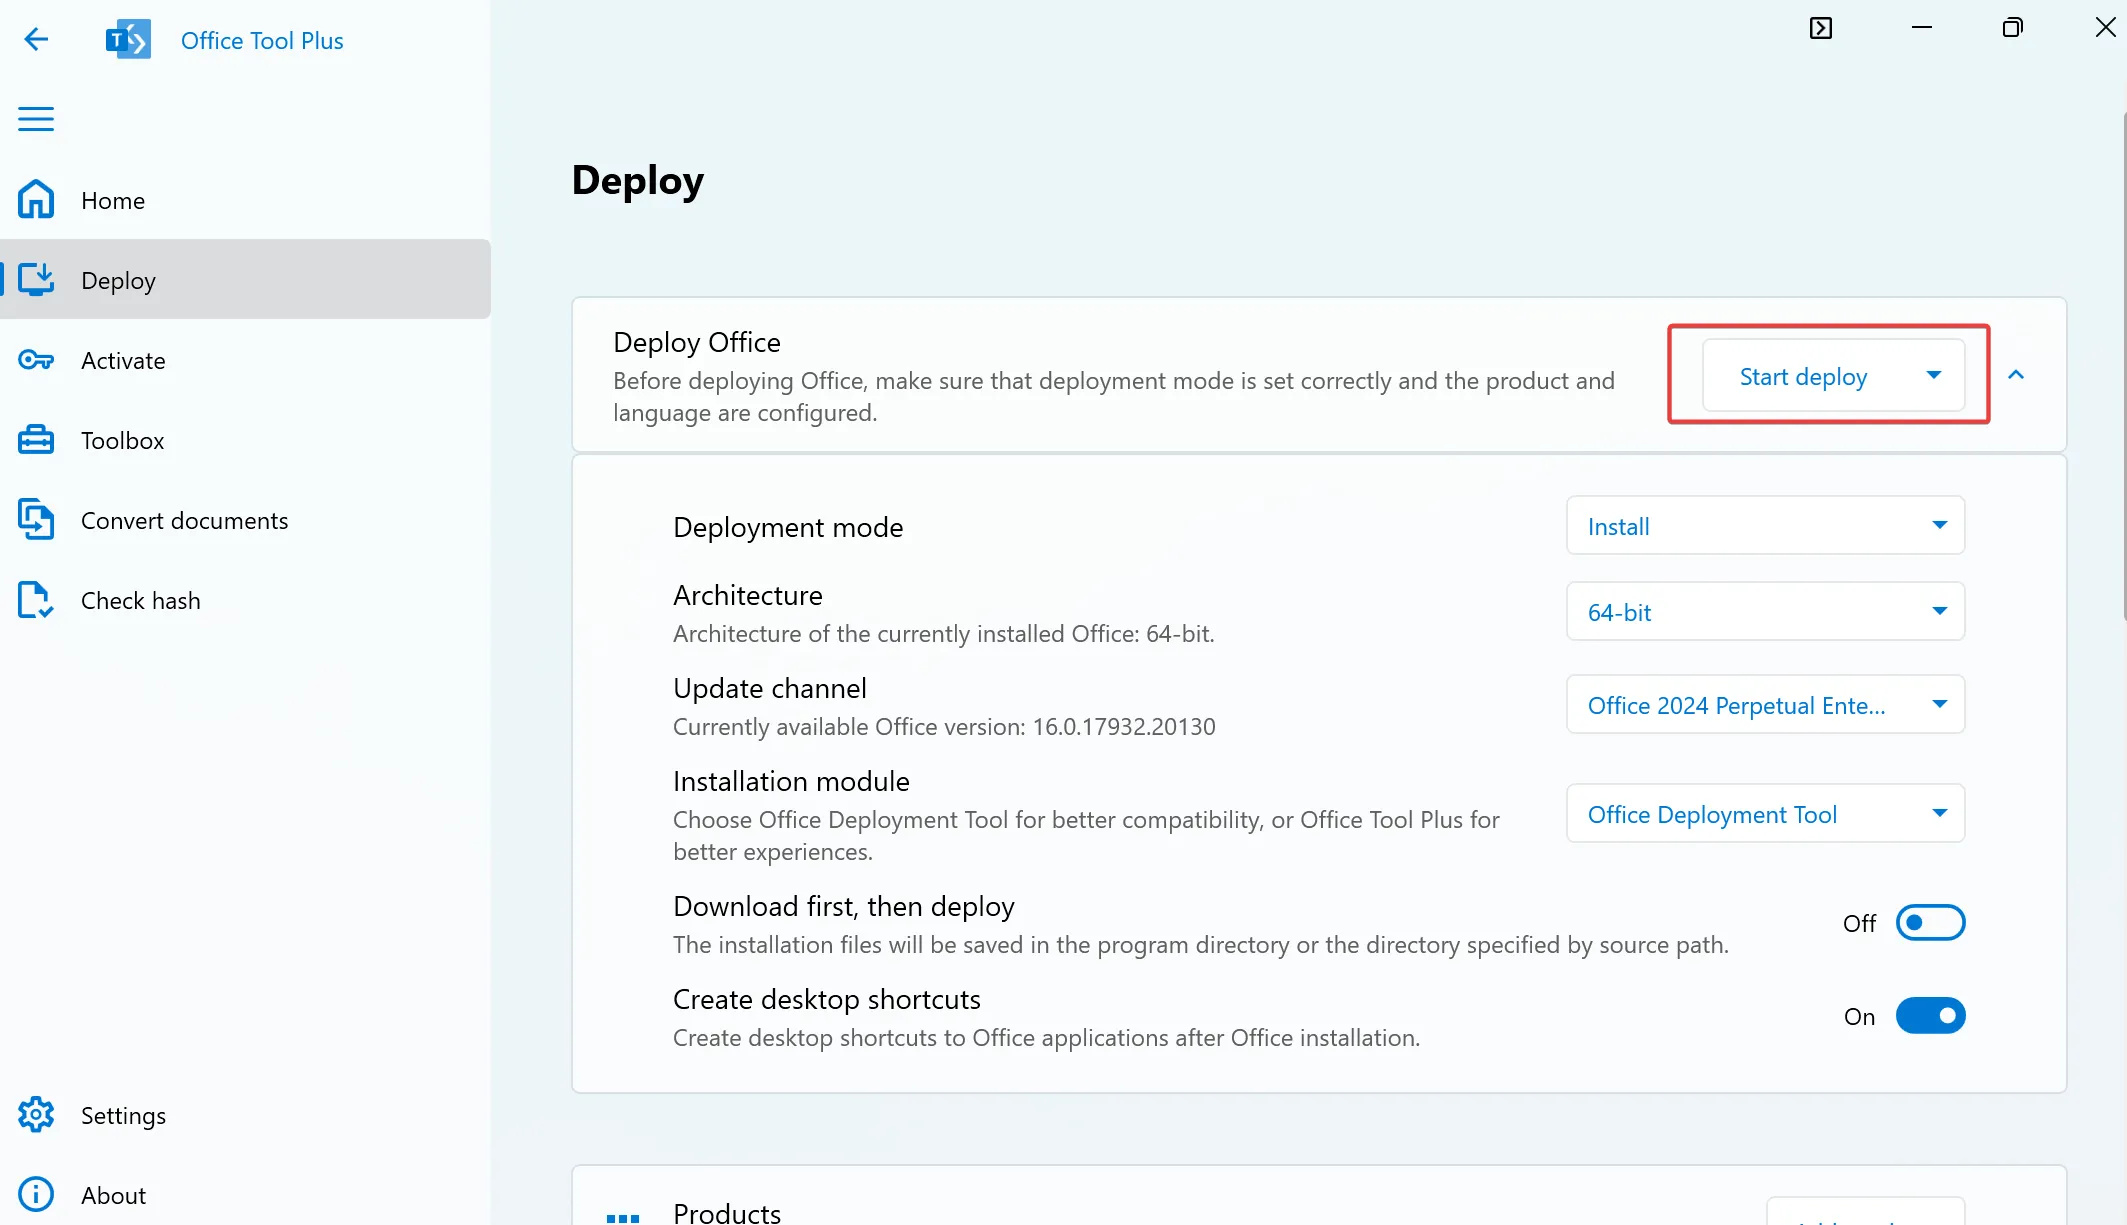
Deploytab. - Set the architecture to
64-bit. - Select the update channel as needed; here, I set it to
Office 2024 Perpetual Enterprise. - Choose whether to
Create desktop shortcuts. - Click the
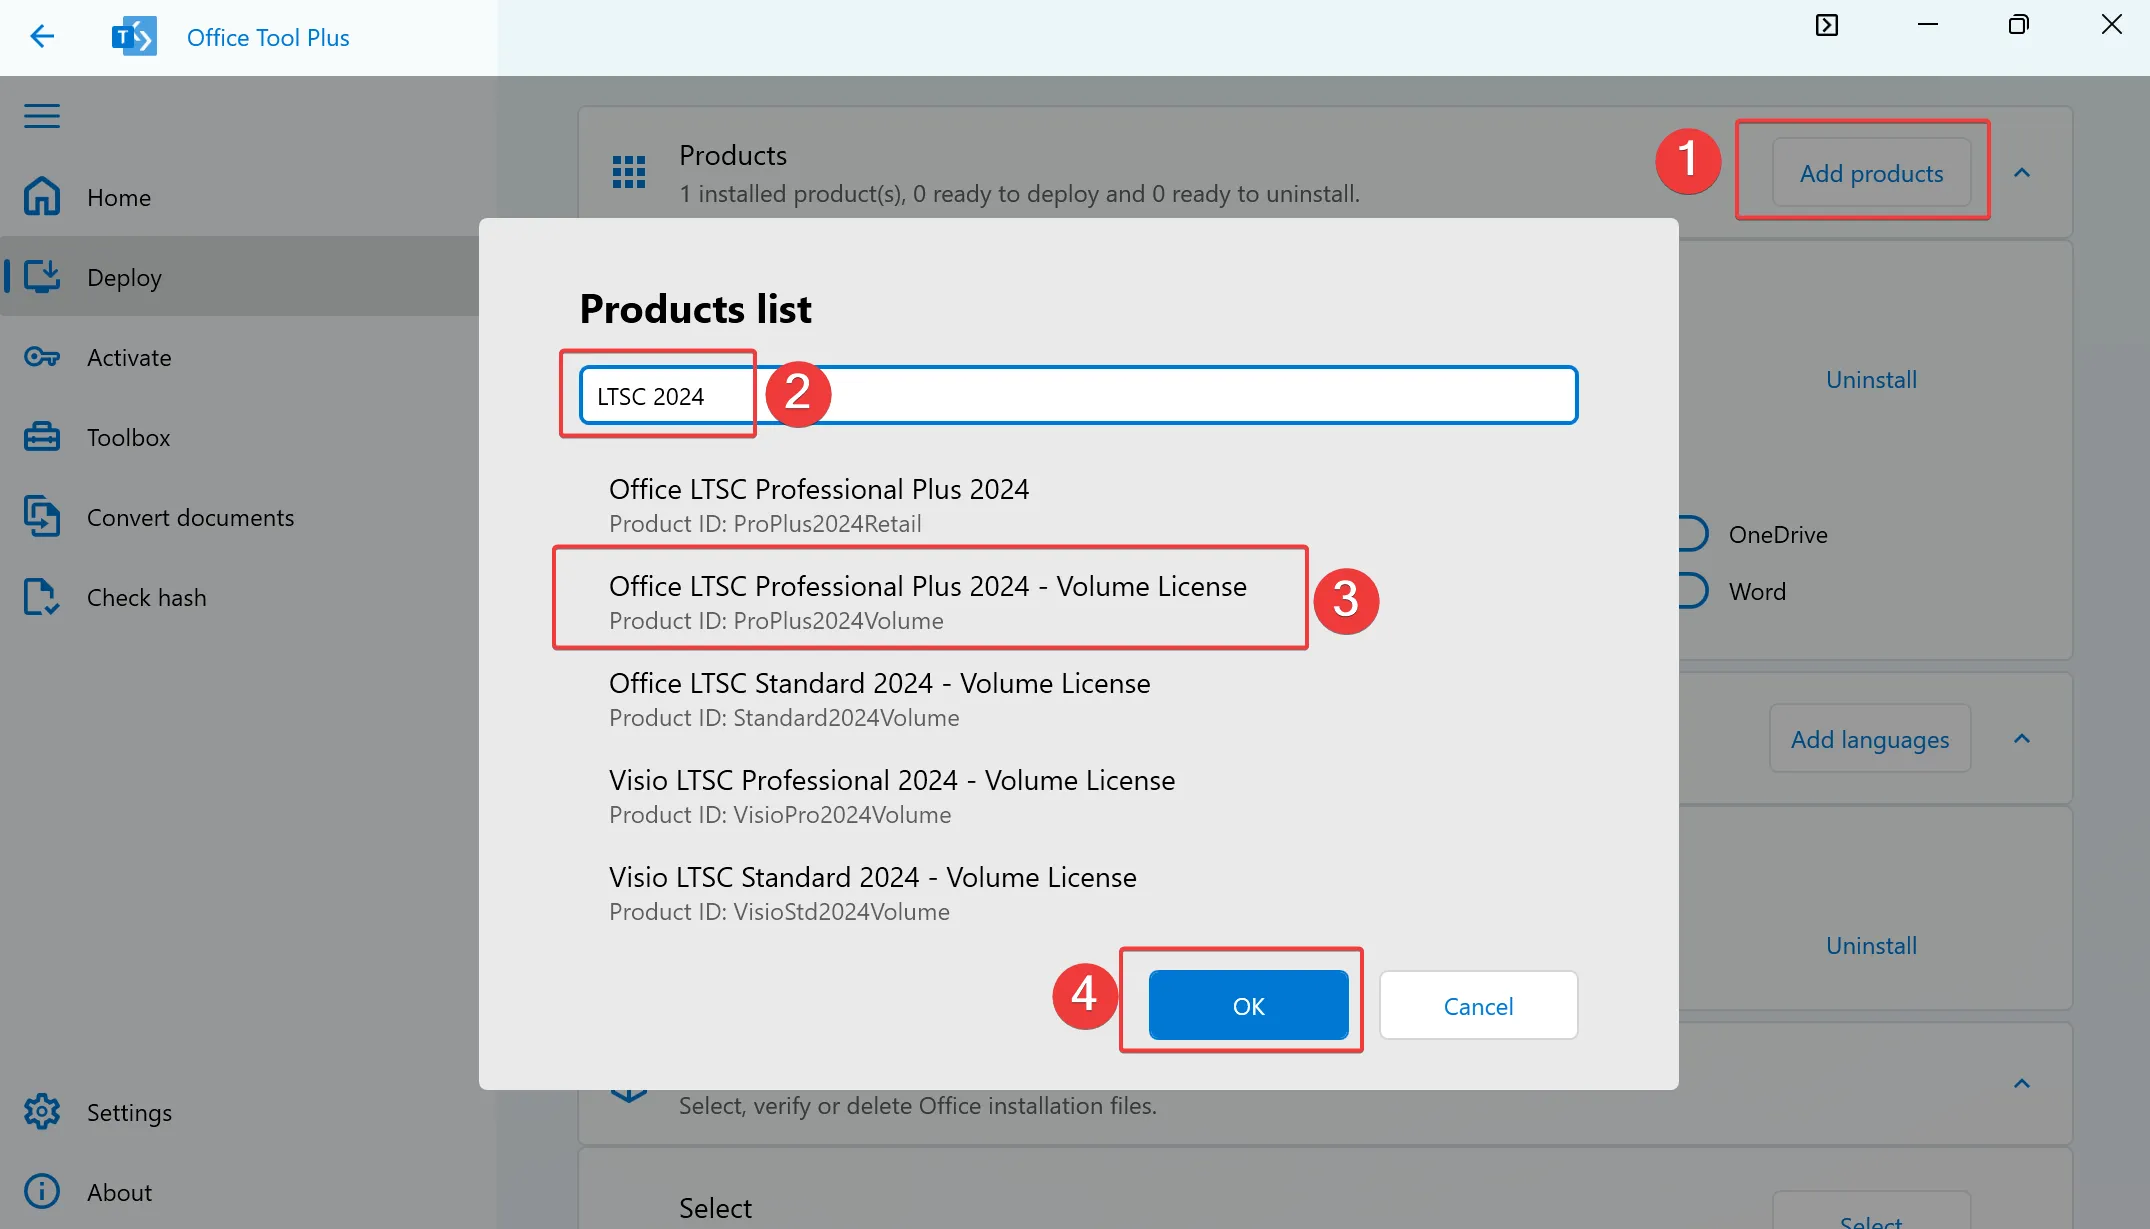
Add productsbutton. - Enter
LTSC 2024in the search bar. - Select
Office LTSC Professional Plus 2024 - Volume License. - Click
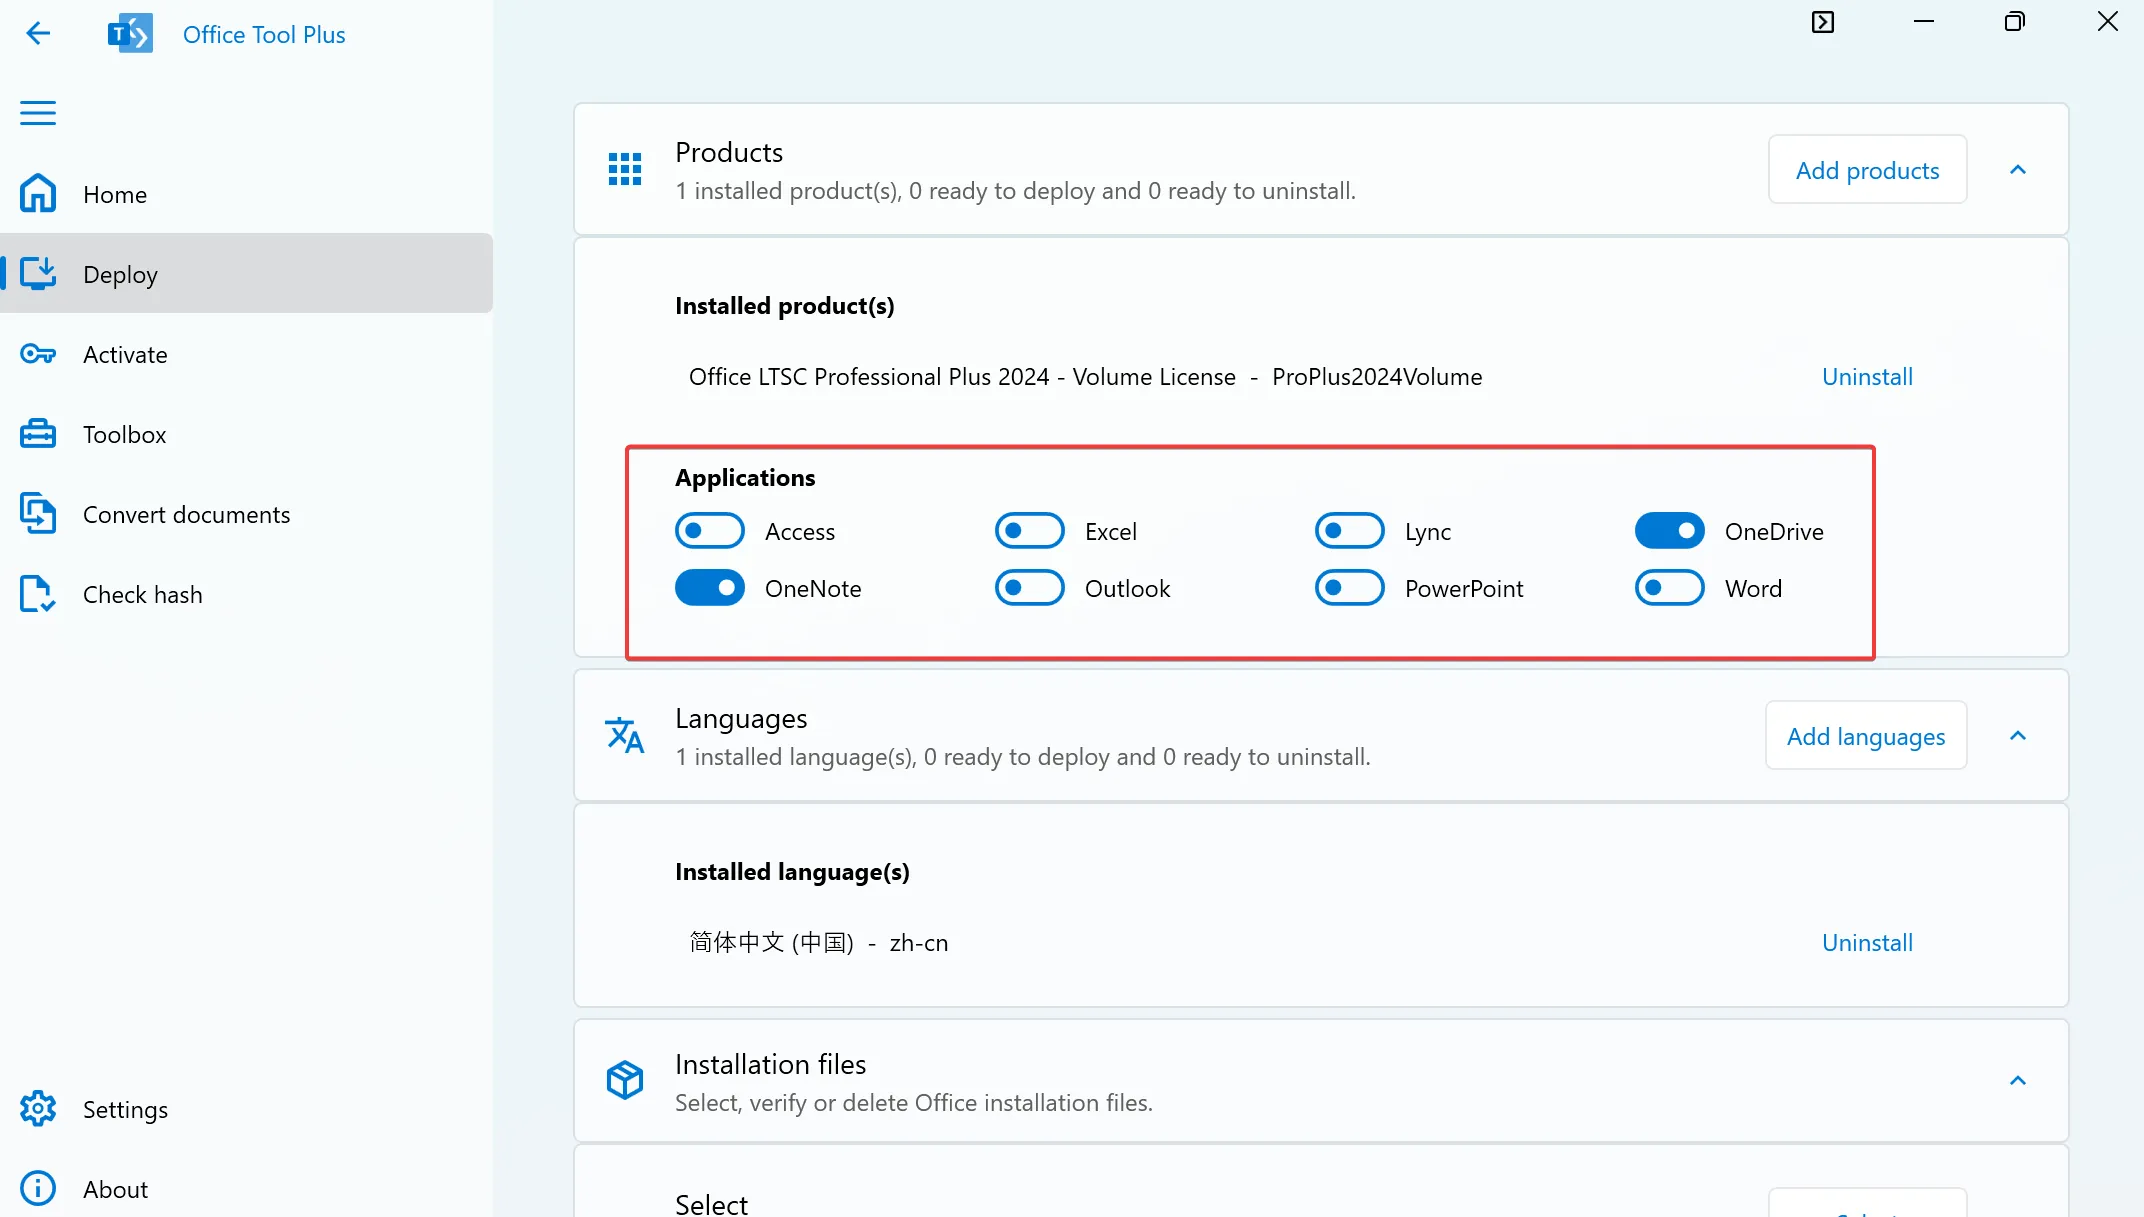
OK. - Select the applications you want to install.
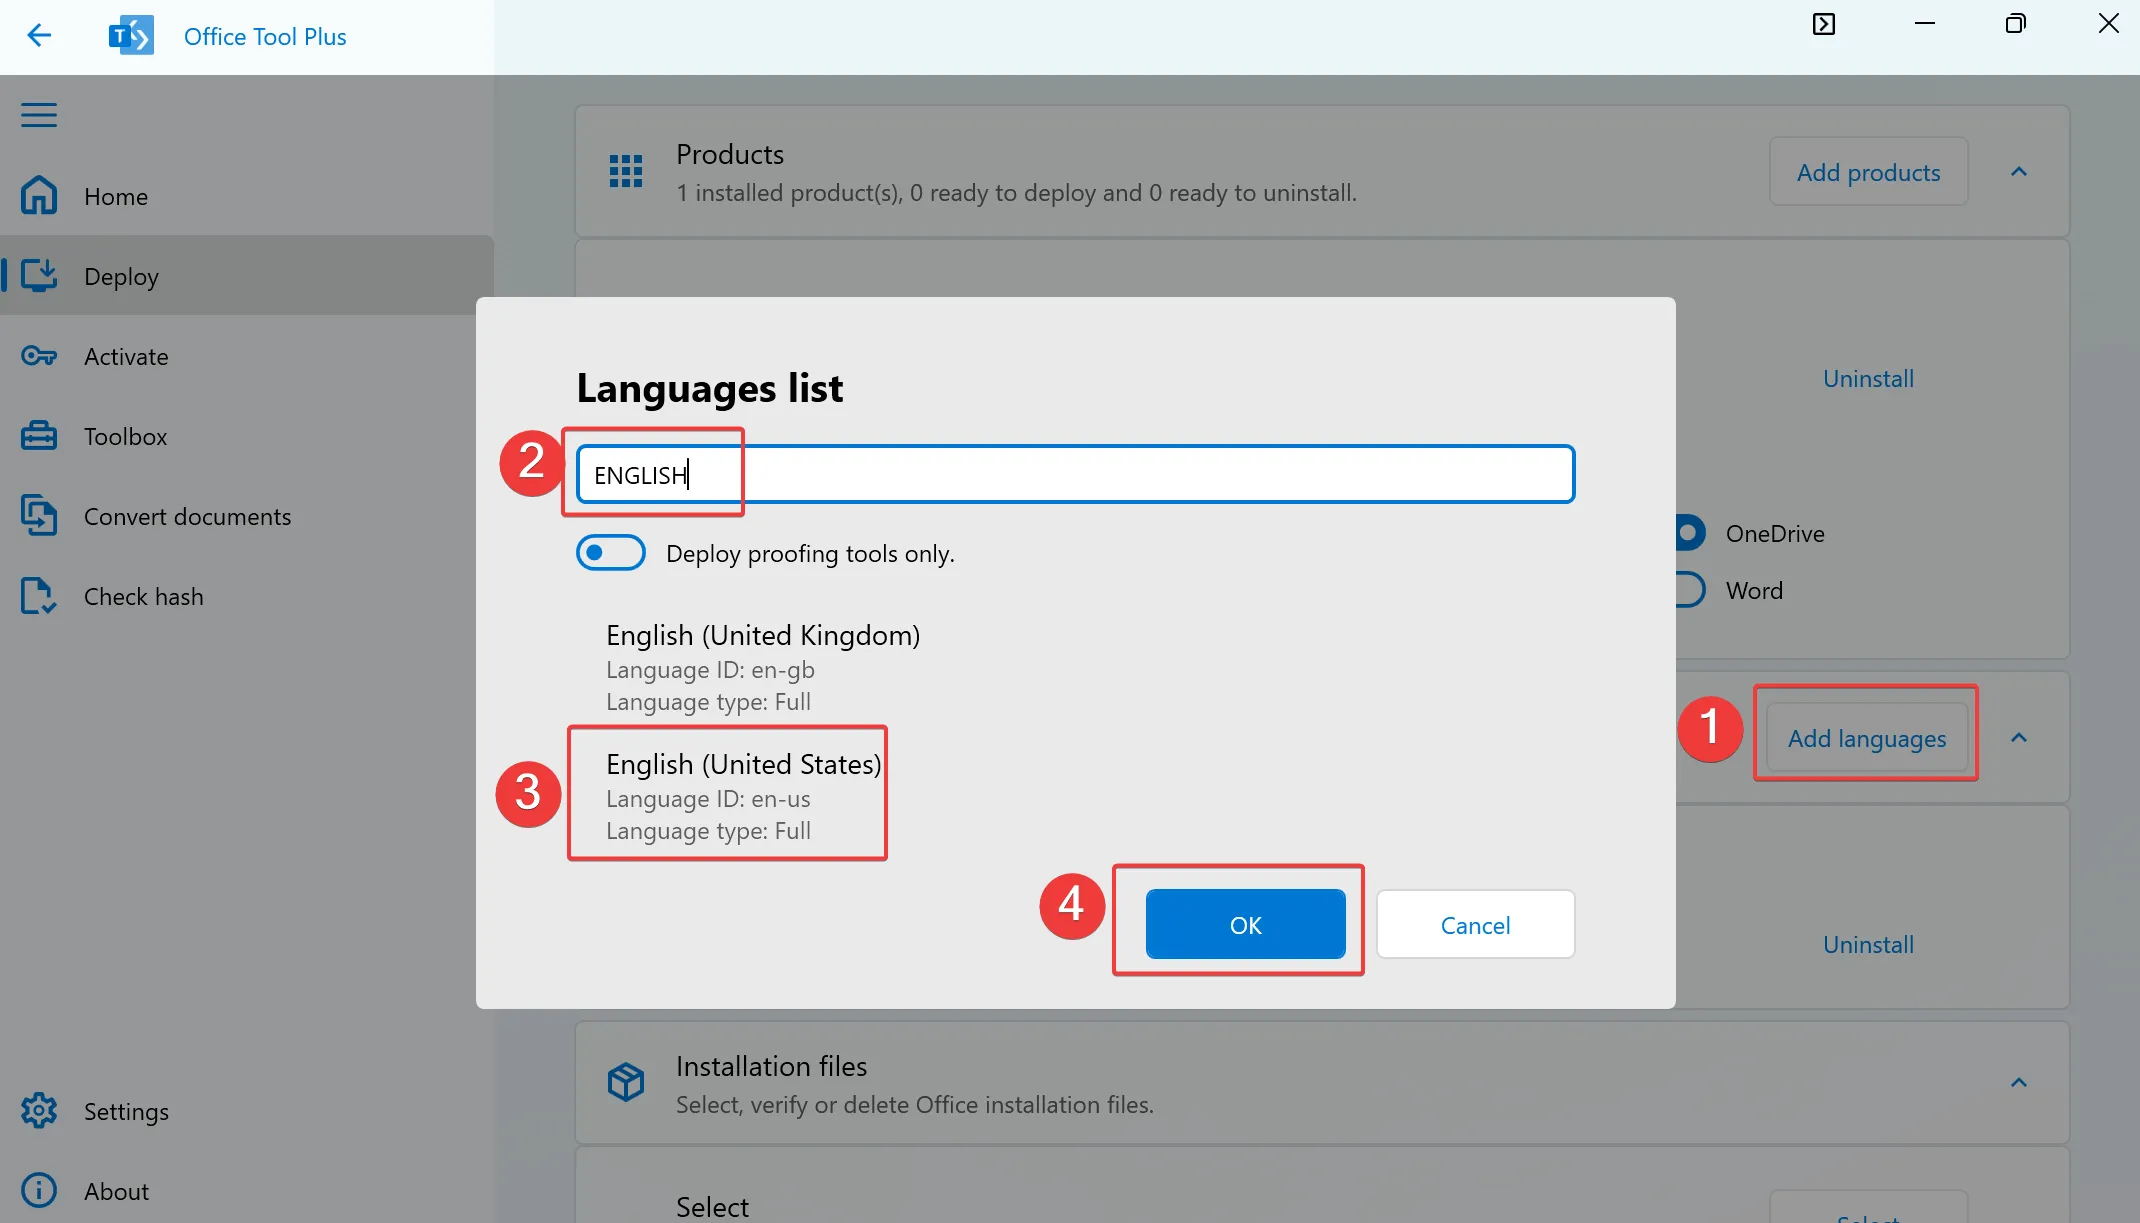
- Click
Add languages. - Search for
English. - Choose
English (United States). - Click
OK. - At the top of the page, click
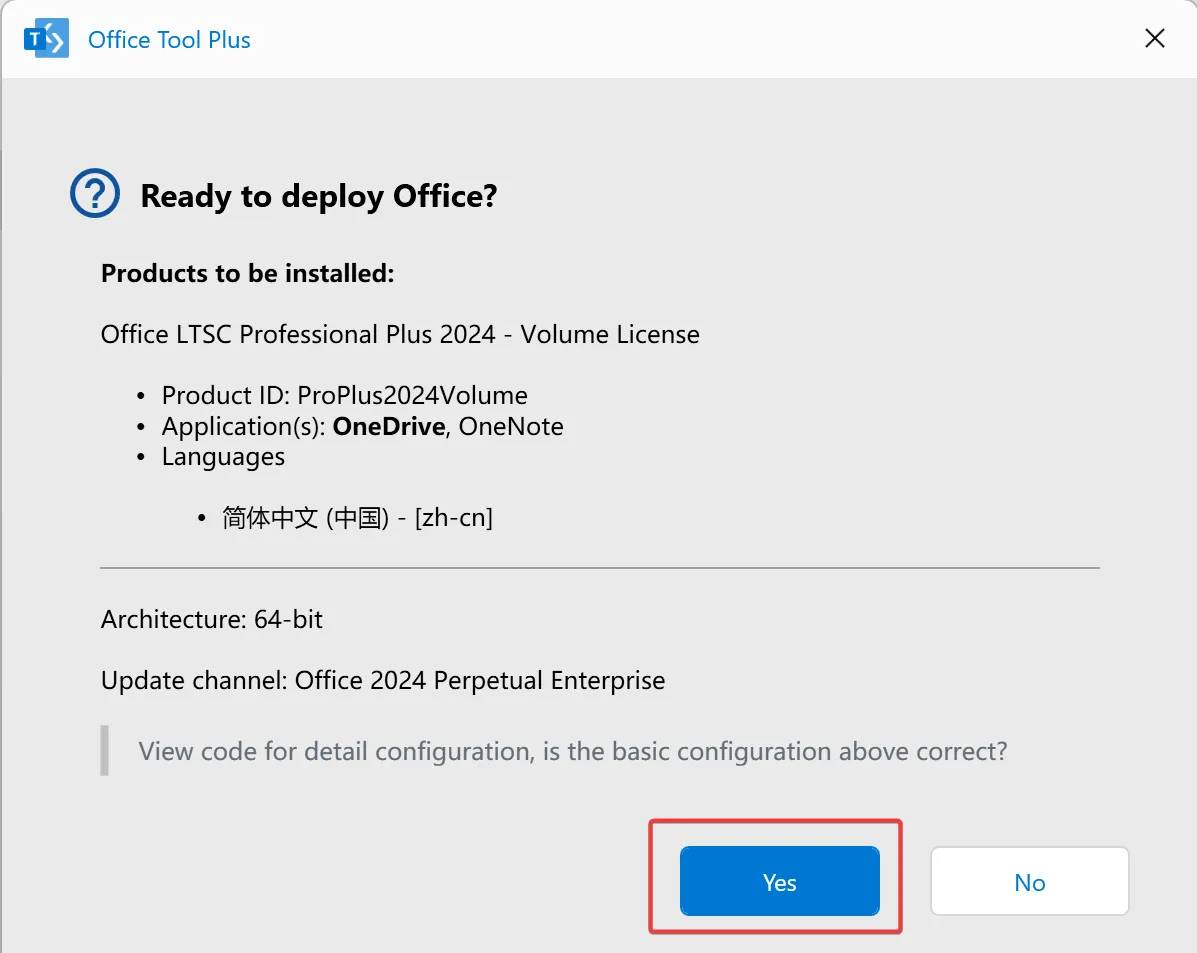
Start deploy. - In the popup, confirm the details and click
Yesto begin installation. - If a message appears stating that the signature cannot be verified, click
Yesto proceed. - Wait for the installation to complete.
Activation
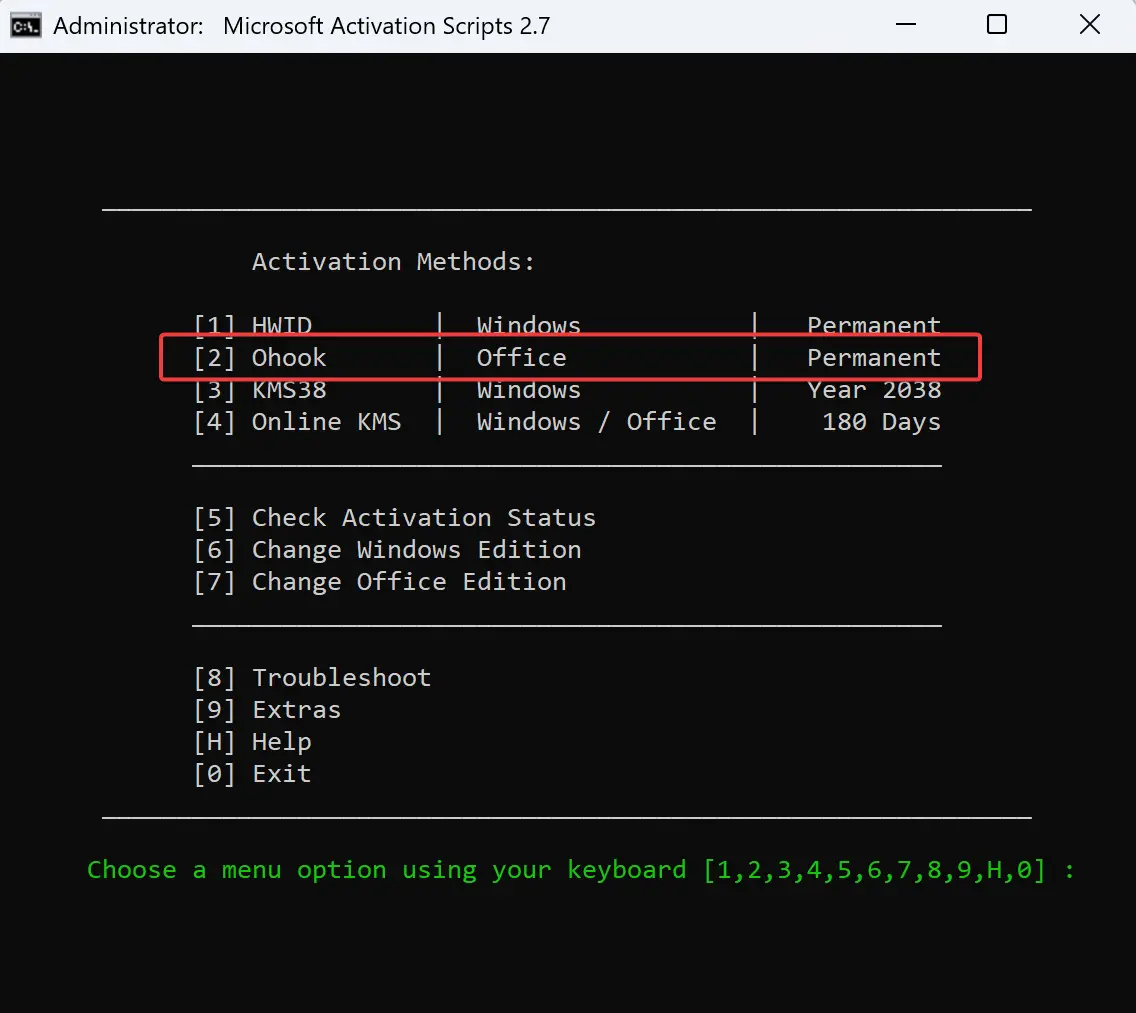
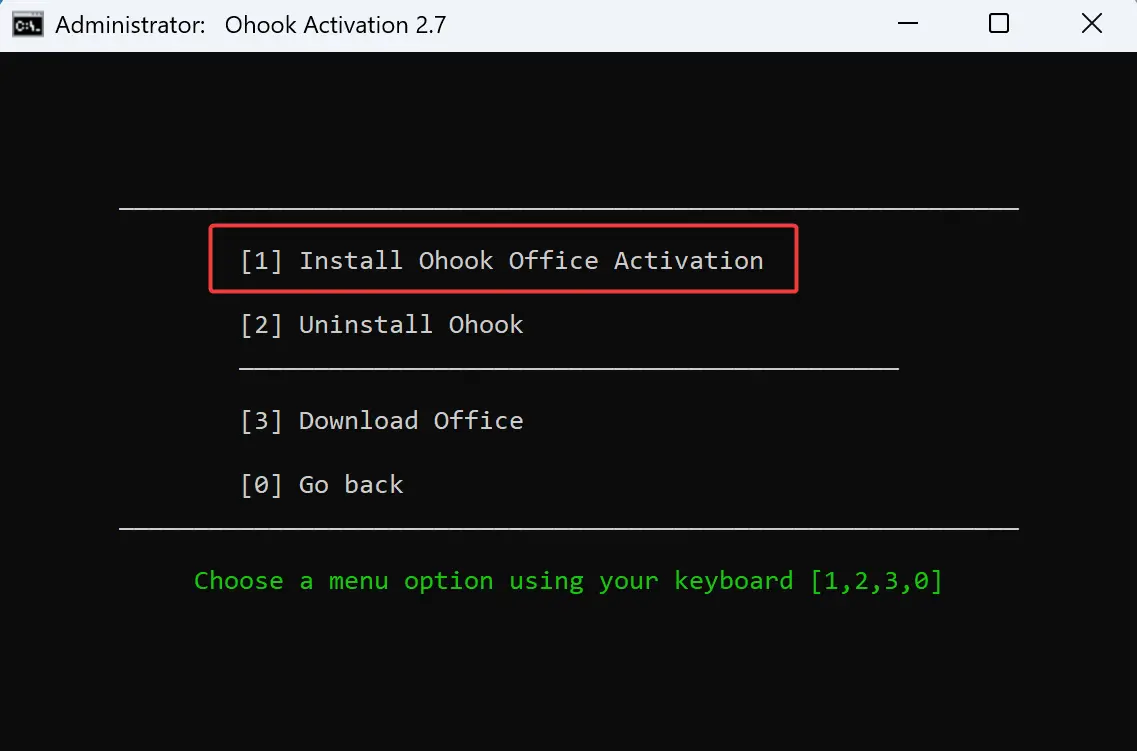
To activate Office, you can also use the MAS script, following similar steps as for system activation:
- Run the MAS script using the same command as for system activation.
- In the window that appears, type
2to choose theOhookactivation method. - Then, type
1to proceed with the activation.
System Adjustments and Bug Fixes
Turn off Microsoft Defender Antivirus
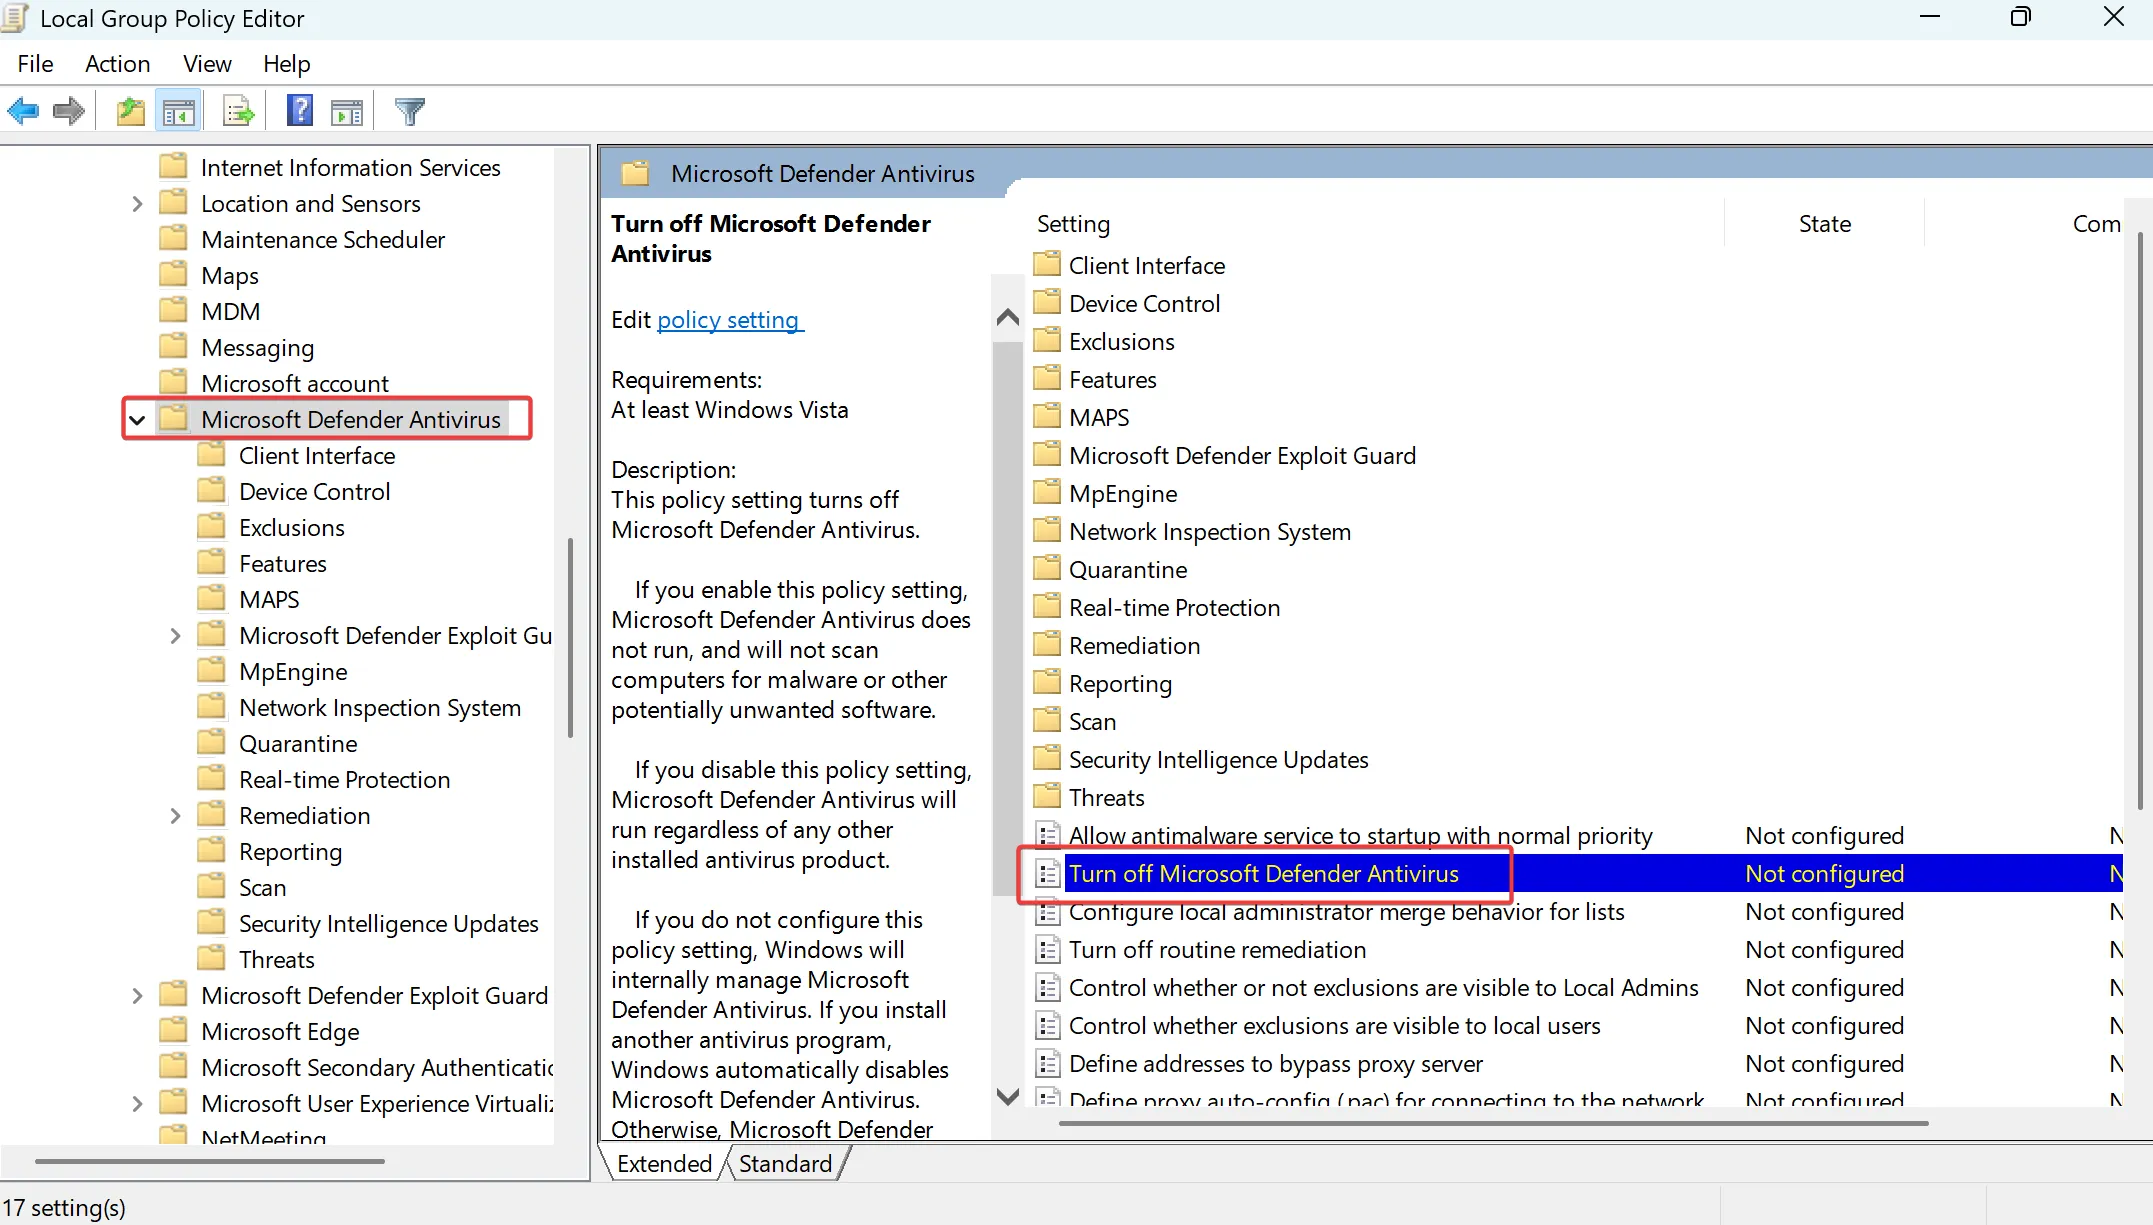
Additionally, my PC encountered a bug where certain software took a long time to launch. After troubleshooting with Task Manager, I found that it was caused by Windows Defender. The antimalware service executable process used a lot of resources during the software launch. This bug only appeared on the computer where I had installed additional antivirus software, while the other two computers were completely fine, which was puzzling. If you do not have other valid antivirus software installed, please DO NOT disable this option, as your system may be exposed to risks!
- First, right-click the Start menu button, click
Run, and typegpedit.mscto open theLocal Group Policy Editor. - Navigate to
Computer Configuration-Administrative Templates-Windows Components-Microsoft Defender Antivirus. - Double-click on
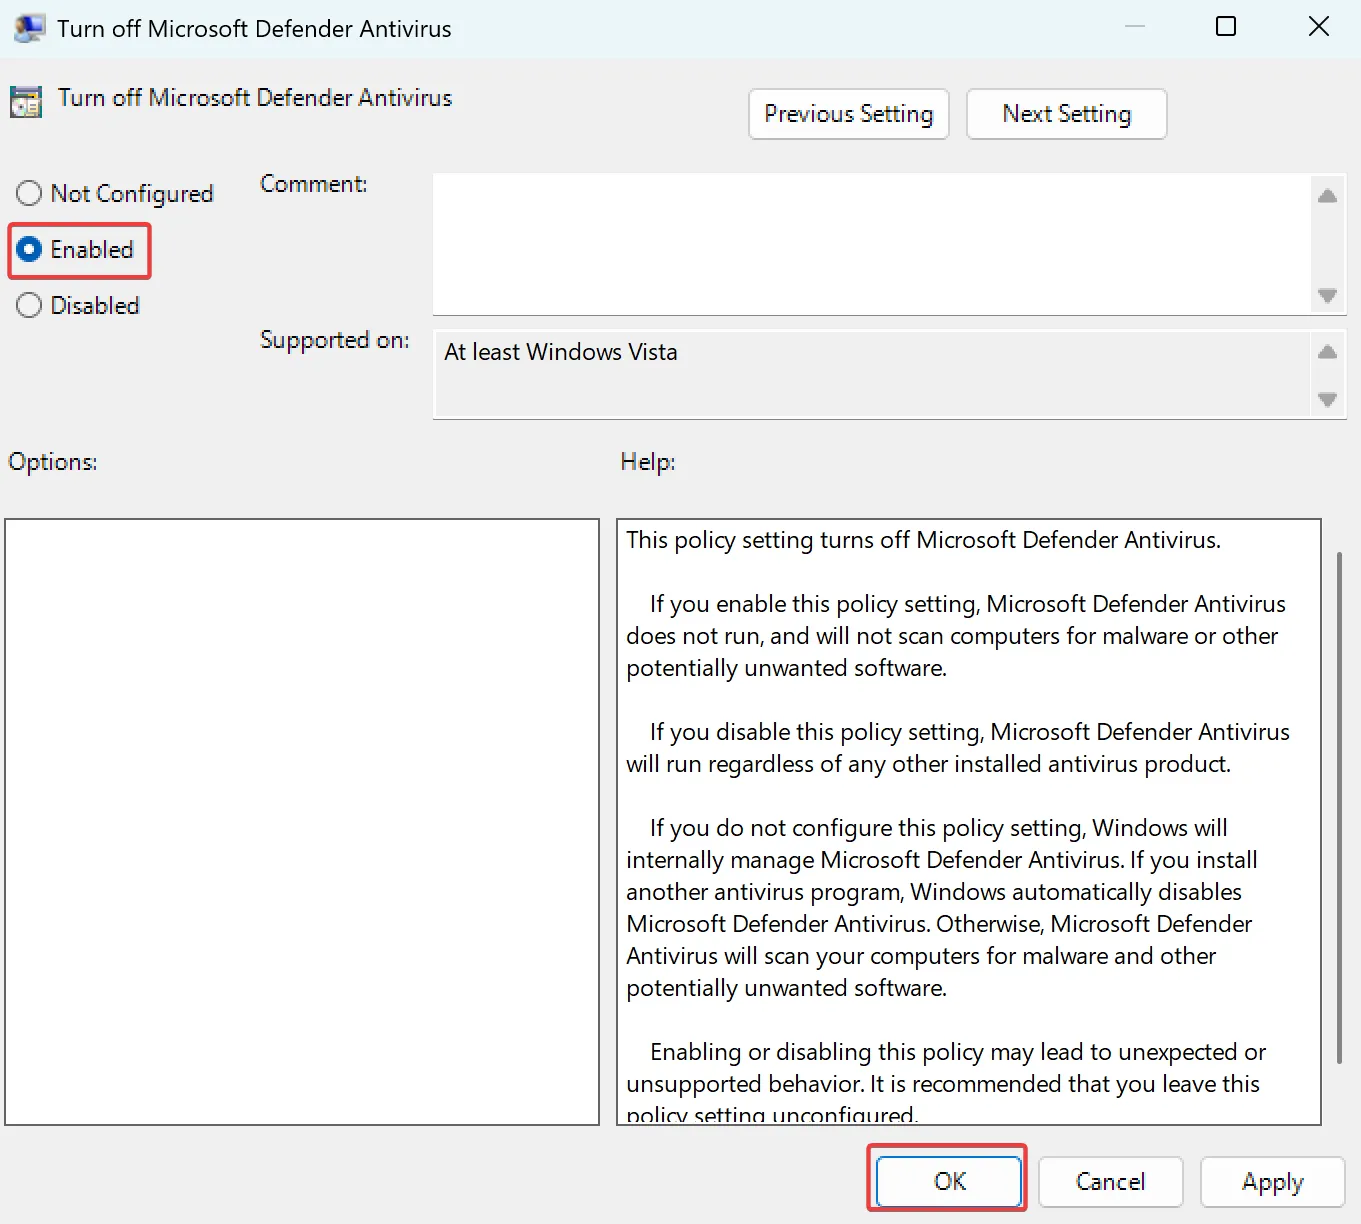
Turn off Microsoft Defender Antiviruson the right side. - Select
Enabled, then clickOKto save the changes.
Disable Fast Startup and Hibernation
When Fast Startup is enabled, clicking the shutdown button actually only puts the system into hibernation, rather than performing a traditional shutdown. Hibernation saves part of the data in memory to the system drive, and the next time the system starts, it restores that data from the system drive back to memory.
While this can speed up boot time, over time, strange issues may arise as the system runs for longer periods. Nowadays, SSDs are standard in computers, and Fast Startup only reduces boot time by a few seconds, which isn’t much. It’s better to simply turn it off. Here’s how:
- Open the Control Panel.
- Go to Hardware and Sound > Power Options > System Settings.
- Click “Change settings that are currently unavailable.”
- Uncheck “Turn on fast startup.”
- Save changes.
Additionally, when hibernation is enabled, a file called hiberfil.sys—which is the temporary storage for memory data—is created on the C drive. This file can be as large as the physical memory size and takes up valuable space on the already limited C drive. It’s a good idea to disable hibernation as well:
- Run the terminal as an administrator.
- Execute the command:
powercfg -h off.
Uninstall MS Edge
Edge has become increasingly bloated. Even if you don’t actively use it, it continues to update itself in the background, which is something no self-respecting cyber clean freak can tolerate. Moreover, to prevent users from uninstalling Edge, Microsoft conveniently omits an uninstall option in the settings. If you try using a third-party uninstaller, SmartScreen might even flag the tool as malicious software when you run it. What can I say? Classic Microsoft move.
Below, you’ll find uninstallers in various versions, but it’s recommended to choose the one that only removes Edge, as some applications still rely on WebView to function properly.
Launch Internet Explorer
Although Microsoft has officially retired the Internet Explorer browser, some legacy government websites still rely on the IE engine to function properly. While Edge does offer an IE compatibility mode, it’s notoriously clunky (and let’s be honest, I’ve already uninstalled Edge). In fact, Internet Explorer still exists within Windows 11, located at C:\Program Files\Internet Explorer\iexplore.exe, but it’s not directly accessible by double-clicking.
However, we can work around this by running an HTA file to launch Internet Explorer.
To do this, create a new text file and paste the following code into it. After saving the file, change the extension to .hta. Then, double-click the file to open it, and click the link “Click me to run Internet Explorer.” Within seconds, the IE browser window will appear.
1 | <h1>IE runner</h1> |
Alternatively, you can use a script to achieve the same result, so all you have to do is double-click and the browser will launch. Create a new text file, paste the following code, save it with a .bat extension, and double-click to run.
1 | echo ^<html^>^<script^>window.location.href^="about:Tabs";^</script^>^</html^> > %temp%/ie.hta |
Source:
- hta code:Reddit - Running Internet Explorer on Windows 11 (latest versions)
- bat:cryptaneonline’s comment
