Installation and Configuration of WSA
Documenting the process of setting up WSA, establishing an internet connection, configuring a proxy, and installing applications.
Reminder of Timeliness
This article was written in June 2022! Please be aware that some of the content may have become outdated!
This post was translated from my Chinese blog post with the aid of ChatGpt.
Preparation
Remember to enable CPU virtualization in BIOS.
Windows Settings Adjustment
Open Settings - Apps - Optional Features - More Windows Features and check Virtual Machine Platform, then wait for installation and restart.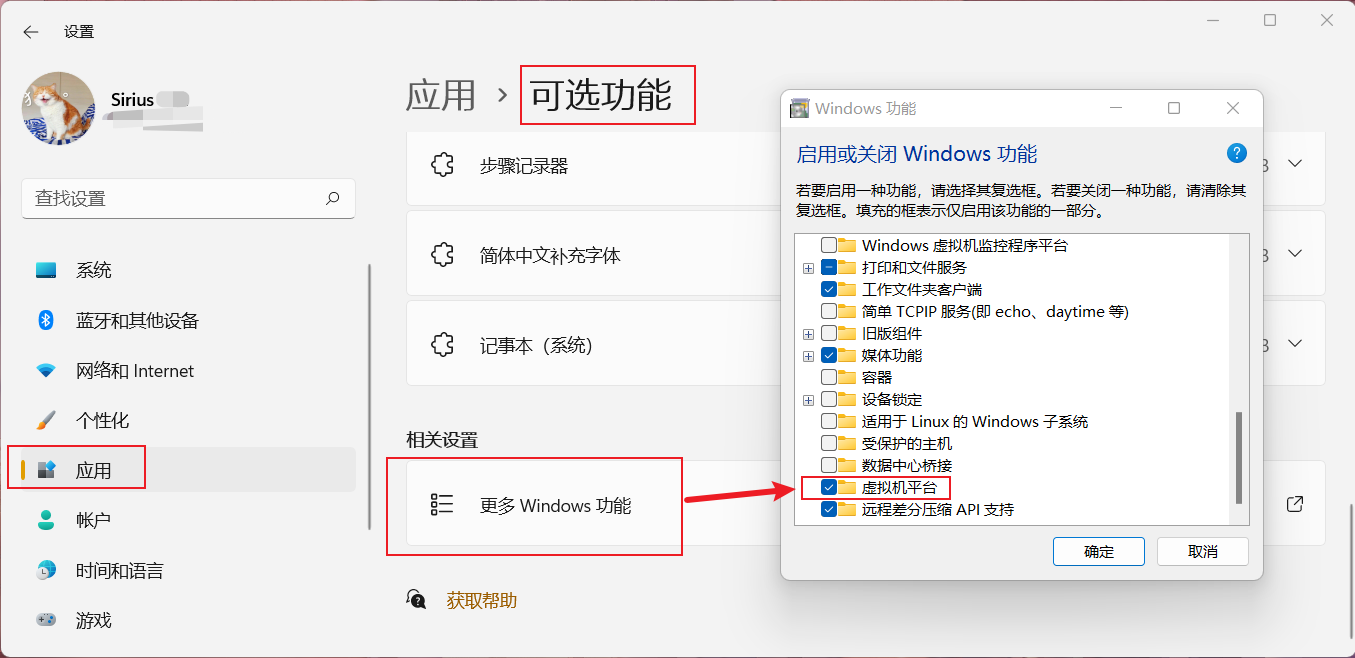
Next, go to Settings - Privacy & Security - Developer options - Developer mode and turn on the switch.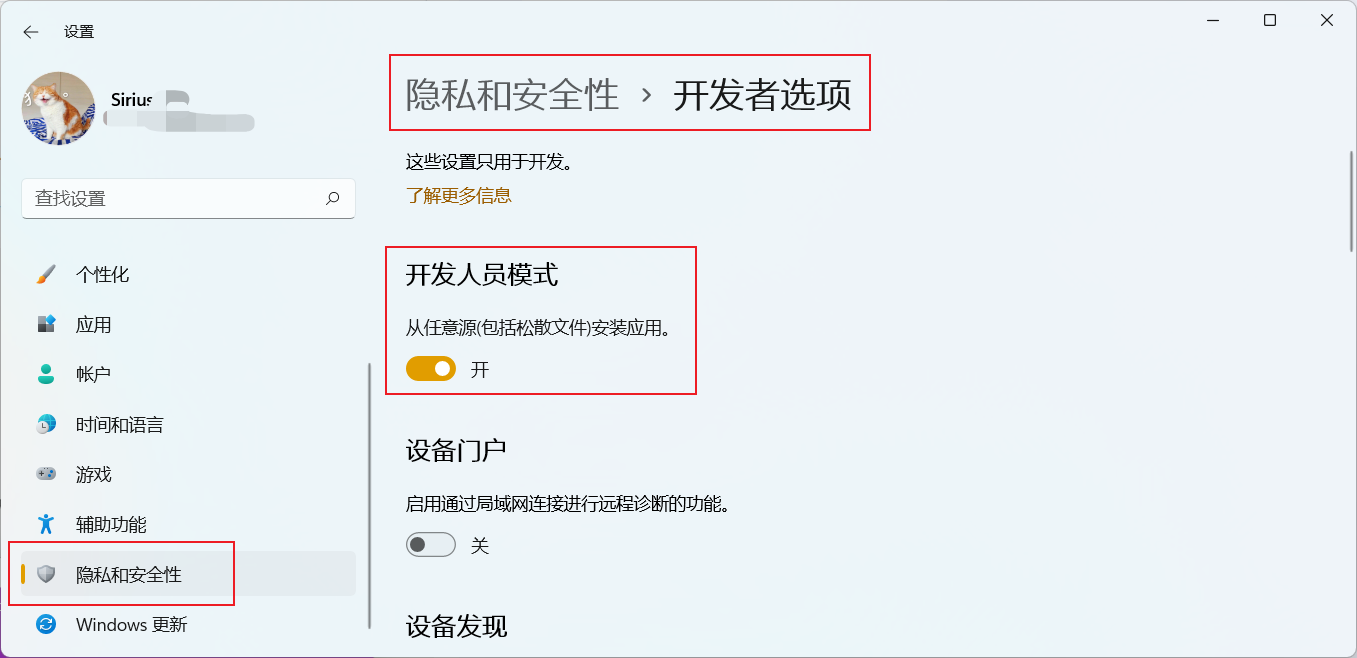
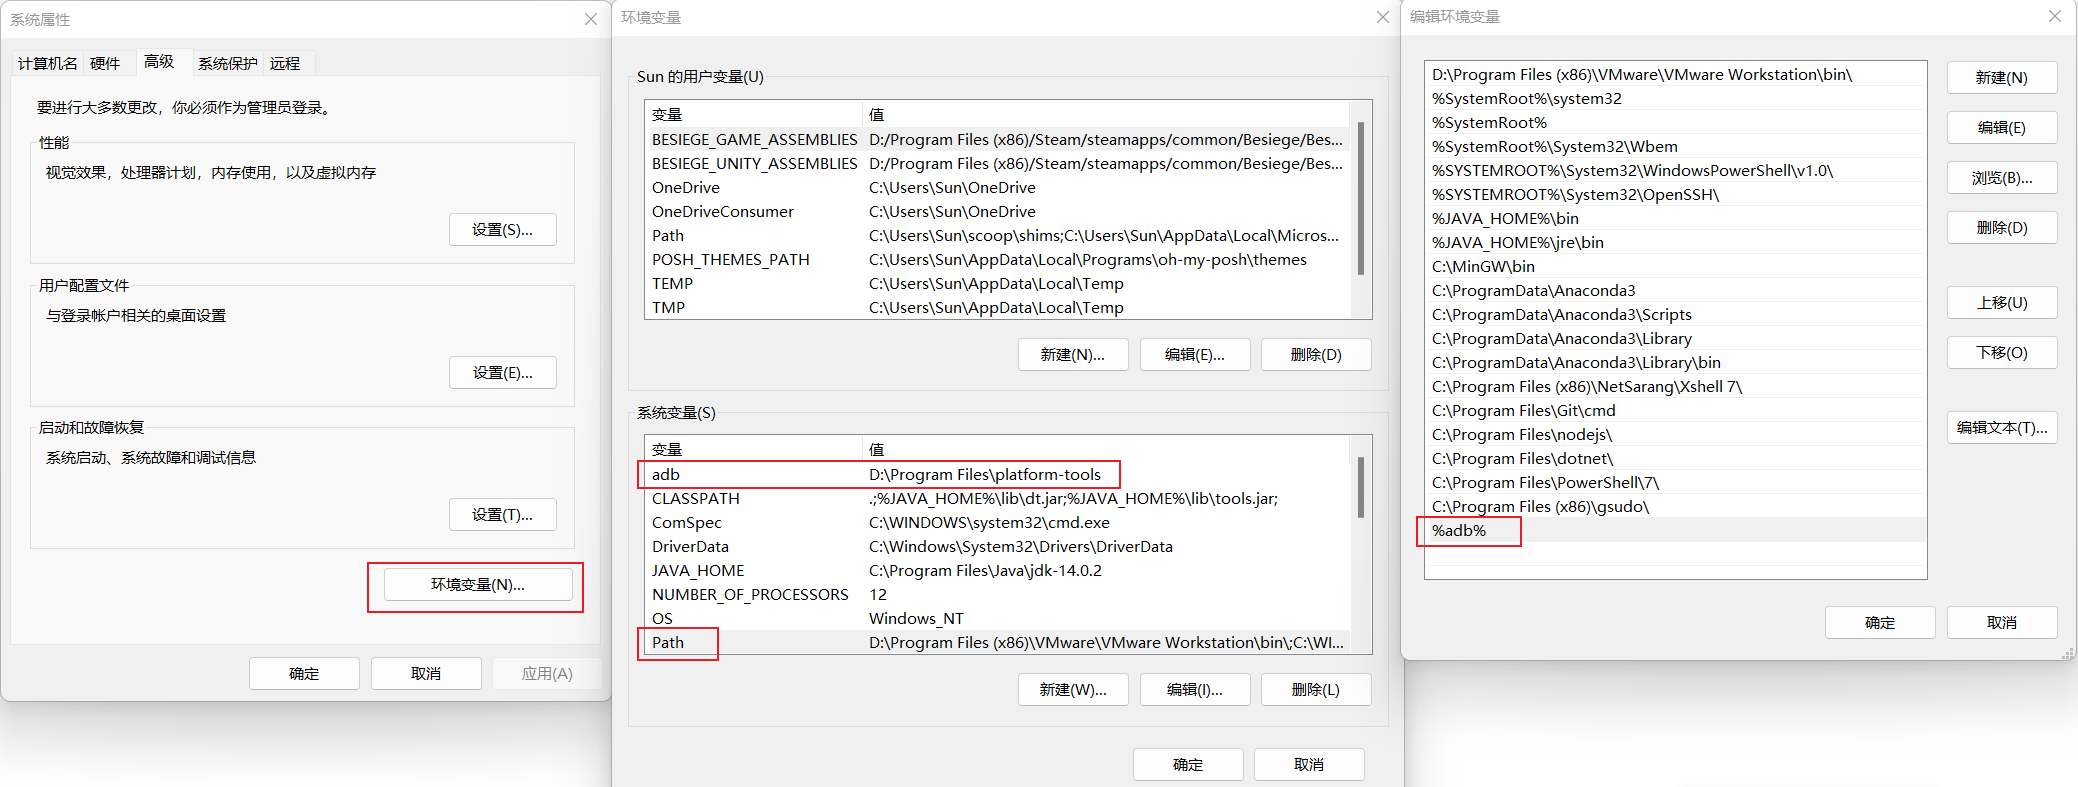
Install adb
- After downloading, place the installation package in a fixed location and then unzip it because you’ll need to set environment variables below.
- Press
Win+S, search for and openEdit the system environment variables. - In the System variables section, create a variable named
adbwith the value being the path to the folder you just unzipped, e.g.,D:\Program Files\platform-tools. - Double-click the variable named
Pathin the System variables section, then add%adb%as a new variable. - Confirm with OK.
- In the terminal, type
adb versionto check if it’s set up correctly.
Install WSA Toolbox
This tool has been removed from the Microsoft Store in the Chinese region, so you can only install it through the link above. You’ll need it later to access the Android system settings for WSA.
Install WSA
Here, I’m using an integrated package that includes root, Magisk, and Google Play, which simplifies the process.
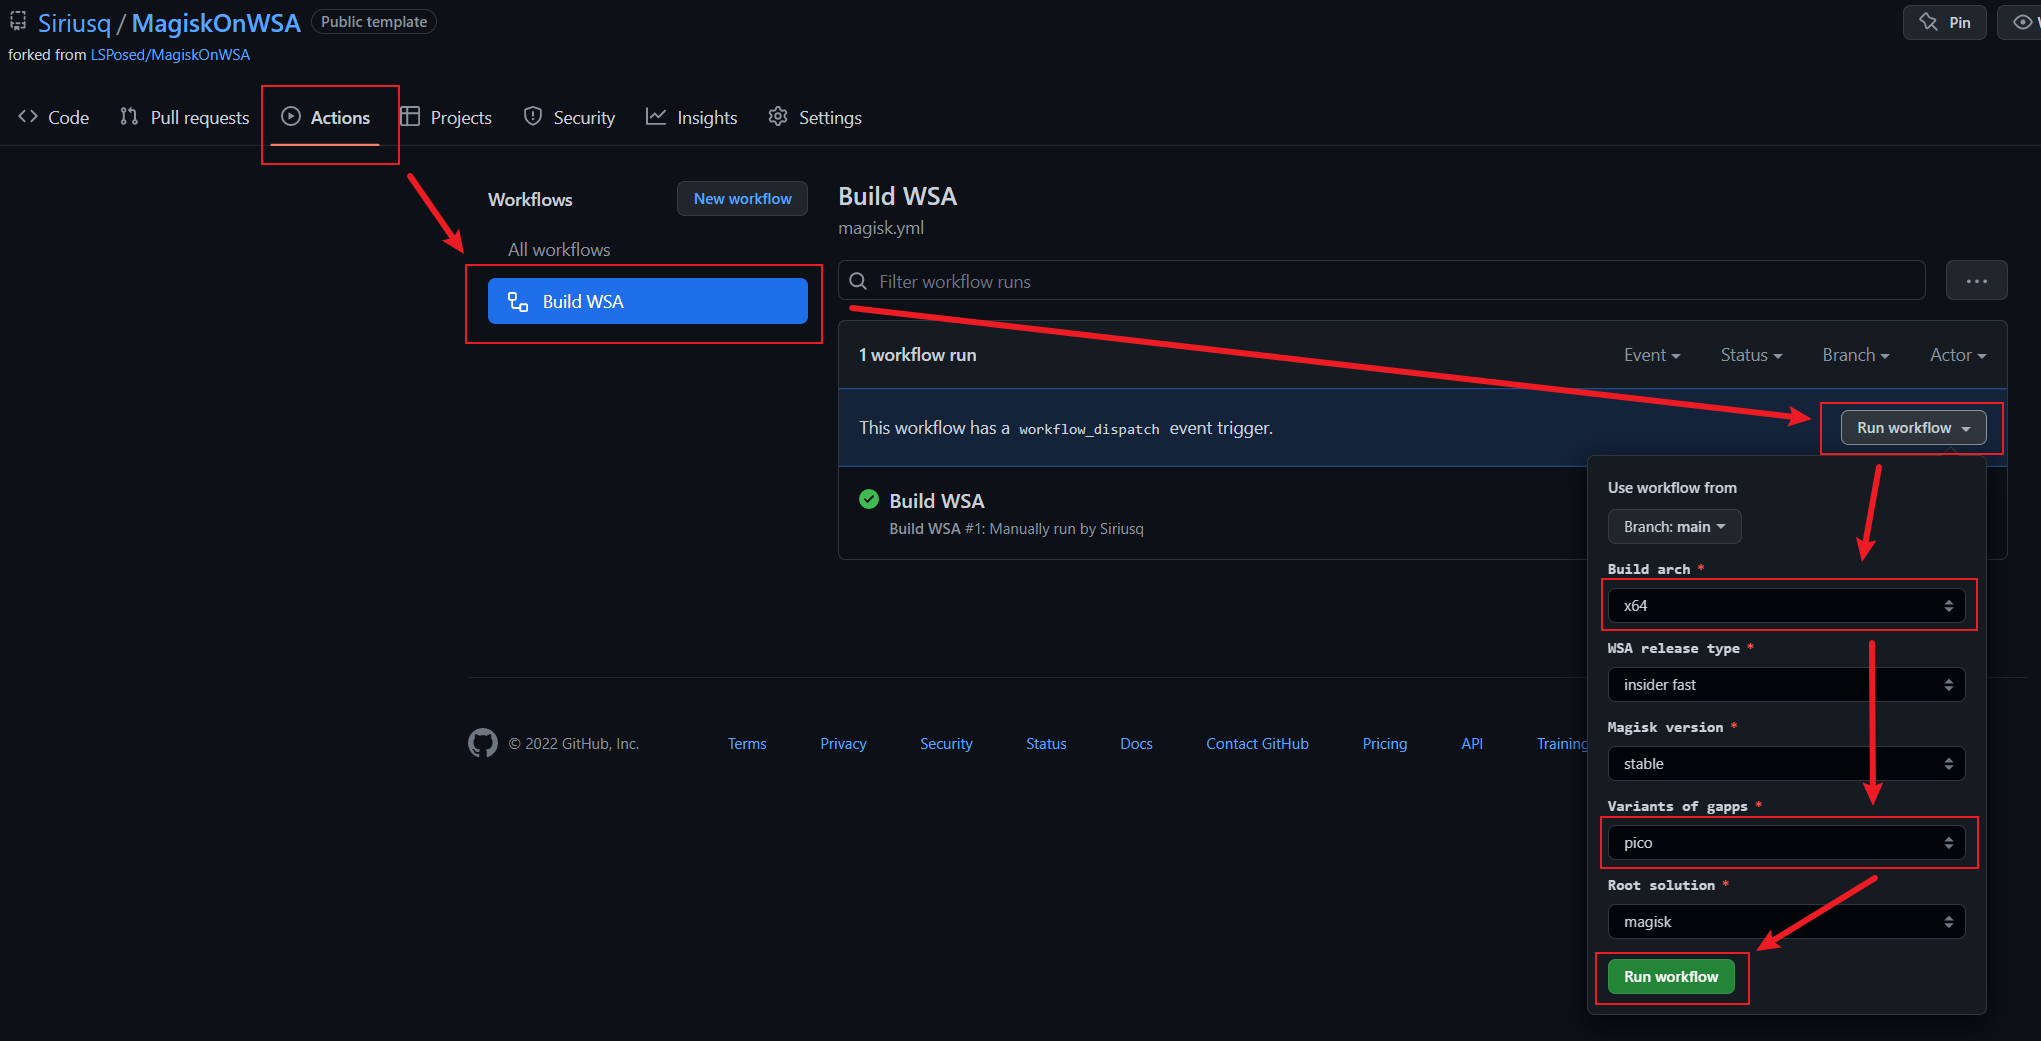
- First, fork the code to your own repository, then in the forked repository, click on
Actionsin the upper left corner. - In the
Workflowsection, click onBuild WSA. - Click on
Run workflowon the right, and in the dropdown menu, selectBuild archasx64, and chooseVariants of gappsaspico. - Finally, click the green
Run workflowbutton, and wait for the build process to complete, which usually takes about five to six minutes.![wsa1.png]()
- Download the completed build, and be sure not to use a multi-threaded downloader.
- Unzip the file.
- Right-click on
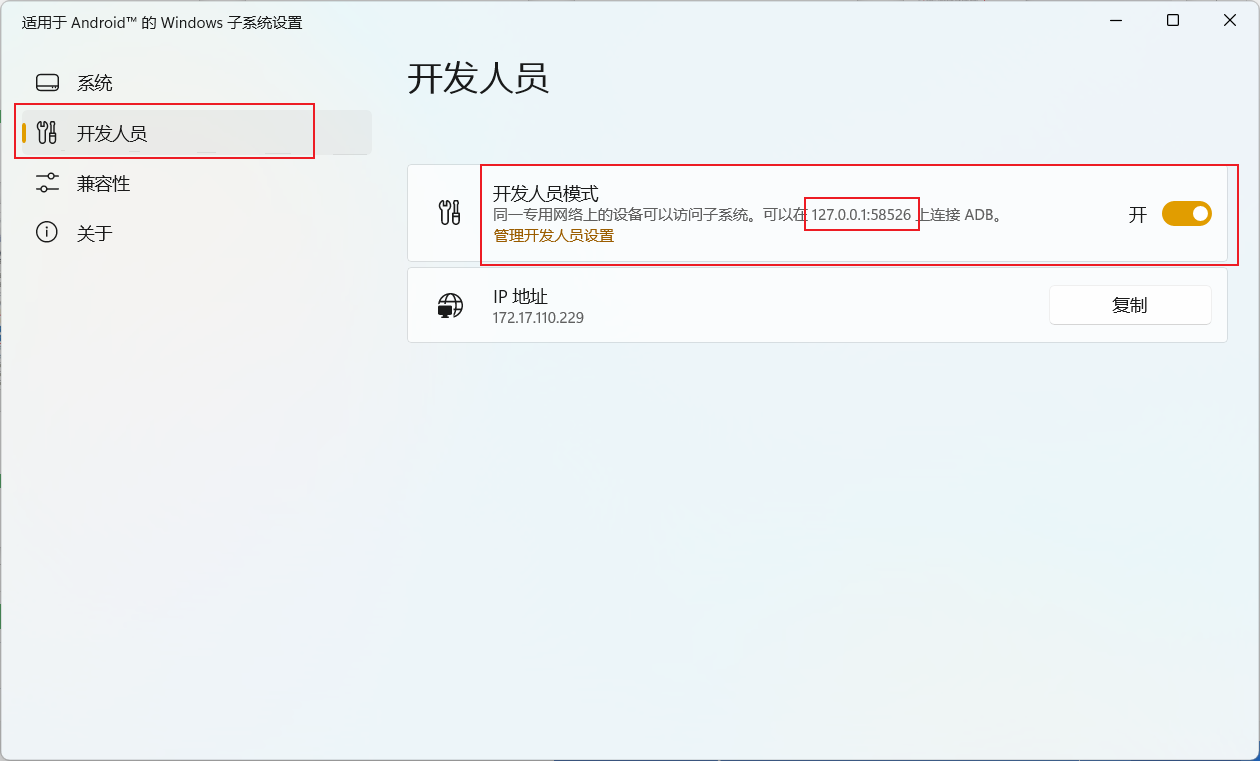
Install.ps1, selectRun with PowerShell, and wait for the installation to complete. After installation, the Play Store will open. - Open
Android-based Windows Subsystem for Android Settings, enableDeveloper mode, and take note of the displayed IP address, which is usually127.0.0.1:58526.![wsa9.png]()
Connectivity Issues
In China, the Play Store cannot be accessed without a proxy. However, you can use the Amazon Appstore to check if you have a network connection. If everything is normal, please skip this section. This section is specifically for users who, like me, encountered connectivity issues.
After installing WSA, if you can’t connect to the internet and you keep seeing “VritWifi connection is limited,” you can try the following methods, as summarized by Google:
Change Firewall Rules
Run the terminal as an administrator and execute the following command to add a firewall rule:
1 | New-NetFirewallRule -DisplayName "WSL" -Direction Inbound -InterfaceAlias "vEthernet (WSL)" -Action Allow |
However, this did not work for me.
Change DNS
Change the default DNS settings of WSA, but this may not work for everyone.
- Open the previously installed
WSA Toolboxand click onAndroid Settingsin the middle. - Go to
Network & Internet>Internet>Wi-Fi>VritWifi. - Click on the settings icon in the upper right.
- Change
DNS 1to8.8.4.4or114.114.115.115, which are commonly used DNS servers.

adb Modify captive_portal
It turns out that this is a misleading solution. Open the terminal and execute the following commands:
1 | adb connect 127.0.0.1:58526 |
The only effect of this operation is to remove the annoying prompt when you are already connected to the internet but still receive a “limited network” warning.
A captive portal is a web page presented to newly connected users before they are granted broader access to the network (Internet). It is commonly used to present a landing or login page that may require authentication or acceptance of usage policies. Captive portals are used in a variety of mobile broadband services (wired and wireless), and can also be used for access to enterprise or residential wired networks (such as apartment buildings, hotels, and business centers).
By default, WSA uses Google’s Captive Portal to check for internet connectivity, which doesn’t work in China. Therefore, it displays the “limited network” message. By changing the detection server to one based in China, you can resolve this issue. Here are some alternative servers you can use:
- Apple: http://www.apple.com/library/test/success.html
- Huawei: http://connectivitycheck.platform.hicloud.com/generate_204
- Vivo: http://wifi.vivo.com.cn/generate_204
USB Tethering
This method is a workaround and may need to be reconfigured after a reboot.
- Open the previously installed
WSA Toolboxand click onAndroid Settingsin the middle. - Go to
System>Developer options. - Enable the
Developer optionstoggle. - Scroll down to
Network>Default USB configuration. - Set it to
USB tethering.
Enable Hyper-V Feature
I found a post on Zhihu by Hilton, which suggested enabling the Hyper-V feature. Surprisingly, it worked, even though the official documentation says it’s not required.
- Open
Settings>Apps>Optional Features>More Windows features. - Expand
Hyper-V. - Check
Hyper-V Platform. - Wait for the installation to complete.

After doing this, magically, you can connect to the internet. I still don’t fully understand why this works. 🤯
Setting up Proxy
Standard Procedure
I’m using the V2rayN client. If you’re using Clash, there are plenty of tutorials available.
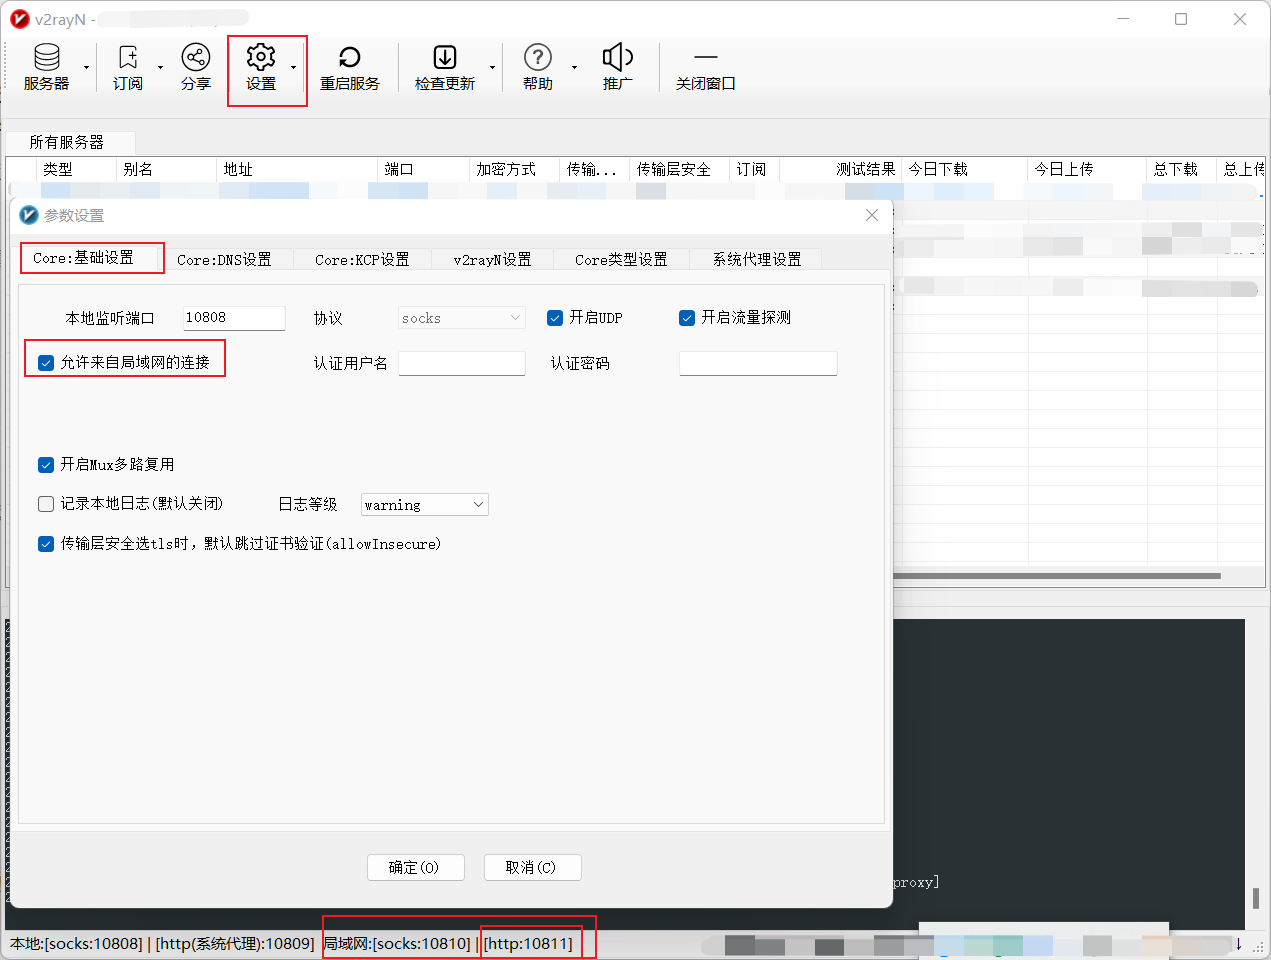
- Open V2rayN, go to
Settings>Parameter Settings>Basic Settings, and check the box that saysAllow connections from the local network. - Take note of the local HTTP port displayed at the bottom, which is usually
10811.![wsa7.png]()
- In the terminal, run the following command, but make sure to replace
127.0.0.1:58526with the IP you noted from theWindows Subsystem for Androidsettings, which is typically this IP.1
adb connect 127.0.0.1:58526
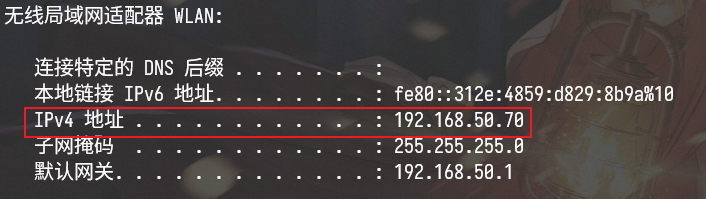
- In the terminal, enter:
1
ipconfig
- Find the IP address of the network card you’re currently using. In my case, it’s
192.168.50.70.![wsa8.png]()
- Run the following command in the terminal, but replace the IP with your network card’s IP:
1
adb shell settings put global http_proxy 192.168.50.70:10811
If you want to disable the proxy, you can use the following commands:
1 | adb shell settings put global http_proxy :0 |
Alternative Solution
If the above methods don’t work, you can install a proxy configuration app, such as V2rayNG, directly in WSA.
Sideloading APKs
If you don’t have access to a proxy, you won’t be able to install apps through the Play Store. However, you can sideload apps using the following method:
- In the terminal, run the following command, but make sure to replace
127.0.0.1:58526with the IP you noted from theWindows Subsystem for Androidsettings, which is typically this IP.1
adb connect 127.0.0.1:58526
- Navigate to the folder where the APK is located.
- Execute the following command:
1
adb install apk_name
I use Coolapk as an alternative app store in China.